Developing Full Stack Next.js Web Applications
Chapter 3 — Creating Single Page Applications with JavaScript
Dr. Jose Annunziato
Chapter 1 and Chapter 2 gave Kambaz structure and style. The screens still show the same hardcoded markup no matter who is signed in or which course you open. The goal of this chapter is to take control of data and logic — variables, functions, arrays, and objects — so the UI can change with the data instead of living as fixed HTML.
JavaScript, officially ECMAScript, is the language browsers run to script pages. The name ECMAScript comes from the European Computer Manufacturers Association (ECMA), which standardized the language in 1997 so implementations would agree. Developers still say "JavaScript"; ECMAScript is the formal name. A major milestone arrived in 2015 as ECMAScript 2015 (ES6): arrow functions, let/const, template literals, modules, and more — the dialect this course writes in. Those features are what libraries like React use to build Single Page Applications (SPAs): one HTML document whose views swap as the URL changes, without a full reload for every screen.
TypeScript, released by Microsoft in 2012, is a superset of JavaScript that adds static types. It compiles to plain JavaScript, so browsers and Node.js run the result. This course writes React in .tsx files — JavaScript with type annotations on parameters and props. The runtime behavior is still JavaScript; the types catch mistakes before the browser does.
3.1 Learning Objectives
By the end of this chapter you will be able to:
- Understand the basics of JavaScript and its role in Web development.
- Declare variables, constants, and data types, including
nullandundefined. - Work with Boolean values and conditionals.
- Use the ternary operator and short-circuit
&&to generate conditional output. - Define functions, including ES6 arrow functions and implied returns.
- Implement template literals for string interpolation.
- Manipulate arrays and objects, including
map,find,filter,findIndex,includes,some,every, andreduce. - Convert data with JSON (
JSON.stringify) and apply the spread operator, destructuring, optional chaining, and nullish coalescing. - Apply dynamic styling with HTML classes and style objects.
- Distinguish Next.js client components from server components.
- Parameterize React components with props,
children, the pathname, and path parameters. - Implement a data-driven Kambaz application — navigation, dashboard, courses, modules, assignments, and people.
- Understand the structure of a single-page application (SPA) using React.
Those objectives are best achieved by building along with the narration — each Lab 3 component and Kambaz data screen as it appears — rather than reading first and coding later. Glance at the Lab 3 checklist in §3.8.5 and the Kambaz checklist in §3.10.10 so the expected coverage is visible from the start. Those lists are recaps, not a reason to skip ahead: work through each section, then use them to confirm what stuck.
3.2 Introduction to JavaScript
SlidesHTML and CSS on their own are static: the same tags and styles render the same way every time. JavaScript adds logic to the page — conditionals, iteration, and data-driven rendering — so content can change with the data instead of living as copy-pasted markup. One map over an array of courses can replace eight nearly identical cards; a ternary can swap a login prompt for a welcome heading. The following sections walk through that logic — conditionals, iteration, and data-driven content — as components imported into a Lab 3 page you grow as you go, the same pattern as Lab 1 and Lab 2. Those lab files are throwaway drills — one idea per component. Kambaz, later in this chapter and across the rest of the course, is the application you keep. A coverage checklist for Lab 3 is in §3.8.5 — use it after you have walked through the samples, not instead of building them as you read.
Keep working in the same webdev-client project. Under app/labs, create lab3 and add page.tsx:
Run npm run build now and then as you go, not only npm run dev: Vercel runs the build, and some mistakes only show up there. If the build fails with an error about uncached data, <Suspense>, or prerendering (for example on new Date(), usePathname, or await params), your project was created with Next.js 16.4. Apply the Next.js 16.4 fix in Chapter 1 (remove cacheComponents and partialPrefetching from next.config.ts) and build again.
mkdir app/labs/lab3Start app/labs/lab3/page.tsx as a single top-level component:
export default function Lab3() {
  return (
    <div id="wd-lab3">
      <h2>Lab 3</h2>
    </div>
  );
}
Add a link to the new lab in both app/labs/page.tsx and app/labs/TOC.tsx, the same two files you updated for Lab 2 in §1.3.10–§1.3.11. Confirm you can reach http://localhost:3000/labs/lab3 from the Labs table of contents before continuing.
3.2.1 Variables and Constants
SlidesVariables can store state information about applications such as user information, preferences, courses, and enrollments. JavaScript offers three declarations: var is function-scoped and the old default; let is block-scoped and the usual choice when the value will change; and const is block-scoped and not reassigned. To practice declaring variables and constants, create the VariablesAndConstants component below and import it from the Lab 3 component. Confirm the browser displays as shown. We will be creating several components to practice various features of the JavaScript language; import them into the Lab 3 page component and confirm the output is as described for each of the lab exercises.
export default function VariablesAndConstants() {
  var functionScoped = 2;
  let blockScoped = 5;
  const constant1 = functionScoped - blockScoped;
  return (
    <div id="wd-variables-and-constants">
      <h4>Variables and Constants</h4>
      functionScoped = {functionScoped} <br />
      blockScoped = {blockScoped}       <br />
      constant1 = {constant1}
      <hr />
    </div>
  );
}
Curly braces in JSX interpolate a JavaScript expression into the markup, so {functionScoped} prints 2. The constant is the difference of the other two, so the page shows -3:
Variables and Constants
functionScoped = 2blockScoped = 5
constant1 = -3
Import the new component at the top of app/labs/lab3/page.tsx and render it under the Lab 3 heading — the same import-and-place pattern you will repeat for every exercise in this chapter. The Lab 3 page now reads:
import VariablesAndConstants from "./VariablesAndConstants";

export default function Lab3() {
  return (
    <div id="wd-lab3">
      <h2>Lab 3</h2>
      <VariablesAndConstants />
    </div>
  );
}3.2.2 Variable Types
SlidesJavaScript declares several datatypes such as Number, String, Date, and so on. The typeof operator reports that type as a string. To practice with variable types, create the VariableTypes component shown below and import it at the bottom of the Lab 3 component. Confirm that the browser renders as shown. Note that we had to convert the boolean variable into a string type before it could render in the browser — that conversion is explained after the sample.
export default function VariableTypes() {
  let numberVariable = 123;
  let floatingPointNumber = 234.345;
  let stringVariable = "Hello World!";
  let booleanVariable = true;
  let isNumber = typeof numberVariable;
  let isString = typeof stringVariable;
  let isBoolean = typeof booleanVariable;
  return (
    <div id="wd-variable-types">
      <h4>Variables Types</h4>
      numberVariable = {numberVariable}           <br />
      floatingPointNumber = {floatingPointNumber} <br />
      stringVariable = {stringVariable}           <br />
      booleanVariable = {booleanVariable + ""}    <br />
      isNumber = {isNumber}                       <br />
      isString = {isString}                       <br />
      isBoolean = {isBoolean}
      <hr />
    </div>
  );
}
JSX does not render a bare boolean — {true} produces nothing on the page. Concatenating an empty string, booleanVariable + "", coerces the value to "true" or "false" so it is visible:
Variables Types
numberVariable = 123floatingPointNumber = 234.345
stringVariable = Hello World!
booleanVariable = true
isNumber = number
isString = string
isBoolean = boolean
Add the import under the first one and render <VariableTypes /> at the bottom of the Lab 3 div:
import VariablesAndConstants from "./VariablesAndConstants";
import VariableTypes from "./VariableTypes";

export default function Lab3() {
  return (
    <div id="wd-lab3">
      <h2>Lab 3</h2>
      <VariablesAndConstants />
      <VariableTypes />
    </div>
  );
}3.2.3 Boolean Variables
SlidesTo practice with Boolean data types, create a component called BooleanVariables and import it in the Lab 3 component. Use the previous lab exercises as a guide. Booleans are the raw material of decisions: && for and, || for or, ! for not, and comparisons. Always compare with === and !== — they test value and type — not ==, which coerces types and hides bugs. The new component should add a section called Boolean Variables that displays each of the new variables so that the browser renders as shown. You might need to cast the boolean values to string by concatenating an empty string, for example false3 = {false3 + ""}.
export default function BooleanVariables() {
  let numberVariable = 123,
    floatingPointNumber = 234.345;
  let true1 = true,
    false1 = false;
  let false2 = true1 && false1;
  let true2 = true1 || false1;
  let true3 = !false2;
  let true4 = numberVariable === 123;
  let true5 = floatingPointNumber !== 321.432;
  let false3 = numberVariable < 100;
  return (
    <div id="wd-boolean-variables">
      <h4>Boolean Variables</h4>
      true1 = {true1 + ""}   <br />
      false1 = {false1 + ""} <br />
      false2 = {false2 + ""} <br />
      true2 = {true2 + ""}   <br />
      true3 = {true3 + ""}   <br />
      true4 = {true4 + ""}   <br />
      true5 = {true5 + ""}   <br />
      false3 = {false3 + ""}
      <hr />
    </div>
  );
}
Concatenate + "" again so each boolean prints as text:
Boolean Variables
true1 = truefalse1 = false
false2 = false
true2 = true
true3 = true
true4 = true
true5 = true
false3 = false
Import it into app/labs/lab3/page.tsx the same way, after VariableTypes:
import VariablesAndConstants from "./VariablesAndConstants";
import VariableTypes from "./VariableTypes";
import BooleanVariables from "./BooleanVariables";

export default function Lab3() {
  return (
    <div id="wd-lab3">
      <h2>Lab 3</h2>
      <VariablesAndConstants />
      <VariableTypes />
      <BooleanVariables />
    </div>
  );
}3.2.4 Conditionals
Conditional expressions allow scripts to make decisions based on predicates that compare values and variables. Scripts can decide to execute different parts of the code based on the result of these predicates using if/else and other constructs. The most common use is an if/else that evaluates a predicate and then runs one of two code blocks depending on whether the predicate is true or false — though in JSX you more often embed that choice in the tree itself. To practice with if/else, create a component called IfElse based on the code shown below. Import it into Lab 3 and confirm it renders a section labeled If Else as shown. The true1 paragraph is only rendered if true1 is true:
export default function IfElse() {
  let true1 = true,
    false1 = false;
  return (
    <div id="wd-if-else">
      <h4>If Else</h4>
      {true1 && <p>true1</p>}
      {!false1 ? <p>!false1</p> : <p>false1</p>}
      <hr />
    </div>
  );
}
The && form is a short circuit: if true1 is true, React renders the paragraph; if it is false, the right-hand side never runs and nothing appears. The ?/: form (the ternary, next section) always picks one of two branches:
If Else
true1
!false1
Import IfElse into app/labs/lab3/page.tsx and render it last:
import VariablesAndConstants from "./VariablesAndConstants";
import VariableTypes from "./VariableTypes";
import BooleanVariables from "./BooleanVariables";
import IfElse from "./IfElse";

export default function Lab3() {
  return (
    <div id="wd-lab3">
      <h2>Lab 3</h2>
      <VariablesAndConstants />
      <VariableTypes />
      <BooleanVariables />
      <IfElse />
    </div>
  );
}3.2.5 Ternary Operator
Ternary conditional operators are a concise alternative to if/else statements. A ternary takes three pieces: a predicate expression that evaluates to true or false followed by a question mark (?); an expression that evaluates if the predicate is true followed by a colon (:); and an expression that evaluates if the predicate is false. To practice the ternary operator, create a new component called TernaryOperator based on the code shown below, import it into Lab 3, and confirm the browser renders as shown:
export default function TernaryOperator() {
  let loggedIn = true;
  return (
    <div id="wd-ternary-operator">
      <h4>Logged In</h4>
      {loggedIn ? <p>Welcome</p> : <p>Please login</p>}
      <hr />
    </div>
  );
}
With loggedIn true, the page greets the user; set it to false and the other paragraph appears instead:
Logged In
Welcome
Import TernaryOperator into app/labs/lab3/page.tsx and render it last:
import VariablesAndConstants from "./VariablesAndConstants";
import VariableTypes from "./VariableTypes";
import BooleanVariables from "./BooleanVariables";
import IfElse from "./IfElse";
import TernaryOperator from "./TernaryOperator";

export default function Lab3() {
  return (
    <div id="wd-lab3">
      <h2>Lab 3</h2>
      <VariablesAndConstants />
      <VariableTypes />
      <BooleanVariables />
      <IfElse />
      <TernaryOperator />
    </div>
  );
}3.2.6 Generating Conditional Output
With boolean expressions we can render content based on some logic. The following example decides rendering one content versus another based on a simple boolean constant loggedIn. If a user is loggedIn, then the component renders a greeting; otherwise it suggests the user should login. The same decision can live in the component's return path — two different trees — or inline in one tree. Implement ConditionalOutputIfElse to practice conditional rendering, starting with an if/else that returns a different heading:
export default function ConditionalOutputIfElse() {
  const loggedIn = true;
  if (loggedIn) {
    return (
      <h2 id="wd-conditional-output-if-else-welcome">Welcome If Else</h2>
    );
  } else {
    return (
      <h2 id="wd-conditional-output-if-else-login">Please login If Else</h2>
    );
  }
}Welcome If Else
A more compact equivalent keeps a single return and short-circuits each heading with &&. Here loggedIn is false, so only the login heading appears:
export default function ConditionalOutputInline() {
  const loggedIn = false;
  return (
    <div id="wd-conditional-output-inline">
      {loggedIn && <h2>Welcome Inline</h2>}
      {!loggedIn && <h2>Please login Inline</h2>}
    </div>
  );
}Please login Inline
Import both components into Lab 3. The if/else version returns early; the inline version always returns one wrapper and includes whichever heading the flags allow. Render them in this order:
import VariablesAndConstants from "./VariablesAndConstants";
import VariableTypes from "./VariableTypes";
import BooleanVariables from "./BooleanVariables";
import IfElse from "./IfElse";
import TernaryOperator from "./TernaryOperator";
import ConditionalOutputIfElse from "./ConditionalOutputIfElse";
import ConditionalOutputInline from "./ConditionalOutputInline";

export default function Lab3() {
  return (
    <div id="wd-lab3">
      <h2>Lab 3</h2>
      <VariablesAndConstants />
      <VariableTypes />
      <BooleanVariables />
      <IfElse />
      <TernaryOperator />
      <ConditionalOutputIfElse />
      <ConditionalOutputInline />
    </div>
  );
}3.2.7 Null vs Undefined
SlidesTwo values mean "no value," and they are not the same. null is an assigned empty value — you put it there on purpose. undefined means nothing was assigned: a missing property, a variable declared but not initialized, a function that did not return. Create NullUndefined.tsx:
export default function NullUndefined() {
  const nullValue = null;
  const undefinedValue = undefined;
  return (
    <div id="wd-null-undefined">
      <h4>Null vs Undefined</h4>
      nullValue = {String(nullValue)}           <br />
      undefinedValue = {String(undefinedValue)} <br />
      typeof nullValue = {typeof nullValue}     <br />
      typeof undefinedValue = {typeof undefinedValue} <br />
      String(null) = {String(null)}             <br />
      String(undefined) = {String(undefined)}
      <hr />
    </div>
  );
}
JSX renders neither null nor undefined — they vanish, the same way a boolean does. String(...) makes them visible. A famous JavaScript quirk: typeof null is "object", while typeof undefined is "undefined". Later, §3.4.17 uses ?. and ?? so missing values do not crash the page:
Null vs Undefined
nullValue = nullundefinedValue = undefined
typeof nullValue = object
typeof undefinedValue = undefined
String(null) = null
String(undefined) = undefined
Import NullUndefined into app/labs/lab3/page.tsx and render it last. Every later Lab 3 component follows the same two steps — one import at the top, one tag at the bottom of the wd-lab3 div — and every later section shows the whole page.tsx again right after its demo, so you can check yours line by line. §3.8.5 shows the finished file:
import VariablesAndConstants from "./VariablesAndConstants";
import VariableTypes from "./VariableTypes";
import BooleanVariables from "./BooleanVariables";
import IfElse from "./IfElse";
import TernaryOperator from "./TernaryOperator";
import ConditionalOutputIfElse from "./ConditionalOutputIfElse";
import ConditionalOutputInline from "./ConditionalOutputInline";
import NullUndefined from "./NullUndefined";

export default function Lab3() {
  return (
    <div id="wd-lab3">
      <h2>Lab 3</h2>
      <VariablesAndConstants />
      <VariableTypes />
      <BooleanVariables />
      <IfElse />
      <TernaryOperator />
      <ConditionalOutputIfElse />
      <ConditionalOutputInline />
      <NullUndefined />
    </div>
  );
}3.3 JavaScript Functions
SlidesFunctions allow reusing an algorithm by wrapping it in a named, parameterized code block, and you can call that block from JSX the same way you call it from any other JavaScript. JavaScript supports two styles of functions based on the language history. Functions are declared using the following syntax.
function <functionName>(<parameterList>) {
  <functionBody>
}
To practice using functions, create a new component called LegacyFunctions based on the code below. Import this new component in the Lab 3 component and confirm the browser renders as shown — the sum prints both as a stored result and as a call inlined in JSX:
function add(a: number, b: number) {
  return a + b;
}

export default function LegacyFunctions() {
  const twoPlusFour = add(2, 4);
  console.log(twoPlusFour);
  return (
    <div id="wd-legacy-functions">
      <h4>Functions</h4>
      <h5>Legacy ES5 functions</h5>
      twoPlusFour = {twoPlusFour} <br />
      add(2, 4) = {add(2, 4)}
      <hr />
    </div>
  );
}
The TypeScript annotations a: number and b: number are compile-time only. The console.log writes to the browser console — you will inspect that output in §3.4.12:
Functions
Legacy ES5 functions
twoPlusFour = 6add(2, 4) = 6
Import LegacyFunctions into app/labs/lab3/page.tsx and render it after NullUndefined:
import VariablesAndConstants from "./VariablesAndConstants";
import VariableTypes from "./VariableTypes";
import BooleanVariables from "./BooleanVariables";
import IfElse from "./IfElse";
import TernaryOperator from "./TernaryOperator";
import ConditionalOutputIfElse from "./ConditionalOutputIfElse";
import ConditionalOutputInline from "./ConditionalOutputInline";
import NullUndefined from "./NullUndefined";
import LegacyFunctions from "./LegacyFunctions";

export default function Lab3() {
  return (
    <div id="wd-lab3">
      <h2>Lab 3</h2>
      <VariablesAndConstants />
      <VariableTypes />
      <BooleanVariables />
      <IfElse />
      <TernaryOperator />
      <ConditionalOutputIfElse />
      <ConditionalOutputInline />
      <NullUndefined />
      <LegacyFunctions />
    </div>
  );
}3.3.1 Arrow Functions
A new version of JavaScript was introduced in 2015 and is officially referred to as ECMAScript 6 or ES6. A new syntax for declaring functions was introduced which is less verbose and provides features we will explore throughout this course. This function syntax is often referred to as arrow functions, and you will use it for almost every callback in this course — map, event handlers, and predicates. The name is optional; you typically store the function in a const. To practice using ES6 arrow functions, create a new component called ArrowFunctions based on the code below. Import this new component in the Lab 3 component and confirm the browser renders as shown:
const subtract = (a: number, b: number) => {
  return a - b;
};

export default function ArrowFunctions() {
  const threeMinusOne = subtract(3, 1);
  console.log(threeMinusOne);
  return (
    <div id="wd-arrow-functions">
      <h4>New ES6 arrow functions</h4>
      threeMinusOne = {threeMinusOne} <br />
      subtract(3, 1) = {subtract(3, 1)}
      <hr />
    </div>
  );
}
The => replaces the function keyword. Parameters still sit in parentheses; the body still sits in curly braces when it needs a return:
New ES6 arrow functions
threeMinusOne = 2subtract(3, 1) = 2
Import ArrowFunctions into app/labs/lab3/page.tsx and render it last:
import VariablesAndConstants from "./VariablesAndConstants";
import VariableTypes from "./VariableTypes";
import BooleanVariables from "./BooleanVariables";
import IfElse from "./IfElse";
import TernaryOperator from "./TernaryOperator";
import ConditionalOutputIfElse from "./ConditionalOutputIfElse";
import ConditionalOutputInline from "./ConditionalOutputInline";
import NullUndefined from "./NullUndefined";
import LegacyFunctions from "./LegacyFunctions";
import ArrowFunctions from "./ArrowFunctions";

export default function Lab3() {
  return (
    <div id="wd-lab3">
      <h2>Lab 3</h2>
      <VariablesAndConstants />
      <VariableTypes />
      <BooleanVariables />
      <IfElse />
      <TernaryOperator />
      <ConditionalOutputIfElse />
      <ConditionalOutputInline />
      <NullUndefined />
      <LegacyFunctions />
      <ArrowFunctions />
    </div>
  );
}3.3.2 Implied Return
One of the new features of the new ES6 functions is implied returns: if the body of the function consists of just returning some value or expression, then the return statement is optional and can be replaced with just the value or expression. To practice this feature, create a new component called ImpliedReturn based on the code below. Import this new component in the Lab 3 component and confirm the browser renders as shown:
export default function ImpliedReturn() {
  const multiply = (a: number, b: number) => a * b;
  const fourTimesFive = multiply(4, 5);
  console.log(fourTimesFive);
  return (
    <div id="wd-implied-return">
      <h4>Implied return</h4>
      fourTimesFive = {fourTimesFive} <br />
      multiply(4, 5) = {multiply(4, 5)}
      <hr />
    </div>
  );
}
(a, b) => a * b is the same as (a, b) => { return a * b; }. That one-liner is the shape you will pass into map and filter in §3.4:
Implied return
fourTimesFive = 20multiply(4, 5) = 20
Import ImpliedReturn into app/labs/lab3/page.tsx and render it last:
import VariablesAndConstants from "./VariablesAndConstants";
import VariableTypes from "./VariableTypes";
import BooleanVariables from "./BooleanVariables";
import IfElse from "./IfElse";
import TernaryOperator from "./TernaryOperator";
import ConditionalOutputIfElse from "./ConditionalOutputIfElse";
import ConditionalOutputInline from "./ConditionalOutputInline";
import NullUndefined from "./NullUndefined";
import LegacyFunctions from "./LegacyFunctions";
import ArrowFunctions from "./ArrowFunctions";
import ImpliedReturn from "./ImpliedReturn";

export default function Lab3() {
  return (
    <div id="wd-lab3">
      <h2>Lab 3</h2>
      <VariablesAndConstants />
      <VariableTypes />
      <BooleanVariables />
      <IfElse />
      <TernaryOperator />
      <ConditionalOutputIfElse />
      <ConditionalOutputInline />
      <NullUndefined />
      <LegacyFunctions />
      <ArrowFunctions />
      <ImpliedReturn />
    </div>
  );
}3.3.3 Template Literals
Generating dynamic HTML consists of writing code that manipulates and concatenates strings to generate new HTML strings based on some program logic — one language writing code in another language, similar to what a compiler does. Working with strings can be error prone especially if you have to use lots of extra operations and variables to concatenate the resulting string. JavaScript template strings provide a better approach by allowing embedding expressions and algorithms right within strings themselves, including a ternary. To practice, implement a new component called TemplateLiterals based on the code below. Import this new component in Lab 3 and confirm the browser renders as shown. In your return statement, wrap the HTML output in a div whose id is wd-template-literals. Do not hard-code the results 5, Welcome home alice, and so on; interpolate the variables result1, result2, and the rest:
export default function TemplateLiterals() {
  const five = 2 + 3;
  const result1 = "2 + 3 = " + five;
  const result2 = `2 + 3 = ${2 + 3}`;
  const username = "alice";
  const greeting1 = `Welcome home ${username}`;
  const loggedIn = false;
  const greeting2 = `Logged in: ${loggedIn ? "Yes" : "No"}`;
  return (
    <div id="wd-template-literals">
      <h4>Template Literals</h4>
      result1 = {result1}     <br />
      result2 = {result2}     <br />
      greeting1 = {greeting1} <br />
      greeting2 = {greeting2}
      <hr />
    </div>
  );
}
result1 and result2 print the same text; the backtick form is the one you will keep using:
Template Literals
result1 = 2 + 3 = 5result2 = 2 + 3 = 5
greeting1 = Welcome home alice
greeting2 = Logged in: No
Import TemplateLiterals into app/labs/lab3/page.tsx and render it last:
import VariablesAndConstants from "./VariablesAndConstants";
import VariableTypes from "./VariableTypes";
import BooleanVariables from "./BooleanVariables";
import IfElse from "./IfElse";
import TernaryOperator from "./TernaryOperator";
import ConditionalOutputIfElse from "./ConditionalOutputIfElse";
import ConditionalOutputInline from "./ConditionalOutputInline";
import NullUndefined from "./NullUndefined";
import LegacyFunctions from "./LegacyFunctions";
import ArrowFunctions from "./ArrowFunctions";
import ImpliedReturn from "./ImpliedReturn";
import TemplateLiterals from "./TemplateLiterals";

export default function Lab3() {
  return (
    <div id="wd-lab3">
      <h2>Lab 3</h2>
      <VariablesAndConstants />
      <VariableTypes />
      <BooleanVariables />
      <IfElse />
      <TernaryOperator />
      <ConditionalOutputIfElse />
      <ConditionalOutputInline />
      <NullUndefined />
      <LegacyFunctions />
      <ArrowFunctions />
      <ImpliedReturn />
      <TemplateLiterals />
    </div>
  );
}3.4 JavaScript Data Structures
SlidesUp to this point we have been discussing primitive datatypes such as strings, numbers, and booleans. These can be combined into complex datatypes such as arrays and objects — an array gathers several values into a single variable, an object names each one — and those are the structures Kambaz will use for courses, modules, and people. Arrays can group values of the same datatype, such as number arrays and string arrays, or even a mix of datatypes in the same array, though you would rarely want a mixed list of primitives. Gathering JSX elements is something you will do often, so a todo list can render as HTML. To practice with arrays, create a component called SimpleArrays and copy the code below. Import the component into Lab 3 and confirm the browser renders as shown. Note that the arrays render without the commas; this feature will come in handy when the array items are HTML elements.
export default function SimpleArrays() {
  var functionScoped = 2;
  let blockScoped = 5;
  const constant1 = functionScoped - blockScoped;
  let numberArray1 = [1, 2, 3, 4, 5];
  let stringArray1 = ["string1", "string2"];
  let htmlArray1 = [
    <li key={1}>Buy milk</li>,
    <li key={2}>Feed the pets</li>,
  ];
  let variableArray1 = [
    functionScoped,
    blockScoped,
    constant1,
    numberArray1,
    stringArray1,
  ];
  return (
    <div id="wd-simple-arrays">
      <h4>Simple Arrays</h4>
      numberArray1 = {numberArray1}     <br />
      stringArray1 = {stringArray1}     <br />
      variableArray1 = {variableArray1} <br />
      Todo list:
      <ol>{htmlArray1}</ol>
      <hr />
    </div>
  );
}
JSX interpolates an array of numbers or strings without commas — handy once the items are HTML. Each li in htmlArray1 carries a key, which React uses to match list items across renders; without it, the console warns and updates can reuse the wrong DOM node. Prefer a stable id from your data; here the keys are 1 and 2 because the list is static:
Simple Arrays
numberArray1 = 12345stringArray1 = string1string2
variableArray1 = 25-312345string1string2
Todo list:
- Buy milk
- Feed the pets
Import SimpleArrays into app/labs/lab3/page.tsx and render it after TemplateLiterals:
import VariablesAndConstants from "./VariablesAndConstants";
import VariableTypes from "./VariableTypes";
import BooleanVariables from "./BooleanVariables";
import IfElse from "./IfElse";
import TernaryOperator from "./TernaryOperator";
import ConditionalOutputIfElse from "./ConditionalOutputIfElse";
import ConditionalOutputInline from "./ConditionalOutputInline";
import NullUndefined from "./NullUndefined";
import LegacyFunctions from "./LegacyFunctions";
import ArrowFunctions from "./ArrowFunctions";
import ImpliedReturn from "./ImpliedReturn";
import TemplateLiterals from "./TemplateLiterals";
import SimpleArrays from "./SimpleArrays";

export default function Lab3() {
  return (
    <div id="wd-lab3">
      <h2>Lab 3</h2>
      <VariablesAndConstants />
      <VariableTypes />
      <BooleanVariables />
      <IfElse />
      <TernaryOperator />
      <ConditionalOutputIfElse />
      <ConditionalOutputInline />
      <NullUndefined />
      <LegacyFunctions />
      <ArrowFunctions />
      <ImpliedReturn />
      <TemplateLiterals />
      <SimpleArrays />
    </div>
  );
}3.4.1 Array Index and Length
An array's length is available as the property length. The indexOf() function finds where a particular array member sits — the first matching index, or -1 if that value is missing. To practice with array indices and length, implement a new component called ArrayIndexAndLength based on the code below. Import this new component in Lab 3 and confirm the browser renders as shown:
export default function ArrayIndexAndLength() {
  let numberArray1 = [1, 2, 3, 4, 5];
  const length1 = numberArray1.length;
  const index1 = numberArray1.indexOf(3);
  return (
    <div id="wd-array-index-and-length">
      <h4>Array index and length</h4>
      length1 = {length1} <br />
      index1 = {index1}
      <hr />
    </div>
  );
}
Five items, and 3 sits at index 2 (arrays are zero-based):
Array index and length
length1 = 5index1 = 2
Import ArrayIndexAndLength into app/labs/lab3/page.tsx and render it last:
import VariablesAndConstants from "./VariablesAndConstants";
import VariableTypes from "./VariableTypes";
import BooleanVariables from "./BooleanVariables";
import IfElse from "./IfElse";
import TernaryOperator from "./TernaryOperator";
import ConditionalOutputIfElse from "./ConditionalOutputIfElse";
import ConditionalOutputInline from "./ConditionalOutputInline";
import NullUndefined from "./NullUndefined";
import LegacyFunctions from "./LegacyFunctions";
import ArrowFunctions from "./ArrowFunctions";
import ImpliedReturn from "./ImpliedReturn";
import TemplateLiterals from "./TemplateLiterals";
import SimpleArrays from "./SimpleArrays";
import ArrayIndexAndLength from "./ArrayIndexAndLength";

export default function Lab3() {
  return (
    <div id="wd-lab3">
      <h2>Lab 3</h2>
      <VariablesAndConstants />
      <VariableTypes />
      <BooleanVariables />
      <IfElse />
      <TernaryOperator />
      <ConditionalOutputIfElse />
      <ConditionalOutputInline />
      <NullUndefined />
      <LegacyFunctions />
      <ArrowFunctions />
      <ImpliedReturn />
      <TemplateLiterals />
      <SimpleArrays />
      <ArrayIndexAndLength />
    </div>
  );
}3.4.2 Adding and Removing From Arrays
In many languages an array has a fixed size, whereas in JavaScript elements can easily be added and removed. The push() function appends elements at the end of an array. The splice() function removes or adds elements anywhere in the array. To practice adding and removing data from arrays, implement component AddingAndRemovingToFromArrays based on the code below. Import this new component in Lab 3 and confirm the browser renders as shown:
export default function AddingAndRemovingToFromArrays() {
  let numberArray1 = [1, 2, 3, 4, 5];
  let stringArray1 = ["string1", "string2"];
  let todoArray = [
    <li key={1}>Buy milk</li>,
    <li key={2}>Feed the pets</li>,
  ];
  numberArray1.push(6);
  stringArray1.push("string3");
  todoArray.push(<li key={3}>Walk the dogs</li>);
  numberArray1.splice(2, 1);
  stringArray1.splice(1, 1);
  return (
    <div id="wd-adding-removing-from-arrays">
      <h4>Add/remove to/from arrays</h4>
      numberArray1 = {numberArray1} <br />
      stringArray1 = {stringArray1} <br />
      Todo list:
      <ol>{todoArray}</ol>
      <hr />
    </div>
  );
}
After a push and a splice, the number array is 1, 2, 4, 5, 6 — the 3 at index 2 is gone, and 6 was appended first. Each new li still needs its own key:
Add/remove to/from arrays
numberArray1 = 12456stringArray1 = string1string3
Todo list:
- Buy milk
- Feed the pets
- Walk the dogs
Import AddingAndRemovingToFromArrays into app/labs/lab3/page.tsx and render it last:
import VariablesAndConstants from "./VariablesAndConstants";
import VariableTypes from "./VariableTypes";
import BooleanVariables from "./BooleanVariables";
import IfElse from "./IfElse";
import TernaryOperator from "./TernaryOperator";
import ConditionalOutputIfElse from "./ConditionalOutputIfElse";
import ConditionalOutputInline from "./ConditionalOutputInline";
import NullUndefined from "./NullUndefined";
import LegacyFunctions from "./LegacyFunctions";
import ArrowFunctions from "./ArrowFunctions";
import ImpliedReturn from "./ImpliedReturn";
import TemplateLiterals from "./TemplateLiterals";
import SimpleArrays from "./SimpleArrays";
import ArrayIndexAndLength from "./ArrayIndexAndLength";
import AddingAndRemovingToFromArrays from "./AddingAndRemovingToFromArrays";

export default function Lab3() {
  return (
    <div id="wd-lab3">
      <h2>Lab 3</h2>
      <VariablesAndConstants />
      <VariableTypes />
      <BooleanVariables />
      <IfElse />
      <TernaryOperator />
      <ConditionalOutputIfElse />
      <ConditionalOutputInline />
      <NullUndefined />
      <LegacyFunctions />
      <ArrowFunctions />
      <ImpliedReturn />
      <TemplateLiterals />
      <SimpleArrays />
      <ArrayIndexAndLength />
      <AddingAndRemovingToFromArrays />
    </div>
  );
}3.4.3 For Loops
SlidesWe can operate on each array value by iterating over them in a for loop, which is useful when you need the position as well as the value. Build a new array inside the loop rather than mutating the source. To practice with for loops, implement a new component called ForLoops based on the code below. Import this new component in Lab 3 and confirm the browser renders as shown:
export default function ForLoops() {
  let stringArray1 = ["string1", "string3"];
  let stringArray2: string[] = [];
  for (let i = 0; i < stringArray1.length; i++) {
    const string1 = stringArray1[i];
    stringArray2.push(string1.toUpperCase());
  }
  return (
    <div id="wd-for-loops">
      <h4>Looping through arrays</h4>
      stringArray2 = {stringArray2}
      <hr />
    </div>
  );
}
The TypeScript annotation string[] tells the compiler the empty array will hold strings. The result is STRING1STRING3 (JSX still omits commas):
Looping through arrays
stringArray2 = STRING1STRING3Import ForLoops into app/labs/lab3/page.tsx and render it last:
import VariablesAndConstants from "./VariablesAndConstants";
import VariableTypes from "./VariableTypes";
import BooleanVariables from "./BooleanVariables";
import IfElse from "./IfElse";
import TernaryOperator from "./TernaryOperator";
import ConditionalOutputIfElse from "./ConditionalOutputIfElse";
import ConditionalOutputInline from "./ConditionalOutputInline";
import NullUndefined from "./NullUndefined";
import LegacyFunctions from "./LegacyFunctions";
import ArrowFunctions from "./ArrowFunctions";
import ImpliedReturn from "./ImpliedReturn";
import TemplateLiterals from "./TemplateLiterals";
import SimpleArrays from "./SimpleArrays";
import ArrayIndexAndLength from "./ArrayIndexAndLength";
import AddingAndRemovingToFromArrays from "./AddingAndRemovingToFromArrays";
import ForLoops from "./ForLoops";

export default function Lab3() {
  return (
    <div id="wd-lab3">
      <h2>Lab 3</h2>
      <VariablesAndConstants />
      <VariableTypes />
      <BooleanVariables />
      <IfElse />
      <TernaryOperator />
      <ConditionalOutputIfElse />
      <ConditionalOutputInline />
      <NullUndefined />
      <LegacyFunctions />
      <ArrowFunctions />
      <ImpliedReturn />
      <TemplateLiterals />
      <SimpleArrays />
      <ArrayIndexAndLength />
      <AddingAndRemovingToFromArrays />
      <ForLoops />
    </div>
  );
}3.4.4 Map Function
An array's map function can iterate over an array's values, apply a function to each value, and collate all the results in a new array. The first example below iterates over numberArray1 and calls the square function for each element. The square function accepts a parameter and returns the square of that parameter, and map collates all the squares into a new array called squares. The second example does the same thing, but uses an implied-return arrow that calculates the cubes of all numbers in the same numberArray1. Mapping to JSX is how Kambaz will turn a courses array into cards. To practice with map, implement a new component called MapFunction based on the code below. Import this new component in Lab 3 and confirm the browser renders as shown:
export default function MapFunction() {
  let numberArray1 = [1, 2, 3, 4, 5, 6];
  const square = (a: number) => a * a;
  const todos = ["Buy milk", "Feed the pets"];
  const squares = numberArray1.map(square);
  const cubes = numberArray1.map((a) => a * a * a);
  return (
    <div id="wd-map-function">
      <h4>Map Function</h4>
      squares = {squares} <br />
      cubes = {cubes}     <br />
      Todos:
      <ol>
        {todos.map((todo) => (
          <li key={todo}>{todo}</li>
        ))}
      </ol>
      <hr />
    </div>
  );
}
The first map passes a named function; the second inlines an implied-return arrow. Mapping to JSX is how Kambaz will turn a courses array into cards. Give each sibling a key — here the todo string is unique, so key={todo} works. When two titles could collide, use a real id from the data instead:
Map Function
squares = 149162536cubes = 182764125216
Todos:
- Buy milk
- Feed the pets
Import MapFunction into app/labs/lab3/page.tsx and render it last:
import VariablesAndConstants from "./VariablesAndConstants";
import VariableTypes from "./VariableTypes";
import BooleanVariables from "./BooleanVariables";
import IfElse from "./IfElse";
import TernaryOperator from "./TernaryOperator";
import ConditionalOutputIfElse from "./ConditionalOutputIfElse";
import ConditionalOutputInline from "./ConditionalOutputInline";
import NullUndefined from "./NullUndefined";
import LegacyFunctions from "./LegacyFunctions";
import ArrowFunctions from "./ArrowFunctions";
import ImpliedReturn from "./ImpliedReturn";
import TemplateLiterals from "./TemplateLiterals";
import SimpleArrays from "./SimpleArrays";
import ArrayIndexAndLength from "./ArrayIndexAndLength";
import AddingAndRemovingToFromArrays from "./AddingAndRemovingToFromArrays";
import ForLoops from "./ForLoops";
import MapFunction from "./MapFunction";

export default function Lab3() {
  return (
    <div id="wd-lab3">
      <h2>Lab 3</h2>
      <VariablesAndConstants />
      <VariableTypes />
      <BooleanVariables />
      <IfElse />
      <TernaryOperator />
      <ConditionalOutputIfElse />
      <ConditionalOutputInline />
      <NullUndefined />
      <LegacyFunctions />
      <ArrowFunctions />
      <ImpliedReturn />
      <TemplateLiterals />
      <SimpleArrays />
      <ArrayIndexAndLength />
      <AddingAndRemovingToFromArrays />
      <ForLoops />
      <MapFunction />
    </div>
  );
}3.4.5 Find Function
SlidesAn array's find function can search for an item in an array and return the element it finds, or undefined if none match. The find function takes a function as an argument that serves as a predicate. The predicate should return true if the element is the one you're looking for. The predicate function is invoked for each of the elements in the array, and when the function returns true, find stops because it has found the element it was looking for. To practice, implement a new component called FindFunction based on the code below. Import this new component in Lab 3 and confirm the browser renders as shown:
export default function FindFunction() {
  let numberArray1 = [1, 2, 3, 4, 5];
  let stringArray1 = ["string1", "string2", "string3"];
  const four = numberArray1.find((a) => a === 4);
  const string3 = stringArray1.find((a) => a === "string3");
  return (
    <div id="wd-find-function">
      <h4>Find Function</h4>
      four = {four} <br />
      string3 = {string3}
      <hr />
    </div>
  );
}Find Function
four = 4string3 = string3
Import FindFunction into app/labs/lab3/page.tsx and render it last:
import VariablesAndConstants from "./VariablesAndConstants";
import VariableTypes from "./VariableTypes";
import BooleanVariables from "./BooleanVariables";
import IfElse from "./IfElse";
import TernaryOperator from "./TernaryOperator";
import ConditionalOutputIfElse from "./ConditionalOutputIfElse";
import ConditionalOutputInline from "./ConditionalOutputInline";
import NullUndefined from "./NullUndefined";
import LegacyFunctions from "./LegacyFunctions";
import ArrowFunctions from "./ArrowFunctions";
import ImpliedReturn from "./ImpliedReturn";
import TemplateLiterals from "./TemplateLiterals";
import SimpleArrays from "./SimpleArrays";
import ArrayIndexAndLength from "./ArrayIndexAndLength";
import AddingAndRemovingToFromArrays from "./AddingAndRemovingToFromArrays";
import ForLoops from "./ForLoops";
import MapFunction from "./MapFunction";
import FindFunction from "./FindFunction";

export default function Lab3() {
  return (
    <div id="wd-lab3">
      <h2>Lab 3</h2>
      <VariablesAndConstants />
      <VariableTypes />
      <BooleanVariables />
      <IfElse />
      <TernaryOperator />
      <ConditionalOutputIfElse />
      <ConditionalOutputInline />
      <NullUndefined />
      <LegacyFunctions />
      <ArrowFunctions />
      <ImpliedReturn />
      <TemplateLiterals />
      <SimpleArrays />
      <ArrayIndexAndLength />
      <AddingAndRemovingToFromArrays />
      <ForLoops />
      <MapFunction />
      <FindFunction />
    </div>
  );
}3.4.6 Find Index
Alternatively we can use the findIndex function to determine the index where an element is located inside an array, or -1 when the predicate never matches. Copy the code below into a FindIndex component, import it in Lab 3, and confirm the browser renders as shown:
export default function FindIndex() {
  let numberArray1 = [1, 2, 4, 5, 6];
  let stringArray1 = ["string1", "string3"];
  const fourIndex = numberArray1.findIndex((a) => a === 4);
  const string3Index = stringArray1.findIndex((a) => a === "string3");
  return (
    <div id="wd-find-index">
      <h4>Find Index Function</h4>
      fourIndex = {fourIndex} <br />
      string3Index = {string3Index}
      <hr />
    </div>
  );
}
4 is at index 2. "string3" is at index 1:
Find Index Function
fourIndex = 2string3Index = 1
Import FindIndex into app/labs/lab3/page.tsx and render it last:
import VariablesAndConstants from "./VariablesAndConstants";
import VariableTypes from "./VariableTypes";
import BooleanVariables from "./BooleanVariables";
import IfElse from "./IfElse";
import TernaryOperator from "./TernaryOperator";
import ConditionalOutputIfElse from "./ConditionalOutputIfElse";
import ConditionalOutputInline from "./ConditionalOutputInline";
import NullUndefined from "./NullUndefined";
import LegacyFunctions from "./LegacyFunctions";
import ArrowFunctions from "./ArrowFunctions";
import ImpliedReturn from "./ImpliedReturn";
import TemplateLiterals from "./TemplateLiterals";
import SimpleArrays from "./SimpleArrays";
import ArrayIndexAndLength from "./ArrayIndexAndLength";
import AddingAndRemovingToFromArrays from "./AddingAndRemovingToFromArrays";
import ForLoops from "./ForLoops";
import MapFunction from "./MapFunction";
import FindFunction from "./FindFunction";
import FindIndex from "./FindIndex";

export default function Lab3() {
  return (
    <div id="wd-lab3">
      <h2>Lab 3</h2>
      <VariablesAndConstants />
      <VariableTypes />
      <BooleanVariables />
      <IfElse />
      <TernaryOperator />
      <ConditionalOutputIfElse />
      <ConditionalOutputInline />
      <NullUndefined />
      <LegacyFunctions />
      <ArrowFunctions />
      <ImpliedReturn />
      <TemplateLiterals />
      <SimpleArrays />
      <ArrayIndexAndLength />
      <AddingAndRemovingToFromArrays />
      <ForLoops />
      <MapFunction />
      <FindFunction />
      <FindIndex />
    </div>
  );
}3.4.7 Filter Function
The filter function can look for elements that meet a criteria and collate them into a new array. For instance, the example below looks through the numberArray1 array for all values that are greater than 2. Then we look for all even numbers and then for all odd numbers. All the results are stored in corresponding arrays with appropriate names. Kambaz will use the same tool to show only the modules, assignments, or people for the current course. To practice, implement a new component called FilterFunction based on the code below. Import this new component in Lab 3 and confirm the browser renders as shown:
export default function FilterFunction() {
  let numberArray1 = [1, 2, 4, 5, 6];
  const numbersGreaterThan2 = numberArray1.filter((a) => a > 2);
  const evenNumbers = numberArray1.filter((a) => a % 2 === 0);
  const oddNumbers = numberArray1.filter((a) => a % 2 !== 0);
  return (
    <div id="wd-filter-function">
      <h4>Filter Function</h4>
      numbersGreaterThan2 = {numbersGreaterThan2} <br />
      evenNumbers = {evenNumbers}                 <br />
      oddNumbers = {oddNumbers}
      <hr />
    </div>
  );
}Filter Function
numbersGreaterThan2 = 456evenNumbers = 246
oddNumbers = 15
Import FilterFunction into app/labs/lab3/page.tsx and render it last:
import VariablesAndConstants from "./VariablesAndConstants";
import VariableTypes from "./VariableTypes";
import BooleanVariables from "./BooleanVariables";
import IfElse from "./IfElse";
import TernaryOperator from "./TernaryOperator";
import ConditionalOutputIfElse from "./ConditionalOutputIfElse";
import ConditionalOutputInline from "./ConditionalOutputInline";
import NullUndefined from "./NullUndefined";
import LegacyFunctions from "./LegacyFunctions";
import ArrowFunctions from "./ArrowFunctions";
import ImpliedReturn from "./ImpliedReturn";
import TemplateLiterals from "./TemplateLiterals";
import SimpleArrays from "./SimpleArrays";
import ArrayIndexAndLength from "./ArrayIndexAndLength";
import AddingAndRemovingToFromArrays from "./AddingAndRemovingToFromArrays";
import ForLoops from "./ForLoops";
import MapFunction from "./MapFunction";
import FindFunction from "./FindFunction";
import FindIndex from "./FindIndex";
import FilterFunction from "./FilterFunction";

export default function Lab3() {
  return (
    <div id="wd-lab3">
      <h2>Lab 3</h2>
      <VariablesAndConstants />
      <VariableTypes />
      <BooleanVariables />
      <IfElse />
      <TernaryOperator />
      <ConditionalOutputIfElse />
      <ConditionalOutputInline />
      <NullUndefined />
      <LegacyFunctions />
      <ArrowFunctions />
      <ImpliedReturn />
      <TemplateLiterals />
      <SimpleArrays />
      <ArrayIndexAndLength />
      <AddingAndRemovingToFromArrays />
      <ForLoops />
      <MapFunction />
      <FindFunction />
      <FindIndex />
      <FilterFunction />
    </div>
  );
}3.4.8 Includes, some, and every
Three more array questions, each returning a boolean: includes(value) asks whether the value is present, some(predicate) whether at least one item passes, and every(predicate) whether all items pass. To practice, implement a new component called IncludesSomeEvery based on the code below. Import this new component in Lab 3 and confirm the browser renders as shown:
export default function IncludesSomeEvery() {
const numbers = [1, 2, 3, 4, 5];
const includes3 = numbers.includes(3);
const includes8 = numbers.includes(8);
const someGreaterThan4 = numbers.some((n) => n > 4);
const everyGreaterThan0 = numbers.every((n) => n > 0);
return (
<div id="wd-includes-some-every">
<h4>Includes, Some, Every</h4>
includes(3) = {includes3 + ""} <br />
includes(8) = {includes8 + ""} <br />
some(n > 4) = {someGreaterThan4 + ""} <br />
every(n > 0) = {everyGreaterThan0 + ""}
<hr />
</div>
);
}Coerce the booleans with + "" again so they print. Kambaz people-table enrollment checks will use some the same way:
Includes, Some, Every
includes(3) = trueincludes(8) = false
some(n > 4) = true
every(n > 0) = true
Import IncludesSomeEvery into app/labs/lab3/page.tsx and render it last:
import VariablesAndConstants from "./VariablesAndConstants";
import VariableTypes from "./VariableTypes";
import BooleanVariables from "./BooleanVariables";
import IfElse from "./IfElse";
import TernaryOperator from "./TernaryOperator";
import ConditionalOutputIfElse from "./ConditionalOutputIfElse";
import ConditionalOutputInline from "./ConditionalOutputInline";
import NullUndefined from "./NullUndefined";
import LegacyFunctions from "./LegacyFunctions";
import ArrowFunctions from "./ArrowFunctions";
import ImpliedReturn from "./ImpliedReturn";
import TemplateLiterals from "./TemplateLiterals";
import SimpleArrays from "./SimpleArrays";
import ArrayIndexAndLength from "./ArrayIndexAndLength";
import AddingAndRemovingToFromArrays from "./AddingAndRemovingToFromArrays";
import ForLoops from "./ForLoops";
import MapFunction from "./MapFunction";
import FindFunction from "./FindFunction";
import FindIndex from "./FindIndex";
import FilterFunction from "./FilterFunction";
import IncludesSomeEvery from "./IncludesSomeEvery";

export default function Lab3() {
  return (
    <div id="wd-lab3">
      <h2>Lab 3</h2>
      <VariablesAndConstants />
      <VariableTypes />
      <BooleanVariables />
      <IfElse />
      <TernaryOperator />
      <ConditionalOutputIfElse />
      <ConditionalOutputInline />
      <NullUndefined />
      <LegacyFunctions />
      <ArrowFunctions />
      <ImpliedReturn />
      <TemplateLiterals />
      <SimpleArrays />
      <ArrayIndexAndLength />
      <AddingAndRemovingToFromArrays />
      <ForLoops />
      <MapFunction />
      <FindFunction />
      <FindIndex />
      <FilterFunction />
      <IncludesSomeEvery />
    </div>
  );
}3.4.9 Reduce
Slidesreduce folds an array down to one value: a running total, a concatenated string, a grouped object. The callback receives the accumulator and the current item; the second argument to reduce is the starting accumulator. To practice, implement a new component called ReduceFunction based on the code below. Import this new component in Lab 3 and confirm the browser renders as shown:
export default function ReduceFunction() {
  const numbers = [1, 2, 3, 4, 5];
  const sum = numbers.reduce((total, n) => total + n, 0);
  return (
    <div id="wd-reduce-function">
      <h4>Reduce Function</h4>
      sum = {sum}
      <hr />
    </div>
  );
}
Starting from 0, the callback adds each n, so the sum is 15:
Reduce Function
sum = 15Import ReduceFunction into app/labs/lab3/page.tsx and render it last:
import VariablesAndConstants from "./VariablesAndConstants";
import VariableTypes from "./VariableTypes";
import BooleanVariables from "./BooleanVariables";
import IfElse from "./IfElse";
import TernaryOperator from "./TernaryOperator";
import ConditionalOutputIfElse from "./ConditionalOutputIfElse";
import ConditionalOutputInline from "./ConditionalOutputInline";
import NullUndefined from "./NullUndefined";
import LegacyFunctions from "./LegacyFunctions";
import ArrowFunctions from "./ArrowFunctions";
import ImpliedReturn from "./ImpliedReturn";
import TemplateLiterals from "./TemplateLiterals";
import SimpleArrays from "./SimpleArrays";
import ArrayIndexAndLength from "./ArrayIndexAndLength";
import AddingAndRemovingToFromArrays from "./AddingAndRemovingToFromArrays";
import ForLoops from "./ForLoops";
import MapFunction from "./MapFunction";
import FindFunction from "./FindFunction";
import FindIndex from "./FindIndex";
import FilterFunction from "./FilterFunction";
import IncludesSomeEvery from "./IncludesSomeEvery";
import ReduceFunction from "./ReduceFunction";

export default function Lab3() {
  return (
    <div id="wd-lab3">
      <h2>Lab 3</h2>
      <VariablesAndConstants />
      <VariableTypes />
      <BooleanVariables />
      <IfElse />
      <TernaryOperator />
      <ConditionalOutputIfElse />
      <ConditionalOutputInline />
      <NullUndefined />
      <LegacyFunctions />
      <ArrowFunctions />
      <ImpliedReturn />
      <TemplateLiterals />
      <SimpleArrays />
      <ArrayIndexAndLength />
      <AddingAndRemovingToFromArrays />
      <ForLoops />
      <MapFunction />
      <FindFunction />
      <FindIndex />
      <FilterFunction />
      <IncludesSomeEvery />
      <ReduceFunction />
    </div>
  );
}3.4.10 JSON Stringify
JavaScript has a global object called JSON, which stands for JavaScript Object Notation — the text format APIs and files use to ship data. The object provides several useful formatting functions such as stringify() and parse(). stringify() converts JavaScript data structures to formatted strings; parse() reads that text back into a value. JSX prints arrays without brackets or commas; JSON.stringify puts them back so you can see the real structure — the array rendered with square brackets and items separated by commas. To practice, implement a new component called JsonStringify based on the code below. Import this new component in Lab 3 and confirm the browser renders as shown:
export default function JsonStringify() {
  const squares = [1, 4, 16, 25, 36];
  return (
    <div id="wd-json-stringify">
      <h3>JSON Stringify</h3>
      squares = {JSON.stringify(squares)}
      <hr />
    </div>
  );
}JSON Stringify
squares = [1,4,16,25,36]Import JsonStringify into app/labs/lab3/page.tsx and render it last:
import VariablesAndConstants from "./VariablesAndConstants";
import VariableTypes from "./VariableTypes";
import BooleanVariables from "./BooleanVariables";
import IfElse from "./IfElse";
import TernaryOperator from "./TernaryOperator";
import ConditionalOutputIfElse from "./ConditionalOutputIfElse";
import ConditionalOutputInline from "./ConditionalOutputInline";
import NullUndefined from "./NullUndefined";
import LegacyFunctions from "./LegacyFunctions";
import ArrowFunctions from "./ArrowFunctions";
import ImpliedReturn from "./ImpliedReturn";
import TemplateLiterals from "./TemplateLiterals";
import SimpleArrays from "./SimpleArrays";
import ArrayIndexAndLength from "./ArrayIndexAndLength";
import AddingAndRemovingToFromArrays from "./AddingAndRemovingToFromArrays";
import ForLoops from "./ForLoops";
import MapFunction from "./MapFunction";
import FindFunction from "./FindFunction";
import FindIndex from "./FindIndex";
import FilterFunction from "./FilterFunction";
import IncludesSomeEvery from "./IncludesSomeEvery";
import ReduceFunction from "./ReduceFunction";
import JsonStringify from "./JsonStringify";

export default function Lab3() {
  return (
    <div id="wd-lab3">
      <h2>Lab 3</h2>
      <VariablesAndConstants />
      <VariableTypes />
      <BooleanVariables />
      <IfElse />
      <TernaryOperator />
      <ConditionalOutputIfElse />
      <ConditionalOutputInline />
      <NullUndefined />
      <LegacyFunctions />
      <ArrowFunctions />
      <ImpliedReturn />
      <TemplateLiterals />
      <SimpleArrays />
      <ArrayIndexAndLength />
      <AddingAndRemovingToFromArrays />
      <ForLoops />
      <MapFunction />
      <FindFunction />
      <FindIndex />
      <FilterFunction />
      <IncludesSomeEvery />
      <ReduceFunction />
      <JsonStringify />
    </div>
  );
}3.4.11 JavaScript Objects
SlidesMultiple values of various datatypes can be combined together to create complex datatypes called objects. For example the code below declares a house object collecting several numbers, strings, arrays, and other objects to represent a particular instance of a house. The house variable is assigned an object literal declared within opening and closing curly braces { and }. Objects contain pairs of properties and values separated by commas. Values can be of any datatype including Number, String, Boolean, arrays, and other objects. In the example below we declared a house with 4 bedrooms, 2.5 bathrooms, and 2000 squareFeet. The house has a nested object stored in property address which contains String properties such as street, city, and state. The owners String array declares the names of the owners. To practice with objects, create a House component as shown below, import it into the Lab 3 component, and confirm it renders as shown:
export default function House() {
  const house = {
    bedrooms: 4,
    bathrooms: 2.5,
    squareFeet: 2000,
    address: {
      street: "Via Roma",
      city: "Roma",
      state: "RM",
      zip: "00100",
      country: "Italy",
    },
    owners: ["Alice", "Bob"],
  };
  console.log(house);
  return (
    <div id="wd-house">
      <h4>House</h4>
      <h5>bedrooms</h5>
      {house.bedrooms}
      <h5>bathrooms</h5>
      {house.bathrooms}
      <h5>Number of properties</h5>
      {Object.keys(house).length}
      <h5>Data</h5>
      <pre>{JSON.stringify(house, null, 2)}</pre>
      <hr />
    </div>
  );
}
Dot notation reads a property: house.bedrooms, house.address.city. Object.keys(obj) returns an array of the object's property names, so Object.keys(house).length gives the number of properties: 6 for this house. The pretty-printed <pre> uses the optional second and third arguments to stringify — a replacer (here null) and an indent width of 2. console.log(house) prints that tree in the Console tab — the next subsection:
House
bedrooms
4bathrooms
2.5Number of properties
5Data
{
  "bedrooms": 4,
  "bathrooms": 2.5,
  "squareFeet": 2000,
  "address": {
    "street": "Via Roma",
    "city": "Roma",
    "state": "RM",
    "zip": "00100",
    "country": "Italy"
  },
  "owners": [
    "Alice",
    "Bob"
  ]
}
Import House into app/labs/lab3/page.tsx and render it last:
import VariablesAndConstants from "./VariablesAndConstants";
import VariableTypes from "./VariableTypes";
import BooleanVariables from "./BooleanVariables";
import IfElse from "./IfElse";
import TernaryOperator from "./TernaryOperator";
import ConditionalOutputIfElse from "./ConditionalOutputIfElse";
import ConditionalOutputInline from "./ConditionalOutputInline";
import NullUndefined from "./NullUndefined";
import LegacyFunctions from "./LegacyFunctions";
import ArrowFunctions from "./ArrowFunctions";
import ImpliedReturn from "./ImpliedReturn";
import TemplateLiterals from "./TemplateLiterals";
import SimpleArrays from "./SimpleArrays";
import ArrayIndexAndLength from "./ArrayIndexAndLength";
import AddingAndRemovingToFromArrays from "./AddingAndRemovingToFromArrays";
import ForLoops from "./ForLoops";
import MapFunction from "./MapFunction";
import FindFunction from "./FindFunction";
import FindIndex from "./FindIndex";
import FilterFunction from "./FilterFunction";
import IncludesSomeEvery from "./IncludesSomeEvery";
import ReduceFunction from "./ReduceFunction";
import JsonStringify from "./JsonStringify";
import House from "./House";

export default function Lab3() {
  return (
    <div id="wd-lab3">
      <h2>Lab 3</h2>
      <VariablesAndConstants />
      <VariableTypes />
      <BooleanVariables />
      <IfElse />
      <TernaryOperator />
      <ConditionalOutputIfElse />
      <ConditionalOutputInline />
      <NullUndefined />
      <LegacyFunctions />
      <ArrowFunctions />
      <ImpliedReturn />
      <TemplateLiterals />
      <SimpleArrays />
      <ArrayIndexAndLength />
      <AddingAndRemovingToFromArrays />
      <ForLoops />
      <MapFunction />
      <FindFunction />
      <FindIndex />
      <FilterFunction />
      <IncludesSomeEvery />
      <ReduceFunction />
      <JsonStringify />
      <House />
    </div>
  );
}3.4.12 Writing to the Console
DevTools' Elements tab showed the DOM in §1.3.1. Functions and objects need the Console tab as well — a place to print values without putting them on the page. Right-click the Lab 3 page and choose Inspect. Click the Console tab — empty until your scripts write to it (Figure 3.4.12a):
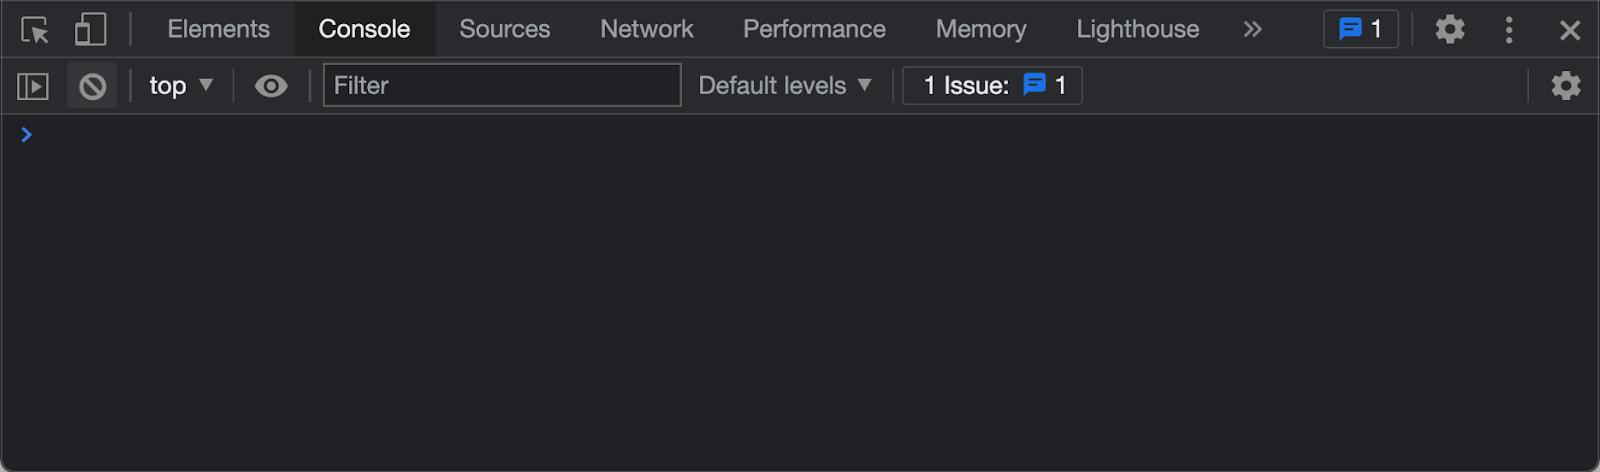
Add console.log("Hello World!") at the top of the Lab 3 function, above the return, reload, and confirm the string appears in the console. The rest of the page stays the same:
import VariablesAndConstants from "./VariablesAndConstants";
import VariableTypes from "./VariableTypes";
import BooleanVariables from "./BooleanVariables";
import IfElse from "./IfElse";
import TernaryOperator from "./TernaryOperator";
import ConditionalOutputIfElse from "./ConditionalOutputIfElse";
import ConditionalOutputInline from "./ConditionalOutputInline";
import NullUndefined from "./NullUndefined";
import LegacyFunctions from "./LegacyFunctions";
import ArrowFunctions from "./ArrowFunctions";
import ImpliedReturn from "./ImpliedReturn";
import TemplateLiterals from "./TemplateLiterals";
import SimpleArrays from "./SimpleArrays";
import ArrayIndexAndLength from "./ArrayIndexAndLength";
import AddingAndRemovingToFromArrays from "./AddingAndRemovingToFromArrays";
import ForLoops from "./ForLoops";
import MapFunction from "./MapFunction";
import FindFunction from "./FindFunction";
import FindIndex from "./FindIndex";
import FilterFunction from "./FilterFunction";
import IncludesSomeEvery from "./IncludesSomeEvery";
import ReduceFunction from "./ReduceFunction";
import JsonStringify from "./JsonStringify";
import House from "./House";

export default function Lab3() {
  console.log("Hello World!");
  return (
    <div id="wd-lab3">
      <h2>Lab 3</h2>
      <VariablesAndConstants />
      <VariableTypes />
      <BooleanVariables />
      <IfElse />
      <TernaryOperator />
      <ConditionalOutputIfElse />
      <ConditionalOutputInline />
      <NullUndefined />
      <LegacyFunctions />
      <ArrowFunctions />
      <ImpliedReturn />
      <TemplateLiterals />
      <SimpleArrays />
      <ArrayIndexAndLength />
      <AddingAndRemovingToFromArrays />
      <ForLoops />
      <MapFunction />
      <FindFunction />
      <FindIndex />
      <FilterFunction />
      <IncludesSomeEvery />
      <ReduceFunction />
      <JsonStringify />
      <House />
    </div>
  );
}
Objects print in the Console as expandable trees. House.tsx already logs the house — reload Lab 3, find that log, and expand address and owners (Figure 3.4.12c):
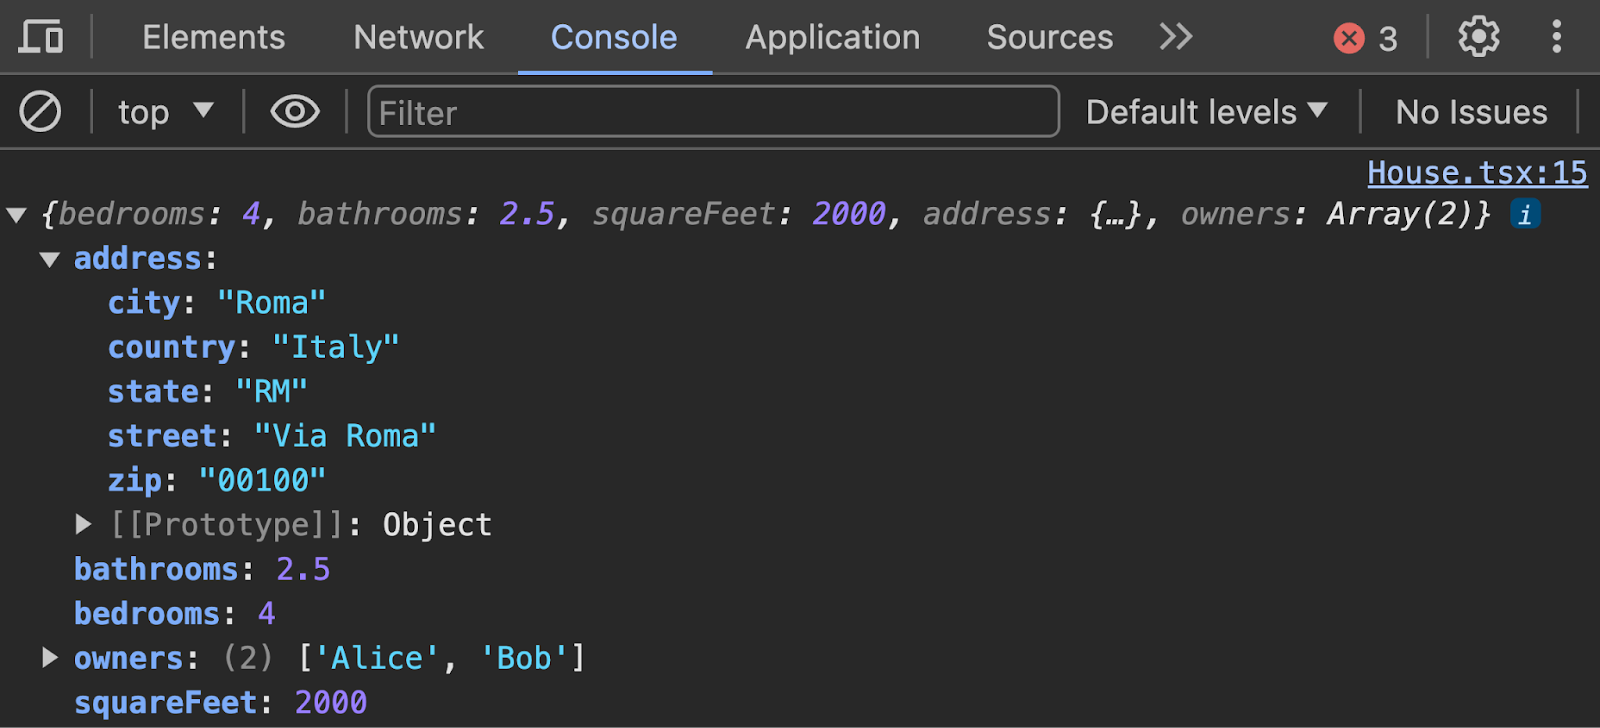
3.4.13 Spread Operator
SlidesThe spread operator ... is used to expand, or copy, an iterable object or array into another object or array. In the example below we declare array arr1 and then copy its content (spread) into array arr2. The resulting array arr2 contains the contents of arr1, followed by the rest of the items already declared in arr2. The spread operator can also be applied to objects. Below, obj1 declares an object with three properties a, b, and c. We then spread obj1 onto obj2 so that obj2 ends up with the properties from both obj1 and obj2. When declaring obj3, we first spread obj1 and then declare b with a value of 4. Since obj1 also has a property called b with a value of 2, there is a collision of properties in obj3. The collision is resolved by keeping the last declaration, so obj3.b ends up being 4. To practice the spread operator, create the Spreader component as shown below — the function inside is named Spreading, matching the lab file — import it in the Lab 3 component, and confirm it renders as shown:
export default function Spreading() {
  const arr1 = [1, 2, 3];
  const arr2 = [...arr1, 4, 5, 6];
  const obj1 = { a: 1, b: 2, c: 3 };
  const obj2 = { ...obj1, d: 4, e: 5, f: 6 };
  const obj3 = { ...obj1, b: 4 };
  return (
    <div id="wd-spreading">
      <h2>Spread Operator</h2>
      <h3>Array Spread</h3>
      arr1 = {JSON.stringify(arr1)} <br />
      arr2 = {JSON.stringify(arr2)} <br />
      <h3>Object Spread</h3>
      {JSON.stringify(obj1)}        <br />
      {JSON.stringify(obj2)}        <br />
      {JSON.stringify(obj3)}        <br />
      <hr />
    </div>
  );
}
obj3.b is 4, not 2 — the later b: 4 overrides the copy from obj1:
Spread Operator
Array Spread
arr1 = [1,2,3]arr2 = [1,2,3,4,5,6]
Object Spread
{"a":1,"b":2,"c":3}{"a":1,"b":2,"c":3,"d":4,"e":5,"f":6}
{"a":1,"b":4,"c":3}
Import it into app/labs/lab3/page.tsx as Spreader, after the file name. A default import can take any local name, so it does not have to match the Spreading function inside. Render it last:
import VariablesAndConstants from "./VariablesAndConstants";
import VariableTypes from "./VariableTypes";
import BooleanVariables from "./BooleanVariables";
import IfElse from "./IfElse";
import TernaryOperator from "./TernaryOperator";
import ConditionalOutputIfElse from "./ConditionalOutputIfElse";
import ConditionalOutputInline from "./ConditionalOutputInline";
import NullUndefined from "./NullUndefined";
import LegacyFunctions from "./LegacyFunctions";
import ArrowFunctions from "./ArrowFunctions";
import ImpliedReturn from "./ImpliedReturn";
import TemplateLiterals from "./TemplateLiterals";
import SimpleArrays from "./SimpleArrays";
import ArrayIndexAndLength from "./ArrayIndexAndLength";
import AddingAndRemovingToFromArrays from "./AddingAndRemovingToFromArrays";
import ForLoops from "./ForLoops";
import MapFunction from "./MapFunction";
import FindFunction from "./FindFunction";
import FindIndex from "./FindIndex";
import FilterFunction from "./FilterFunction";
import IncludesSomeEvery from "./IncludesSomeEvery";
import ReduceFunction from "./ReduceFunction";
import JsonStringify from "./JsonStringify";
import House from "./House";
import Spreader from "./Spreader";

export default function Lab3() {
  console.log("Hello World!");
  return (
    <div id="wd-lab3">
      <h2>Lab 3</h2>
      <VariablesAndConstants />
      <VariableTypes />
      <BooleanVariables />
      <IfElse />
      <TernaryOperator />
      <ConditionalOutputIfElse />
      <ConditionalOutputInline />
      <NullUndefined />
      <LegacyFunctions />
      <ArrowFunctions />
      <ImpliedReturn />
      <TemplateLiterals />
      <SimpleArrays />
      <ArrayIndexAndLength />
      <AddingAndRemovingToFromArrays />
      <ForLoops />
      <MapFunction />
      <FindFunction />
      <FindIndex />
      <FilterFunction />
      <IncludesSomeEvery />
      <ReduceFunction />
      <JsonStringify />
      <House />
      <Spreader />
    </div>
  );
}3.4.14 Destructing
While the spread operator is used to expand an iterable object into a new object or array, the destructing operator unpacks values from arrays, or properties from objects, into distinct variables. The lab file is named Destructing.tsx, but the operation in prose is destructuring. In the example below we declare object person and array numbers. These can be unpacked, or destructed, into new variables or constants by an object's property name or an array's item position. The curly brackets around constants name and age destruct the object person on the right side of the assignment and assign the properties of the same name into the new constants, so name and age end up with the values of person.name and person.age. While object destructing is based on the names of the properties, destructing arrays is based on the positions of the items: the square brackets unpack numbers into first, second, and third, which end up with the values of numbers[0], numbers[1], and numbers[2]. To practice destructing objects and arrays, create component Destructing as shown below, import it in the Lab 3 component, and confirm it renders as shown:
export default function Destructing() {
const person = { name: "John", age: 25 };
const { name, age } = person;
const numbers = ["one", "two", "three"];
const [first, second, third] = numbers;
return (
<div id="wd-destructing">
<h2>Destructing</h2>
<h3>Object Destructing</h3>
const { name, age } = { name: "John", age: 25 } <br /> <br />
name = {name} <br />
age = {age}
<h3>Array Destructing</h3>
const [first, second, third] = ["one","two","three"] <br /> <br />
first = {first} <br />
second = {second} <br />
third = {third}
<hr />
</div>
);
}const { name, age } = person is the same as const name = person.name and const age = person.age. Array destructuring is the same as numbers[0], numbers[1], numbers[2]:
Destructing
Object Destructing
const { name, age } = { name: "John", age: 25 }name = John
age = 25
Array Destructing
const [first, second, third] = ["one","two","three"]first = one
second = two
third = three
Import Destructing into app/labs/lab3/page.tsx and render it last:
import VariablesAndConstants from "./VariablesAndConstants";
import VariableTypes from "./VariableTypes";
import BooleanVariables from "./BooleanVariables";
import IfElse from "./IfElse";
import TernaryOperator from "./TernaryOperator";
import ConditionalOutputIfElse from "./ConditionalOutputIfElse";
import ConditionalOutputInline from "./ConditionalOutputInline";
import NullUndefined from "./NullUndefined";
import LegacyFunctions from "./LegacyFunctions";
import ArrowFunctions from "./ArrowFunctions";
import ImpliedReturn from "./ImpliedReturn";
import TemplateLiterals from "./TemplateLiterals";
import SimpleArrays from "./SimpleArrays";
import ArrayIndexAndLength from "./ArrayIndexAndLength";
import AddingAndRemovingToFromArrays from "./AddingAndRemovingToFromArrays";
import ForLoops from "./ForLoops";
import MapFunction from "./MapFunction";
import FindFunction from "./FindFunction";
import FindIndex from "./FindIndex";
import FilterFunction from "./FilterFunction";
import IncludesSomeEvery from "./IncludesSomeEvery";
import ReduceFunction from "./ReduceFunction";
import JsonStringify from "./JsonStringify";
import House from "./House";
import Spreader from "./Spreader";
import Destructing from "./Destructing";

export default function Lab3() {
  console.log("Hello World!");
  return (
    <div id="wd-lab3">
      <h2>Lab 3</h2>
      <VariablesAndConstants />
      <VariableTypes />
      <BooleanVariables />
      <IfElse />
      <TernaryOperator />
      <ConditionalOutputIfElse />
      <ConditionalOutputInline />
      <NullUndefined />
      <LegacyFunctions />
      <ArrowFunctions />
      <ImpliedReturn />
      <TemplateLiterals />
      <SimpleArrays />
      <ArrayIndexAndLength />
      <AddingAndRemovingToFromArrays />
      <ForLoops />
      <MapFunction />
      <FindFunction />
      <FindIndex />
      <FilterFunction />
      <IncludesSomeEvery />
      <ReduceFunction />
      <JsonStringify />
      <House />
      <Spreader />
      <Destructing />
    </div>
  );
}3.4.15 Function Destructing
The destructing-objects syntax is very popular in React, especially when passing parameters to functions. React components receive props as one object, and destructuring that object in the parameter list is the usual way to name each prop. In the example below we declare two functions add and subtract using the new arrow function syntax. The add function takes two arguments a and b and returns the sum of the arguments. The subtract function takes a single object argument with properties a and b with values 4 and 2. In the argument list declaration, subtract uses object destructing to declare constants a and b which unpack the values 4 and 2 from the object argument with properties of the same name. To practice function destructing, copy the code below into a FunctionDestructing component, import it into the Lab 3 component, and confirm it renders as shown:
export default function FunctionDestructing() {
const add = (a: number, b: number) => a + b;
const sum = add(1, 2);
const subtract = ({ a, b }: { a: number; b: number }) => a - b;
const difference = subtract({ a: 4, b: 2 });
return (
<div id="wd-function-destructing">
<h2>Function Destructing</h2>
const add = (a, b) => a + b; <br />
const sum = add(1, 2); <br />
const subtract = ({ a, b }) => a - b; <br />
const difference = subtract({ a: 4, b: 2 }); <br />
sum = {sum} <br />
difference = {difference}
<hr />
</div>
);
}add takes two numbers. subtract takes one object and unpacks a and b from it — the same shape as function Add({ a, b }: { a: number; b: number }) in §3.8:
Parameters can also carry a default: (name = "Ada") => name uses "Ada" when the caller omits the argument. Destructured props work the same way — { a, b = 0 } — which §3.8.4 uses for a default todo.
Function Destructing
const add = (a, b) => a + b;const sum = add(1, 2);
const subtract = ({ a, b }) => a - b;
const difference = subtract({ a: 4, b: 2 });
sum = 3
difference = 2
Import FunctionDestructing into app/labs/lab3/page.tsx and render it last:
import VariablesAndConstants from "./VariablesAndConstants";
import VariableTypes from "./VariableTypes";
import BooleanVariables from "./BooleanVariables";
import IfElse from "./IfElse";
import TernaryOperator from "./TernaryOperator";
import ConditionalOutputIfElse from "./ConditionalOutputIfElse";
import ConditionalOutputInline from "./ConditionalOutputInline";
import NullUndefined from "./NullUndefined";
import LegacyFunctions from "./LegacyFunctions";
import ArrowFunctions from "./ArrowFunctions";
import ImpliedReturn from "./ImpliedReturn";
import TemplateLiterals from "./TemplateLiterals";
import SimpleArrays from "./SimpleArrays";
import ArrayIndexAndLength from "./ArrayIndexAndLength";
import AddingAndRemovingToFromArrays from "./AddingAndRemovingToFromArrays";
import ForLoops from "./ForLoops";
import MapFunction from "./MapFunction";
import FindFunction from "./FindFunction";
import FindIndex from "./FindIndex";
import FilterFunction from "./FilterFunction";
import IncludesSomeEvery from "./IncludesSomeEvery";
import ReduceFunction from "./ReduceFunction";
import JsonStringify from "./JsonStringify";
import House from "./House";
import Spreader from "./Spreader";
import Destructing from "./Destructing";
import FunctionDestructing from "./FunctionDestructing";

export default function Lab3() {
  console.log("Hello World!");
  return (
    <div id="wd-lab3">
      <h2>Lab 3</h2>
      <VariablesAndConstants />
      <VariableTypes />
      <BooleanVariables />
      <IfElse />
      <TernaryOperator />
      <ConditionalOutputIfElse />
      <ConditionalOutputInline />
      <NullUndefined />
      <LegacyFunctions />
      <ArrowFunctions />
      <ImpliedReturn />
      <TemplateLiterals />
      <SimpleArrays />
      <ArrayIndexAndLength />
      <AddingAndRemovingToFromArrays />
      <ForLoops />
      <MapFunction />
      <FindFunction />
      <FindIndex />
      <FilterFunction />
      <IncludesSomeEvery />
      <ReduceFunction />
      <JsonStringify />
      <House />
      <Spreader />
      <Destructing />
      <FunctionDestructing />
    </div>
  );
}3.4.16 Destructing Imports
Let's create a simple library to illustrate various ways of importing the functions and constants declared in the Math library below. The functions add, subtract, multiply, and divide are all exported with the export keyword so that they can be imported individually. The Math constant declares an object containing references to the local functions. We export the Math object as the default export so that the functions can be imported as a single object map. To demonstrate how the functions can be imported in several ways, create the DestructingImports component below. First, the functions can be imported as the single Math object that contains references to all the functions as import Math from "./Math", then accessed as Math.add(), Math.subtract(), and so on. An alternative is import * as Matematica from "./Math", where Matematica is a custom local object name, so you invoke Matematica.add() and Matematica.subtract(). Finally, the functions can be imported individually by destructing the exported functions as import { add, subtract, multiply, divide } from "./Math". Implement the Math.ts library and the DestructingImports component, import them in Lab 3, and confirm the table renders as shown:
export function add(a: number, b: number): number {
  return a + b;
}
export function subtract(a: number, b: number): number {
  return a - b;
}
export function multiply(a: number, b: number): number {
  return a * b;
}
export function divide(a: number, b: number): number {
  return a / b;
}
const Math = {
  add,
  subtract,
  multiply,
  divide,
};
export default Math;import Math, { add, subtract, multiply, divide } from "./Math";
import * as Matematica from "./Math";
export default function DestructingImports() {
return (
<div id="wd-destructuring-imports">
<h2>Destructing Imports</h2>
<table className="w-full border-collapse text-sm">
<thead>
<tr>
<th>Math</th>
<th>Matematica</th>
<th>Functions</th>
</tr>
</thead>
<tbody>
<tr>
<td>Math.add(2, 3) = {Math.add(2, 3)}</td>
<td>Matematica.add(2, 3) = {Matematica.add(2, 3)}</td>
<td>add(2, 3) = {add(2, 3)}</td>
</tr>
<tr>
<td>Math.subtract(5, 1) = {Math.subtract(5, 1)}</td>
<td>Matematica.subtract(5, 1) = {Matematica.subtract(5, 1)}</td>
<td>subtract(5, 1) = {subtract(5, 1)}</td>
</tr>
<tr>
<td>Math.multiply(3, 4) = {Math.multiply(3, 4)}</td>
<td>Matematica.multiply(3, 4) = {Matematica.multiply(3, 4)}</td>
<td>multiply(3, 4) = {multiply(3, 4)}</td>
</tr>
<tr>
<td>Math.divide(8, 2) = {Math.divide(8, 2)}</td>
<td>Matematica.divide(8, 2) = {Matematica.divide(8, 2)}</td>
<td>divide(8, 2) = {divide(8, 2)}</td>
</tr>
</tbody>
</table>
<hr />
</div>
);
}A module can export many named values (export function add) and at most one default (export default Math). Named imports use braces: import { add } from "./Math". The default import does not: import Math from "./Math" — the same pattern as import House from "./House" and as every Next.js page.tsx, which must default-export the page component. import * as Matematica gathers every export as one object. Each column of the table is the same arithmetic:
Destructing Imports
| Math | Matematica | Functions |
|---|---|---|
| Math.add(2, 3) = 5 | Matematica.add(2, 3) = 5 | add(2, 3) = 5 |
| Math.subtract(5, 1) = 4 | Matematica.subtract(5, 1) = 4 | subtract(5, 1) = 4 |
| Math.multiply(3, 4) = 12 | Matematica.multiply(3, 4) = 12 | multiply(3, 4) = 12 |
| Math.divide(8, 2) = 4 | Matematica.divide(8, 2) = 4 | divide(8, 2) = 4 |
Only DestructingImports goes on the page — Math.ts is imported by that component, not by Lab 3. Import it into app/labs/lab3/page.tsx and render it last:
import VariablesAndConstants from "./VariablesAndConstants";
import VariableTypes from "./VariableTypes";
import BooleanVariables from "./BooleanVariables";
import IfElse from "./IfElse";
import TernaryOperator from "./TernaryOperator";
import ConditionalOutputIfElse from "./ConditionalOutputIfElse";
import ConditionalOutputInline from "./ConditionalOutputInline";
import NullUndefined from "./NullUndefined";
import LegacyFunctions from "./LegacyFunctions";
import ArrowFunctions from "./ArrowFunctions";
import ImpliedReturn from "./ImpliedReturn";
import TemplateLiterals from "./TemplateLiterals";
import SimpleArrays from "./SimpleArrays";
import ArrayIndexAndLength from "./ArrayIndexAndLength";
import AddingAndRemovingToFromArrays from "./AddingAndRemovingToFromArrays";
import ForLoops from "./ForLoops";
import MapFunction from "./MapFunction";
import FindFunction from "./FindFunction";
import FindIndex from "./FindIndex";
import FilterFunction from "./FilterFunction";
import IncludesSomeEvery from "./IncludesSomeEvery";
import ReduceFunction from "./ReduceFunction";
import JsonStringify from "./JsonStringify";
import House from "./House";
import Spreader from "./Spreader";
import Destructing from "./Destructing";
import FunctionDestructing from "./FunctionDestructing";
import DestructingImports from "./DestructingImports";

export default function Lab3() {
  console.log("Hello World!");
  return (
    <div id="wd-lab3">
      <h2>Lab 3</h2>
      <VariablesAndConstants />
      <VariableTypes />
      <BooleanVariables />
      <IfElse />
      <TernaryOperator />
      <ConditionalOutputIfElse />
      <ConditionalOutputInline />
      <NullUndefined />
      <LegacyFunctions />
      <ArrowFunctions />
      <ImpliedReturn />
      <TemplateLiterals />
      <SimpleArrays />
      <ArrayIndexAndLength />
      <AddingAndRemovingToFromArrays />
      <ForLoops />
      <MapFunction />
      <FindFunction />
      <FindIndex />
      <FilterFunction />
      <IncludesSomeEvery />
      <ReduceFunction />
      <JsonStringify />
      <House />
      <Spreader />
      <Destructing />
      <FunctionDestructing />
      <DestructingImports />
    </div>
  );
}3.4.17 Optional chaining and nullish coalescing
SlidesReading house.address.city throws if address is missing. Optional chaining ?. stops at the first null or undefined and yields undefined instead of crashing. Nullish coalescing ?? supplies a default only when the left side is null or undefined (unlike ||, which also treats 0 and "" as missing). Create OptionalChaining.tsx:
type House = {
  bedrooms: number;
  address?: { street: string; city: string; zip?: string };
  garage?: { cars: number };
};

export default function OptionalChaining() {
  const house: House = {
    bedrooms: 4,
    address: {
      street: "Via Roma",
      city: "Roma",
    },
  };
  const missing = undefined as { prop?: string } | undefined;
  return (
    <div id="wd-optional-chaining">
      <h4>Optional Chaining</h4>
      house.address?.city = {house.address?.city} <br />
      missing?.prop ?? "n/a" = {missing?.prop ?? "n/a"}
      <hr />
    </div>
  );
}
house.address?.city is Roma. missing?.prop is undefined, so ?? "n/a" fills in the fallback — the same pattern the assignment editor uses for assignment?.title ?? "" in §3.10.8.1. The House type marks address, zip, and garage optional with ?. TypeScript only lets you read a property the type declares, even through ?., so without the type, house.garage?.cars below would work in npm run dev but fail next build (and your Vercel deploy):
Optional Chaining
house.address?.city = Romamissing?.prop ?? "n/a" = n/a
Import OptionalChaining into app/labs/lab3/page.tsx and render it last:
import VariablesAndConstants from "./VariablesAndConstants";
import VariableTypes from "./VariableTypes";
import BooleanVariables from "./BooleanVariables";
import IfElse from "./IfElse";
import TernaryOperator from "./TernaryOperator";
import ConditionalOutputIfElse from "./ConditionalOutputIfElse";
import ConditionalOutputInline from "./ConditionalOutputInline";
import NullUndefined from "./NullUndefined";
import LegacyFunctions from "./LegacyFunctions";
import ArrowFunctions from "./ArrowFunctions";
import ImpliedReturn from "./ImpliedReturn";
import TemplateLiterals from "./TemplateLiterals";
import SimpleArrays from "./SimpleArrays";
import ArrayIndexAndLength from "./ArrayIndexAndLength";
import AddingAndRemovingToFromArrays from "./AddingAndRemovingToFromArrays";
import ForLoops from "./ForLoops";
import MapFunction from "./MapFunction";
import FindFunction from "./FindFunction";
import FindIndex from "./FindIndex";
import FilterFunction from "./FilterFunction";
import IncludesSomeEvery from "./IncludesSomeEvery";
import ReduceFunction from "./ReduceFunction";
import JsonStringify from "./JsonStringify";
import House from "./House";
import Spreader from "./Spreader";
import Destructing from "./Destructing";
import FunctionDestructing from "./FunctionDestructing";
import DestructingImports from "./DestructingImports";
import OptionalChaining from "./OptionalChaining";

export default function Lab3() {
  console.log("Hello World!");
  return (
    <div id="wd-lab3">
      <h2>Lab 3</h2>
      <VariablesAndConstants />
      <VariableTypes />
      <BooleanVariables />
      <IfElse />
      <TernaryOperator />
      <ConditionalOutputIfElse />
      <ConditionalOutputInline />
      <NullUndefined />
      <LegacyFunctions />
      <ArrowFunctions />
      <ImpliedReturn />
      <TemplateLiterals />
      <SimpleArrays />
      <ArrayIndexAndLength />
      <AddingAndRemovingToFromArrays />
      <ForLoops />
      <MapFunction />
      <FindFunction />
      <FindIndex />
      <FilterFunction />
      <IncludesSomeEvery />
      <ReduceFunction />
      <JsonStringify />
      <House />
      <Spreader />
      <Destructing />
      <FunctionDestructing />
      <DestructingImports />
      <OptionalChaining />
    </div>
  );
}3.5 TypeScript Types
SlidesThe files in this course end in .ts and .tsx because they are written in TypeScript: JavaScript plus types that describe what each variable, object, and function holds. Your editor uses the types to suggest names and flag mistakes as you type, and next build refuses to build code whose types do not line up, which is why a page can work in npm run dev and still fail on Vercel. The types are removed when the code runs, so the browser only ever sees plain JavaScript. Each step below adds a small component under app/labs/lab3/types, and all of them render together on a page at app/labs/lab3/types/page.tsx:
import TypeAnnotations from "./TypeAnnotations";
import ObjectTypes from "./ObjectTypes";
import Interfaces from "./Interfaces";
import UnionTypes from "./UnionTypes";
import Enums from "./Enums";
import FunctionTypes from "./FunctionTypes";
import TypedProps from "./TypedProps";
import Narrowing from "./Narrowing";
import AnyVsUnknown from "./AnyVsUnknown";
import UtilityTypes from "./UtilityTypes";

export default function TypesPage() {
  return (
    <div id="wd-lab3-types" className="p-4">
      <h2>TypeScript Types</h2>
      <TypeAnnotations />
      <ObjectTypes />
      <Interfaces />
      <UnionTypes />
      <Enums />
      <FunctionTypes />
      <TypedProps />
      <Narrowing />
      <AnyVsUnknown />
      <UtilityTypes />
    </div>
  );
}
Open http://localhost:3000/labs/lab3/types as you add each component.
3.5.1 Type Annotations
A type annotation is a colon and a type after a variable or parameter name. It tells TypeScript what kind of value the name may hold, and next build refuses code that stores anything else there. The primitive types are string, number, and boolean, and adding [] after a type, as in string[], makes an array of that type. Create app/labs/lab3/types/TypeAnnotations.tsx:
export default function TypeAnnotations() {
  const course: string = "Web Development";
  const credits: number = 4;
  const isOnline: boolean = false;
  const topics: string[] = ["HTML", "CSS", "JavaScript"];
  const section = "CS5610"; // inferred as string
  const seats = 40; // inferred as number
  return (
    <div id="wd-type-annotations">
      <h4>Type Annotations</h4>
      course = {course} <br />
      credits = {credits} <br />
      isOnline = {isOnline + ""} <br />
      topics = {topics.join(", ")} <br />
      section = {section}, seats = {seats}
      <hr />
    </div>
  );
}
The last two constants have no annotation. TypeScript infers their types from the values they start with, so section is a string and seats is a number, and assigning seats = "forty" later would still be an error. Write an annotation when the type is not obvious from the value, and let inference handle the rest:
Type Annotations
course = Web Developmentcredits = 4
isOnline = false
topics = HTML, CSS, JavaScript
section = CS5610, seats = 40
3.5.2 Object Types and Type Aliases
The type keyword gives a name, or alias, to a type, which is most useful for the shape of an object. Each property is listed with its own type, and a ? after the property name makes it optional, so an object may leave it out. Create ObjectTypes.tsx:
type Course = {
  name: string;
  number: string;
  credits: number;
  description?: string;
};

export default function ObjectTypes() {
  const webDev: Course = {
    name: "Web Development",
    number: "CS5610",
    credits: 4,
    description: "Full stack web apps",
  };
  const algorithms: Course = {
    name: "Algorithms",
    number: "CS5800",
    credits: 4,
  };
  return (
    <div id="wd-object-types">
      <h4>Object Types</h4>
      {webDev.number} {webDev.name}: {webDev.description} <br />
      {algorithms.number} {algorithms.name}:{" "}
      {algorithms.description ?? "no description"}
      <hr />
    </div>
  );
}
algorithms has no description, which is allowed because the property is optional. Reading an optional property gives undefined when it is missing, so the listing falls back with ??. Leaving out a required property such as credits, or misspelling one, fails the build:
Object Types
CS5610 Web Development: Full stack web appsCS5800 Algorithms: no description
3.5.3 Interfaces
An interface also describes the shape of an object. For objects it works almost the same as a type alias, and one interface can build on another with extends. A type alias gets the same result by combining types with &. Create Interfaces.tsx:
interface Person {
  firstName: string;
  lastName: string;
}

interface Student extends Person {
  nuid: string;
  section: string;
}

type Faculty = Person & { office: string };

export default function Interfaces() {
  const student: Student = {
    firstName: "Alice",
    lastName: "Wonderland",
    nuid: "001234567",
    section: "CS5610-02",
  };
  const faculty: Faculty = {
    firstName: "Bob",
    lastName: "Builder",
    office: "WVH 310",
  };
  return (
    <div id="wd-interfaces">
      <h4>Interfaces</h4>
      {student.firstName} {student.lastName} ({student.nuid}) is in{" "}
      {student.section} <br />
      {faculty.firstName} {faculty.lastName} works in {faculty.office}
      <hr />
    </div>
  );
}
Student has every property of Person plus its own, and so does Faculty. Interfaces only describe objects, while type can also name unions, functions, and primitives, which is why this book mostly uses type. Pick one style and use it consistently in a project:
Interfaces
Alice Wonderland (001234567) is in CS5610-02Bob Builder works in WVH 310
3.5.4 Union and Literal Types
A union type joins types with | and means "any one of these." A literal type is a single exact value, such as "STUDENT". A union of literals limits a value to a fixed list of choices, like the roles a user can have. Create UnionTypes.tsx:
type Role = "STUDENT" | "FACULTY" | "TA";
type Id = string | number;

export default function UnionTypes() {
  const role: Role = "FACULTY";
  const courseId: Id = "RS101";
  const userId: Id = 123;
  const roles: Role[] = ["STUDENT", "FACULTY", "TA"];
  return (
    <div id="wd-union-types">
      <h4>Union and Literal Types</h4>
      role = {role} <br />
      courseId = {courseId}, userId = {userId} <br />
      roles = {roles.join(" | ")}
      <hr />
    </div>
  );
}
Assigning "ADMIN" to role would fail the build because it is not one of the three listed values, and your editor suggests the valid ones as you type. Id accepts either a string or a number:
Union and Literal Types
role = FACULTYcourseId = RS101, userId = 123
roles = STUDENT | FACULTY | TA
3.5.5 Enums
An enum declares a named set of constants. Each member can be given a value, as in Grade, or left to count up from 0, as in Weekday. You read a member with a dot, like Grade.A. Create Enums.tsx:
enum Grade {
  A = "A",
  B = "B",
  C = "C",
}

enum Weekday {
  Monday,
  Tuesday,
  Wednesday,
}

type Status = "OPEN" | "CLOSED";

export default function Enums() {
  const grade: Grade = Grade.A;
  const day: Weekday = Weekday.Wednesday;
  const status: Status = "OPEN";
  return (
    <div id="wd-enums">
      <h4>Enums</h4>
      grade = {grade} <br />
      day = {day} ({Weekday[day]}) <br />
      status = {status}
      <hr />
    </div>
  );
}
Weekday.Wednesday is the number 2, and Weekday[day] looks the name back up. Unlike other types, an enum also creates a real object that runs in the browser. When the values are plain strings that come from data, such as a user's role in JSON, a union of literals like Status is usually the better choice: it needs no import and matches the strings directly:
Enums
grade = Aday = 2 (Wednesday)
status = OPEN
3.5.6 Function Types
Function parameters take annotations the same way variables do, and the type after the parameter list is the type the function returns. A ? makes a parameter optional, a default value makes it optional and fills it in, and void means the function returns nothing. A type alias can also describe a whole function. Create FunctionTypes.tsx:
function add(a: number, b: number): number {
return a + b;
}
const fullName = (first: string, last?: string): string =>
last ? `${first} ${last}` : first;
const greet = (name: string = "World"): string => `Hello ${name}`;
function logMessage(message: string): void {
console.log(message);
}
type Operation = (a: number, b: number) => number;
const multiply: Operation = (a, b) => a * b;
export default function FunctionTypes() {
logMessage("FunctionTypes rendered");
return (
<div id="wd-function-types">
<h4>Function Types</h4>
add(2, 3) = {add(2, 3)} <br />
fullName("Alice") = {fullName("Alice")} <br />
fullName("Alice", "Wonderland") ={" "}
{fullName("Alice", "Wonderland")} <br />
greet() = {greet()} <br />
multiply(4, 5) = {multiply(4, 5)}
<hr />
</div>
);
}Calling add("2", 3) would fail the build. multiply needs no annotations on a and b because its Operation type already declares them. On this page, logMessage writes to the console of the terminal running npm run dev, not the browser console:
Function Types
add(2, 3) = 5fullName("Alice") = Alice
fullName("Alice", "Wonderland") = Alice Wonderland
greet() = Hello World
multiply(4, 5) = 20
3.5.7 Typing React Props
A component's props are just an object, so they are typed with an object type, usually named Props. The children prop, which holds whatever is written between a component's opening and closing tags, has the type ReactNode, which covers text, elements, and lists of them. Create CourseBadge.tsx:
import type { ReactNode } from "react";

type Props = {
  number: string;
  credits?: number;
  children: ReactNode;
};

export default function CourseBadge({ number, credits = 4, children }: Props) {
  return (
    <div style={{ border: "1px solid gray", padding: "5px", margin: "5px" }}>
      <strong>{number}</strong> ({credits} credits): {children}
    </div>
  );
}
credits is optional in Props and gets a default in the destructured parameters. Then create TypedProps.tsx to render two badges:
import CourseBadge from "./CourseBadge";

export default function TypedProps() {
  return (
    <div id="wd-typed-props">
      <h4>Typing React Props</h4>
      <CourseBadge number="CS5610">Web Development</CourseBadge>
      <CourseBadge number="CS5800" credits={3}>
        Algorithms
      </CourseBadge>
      <hr />
    </div>
  );
}
Leaving out number or passing credits="3" as a string fails the build, and the editor lists the available props as you type:
Typing React Props
3.5.8 Null, Undefined, and Narrowing
TypeScript treats null and undefined as their own types, so a value that might be missing is written as a union such as string | null. Before you use it, you check it. After a check like if (value === null) or typeof value === "number", TypeScript narrows the type and lets you call methods that only that type has. The optional chaining ?. and nullish coalescing ?? operators from §3.4.17 do the same for optional properties. Create Narrowing.tsx:
type User = {
username: string;
email?: string;
address?: { city: string };
};
function describe(value: string | number | null): string {
if (value === null) return "nothing";
if (typeof value === "number") return `the number ${value.toFixed(1)}`;
return `the text "${value.toUpperCase()}"`;
}
export default function Narrowing() {
const alice: User = { username: "alice", address: { city: "Boston" } };
const bob: User = { username: "bob" };
const nickname: string | undefined = undefined;
return (
<div id="wd-narrowing">
<h4>Null, Undefined, and Narrowing</h4>
describe(null) = {describe(null)} <br />
describe(7) = {describe(7)} <br />
describe("hi") = {describe("hi")} <br />
alice.address?.city = {alice.address?.city} <br />
bob.address?.city ?? "unknown" ={" "}
{bob.address?.city ?? "unknown"} <br />
nickname ?? "none" = {nickname ?? "none"}
<hr />
</div>
);
}Inside describe, calling value.toFixed(1) before the checks would fail, because value could still be a string or null. After each return, the remaining possibilities shrink until only string is left:
Null, Undefined, and Narrowing
describe(null) = nothingdescribe(7) = the number 7.0
describe("hi") = the text "HI"
alice.address?.city = Boston
bob.address?.city ?? "unknown" = unknown
nickname ?? "none" = none
3.5.9 any vs unknown
The type any turns type checking off for a value: you can call anything on it, and mistakes only show up when the code runs. The type unknown also accepts any value, but you must narrow it before using it. Use unknown for data whose shape you do not control, such as the result of JSON.parse, and avoid any. The project's ESLint setup reports any, so the listing switches that rule off for one line. Create AnyVsUnknown.tsx:
function lengthOf(value: unknown): number {
if (typeof value === "string") return value.length;
if (Array.isArray(value)) return value.length;
return 0;
}
export default function AnyVsUnknown() {
// eslint-disable-next-line @typescript-eslint/no-explicit-any
const anything: any = "hello";
const parsed: unknown = JSON.parse('{"name": "Alice"}');
const name =
typeof parsed === "object" && parsed !== null && "name" in parsed
? String(parsed.name)
: "unknown";
return (
<div id="wd-any-vs-unknown">
<h4>any vs unknown</h4>
anything.toUpperCase() = {anything.toUpperCase()} <br />
lengthOf("hello") = {lengthOf("hello")} <br />
lengthOf([1, 2, 3]) = {lengthOf([1, 2, 3])} <br />
lengthOf(42) = {lengthOf(42)} <br />
parsed name = {name}
<hr />
</div>
);
}anything.toUpperCase() works here only because the value happens to be a string; if it were a number, the build would still pass and the page would crash. With unknown, the typeof, Array.isArray, and in checks are required before the value can be read:
any vs unknown
anything.toUpperCase() = HELLOlengthOf("hello") = 5
lengthOf([1, 2, 3]) = 3
lengthOf(42) = 0
parsed name = Alice
3.5.10 Utility Types: Partial, Record, and keyof
TypeScript can build new types from existing ones. Partial<Course> is the Course object type from Step 2 with every property made optional, which fits an update that changes only some fields. keyof Course is the union of its property names, "name" | "number" | "credits". Record<string, number> is an object whose keys are strings and whose values are numbers. Create UtilityTypes.tsx:
type Course = {
  name: string;
  number: string;
  credits: number;
};

type CourseUpdate = Partial<Course>;
type CourseField = keyof Course;
type Enrollment = Record<string, number>;

export default function UtilityTypes() {
  const course: Course = { name: "Web Dev", number: "CS5610", credits: 4 };
  const update: CourseUpdate = { name: "Web Development" };
  const updated: Course = { ...course, ...update };
  const fields: CourseField[] = ["name", "number", "credits"];
  const enrollment: Enrollment = { CS5610: 120, CS5800: 85 };
  return (
    <div id="wd-utility-types">
      <h4>Utility Types</h4>
      updated.name = {updated.name} <br />
      fields = {fields.map((field) => `${field}: ${updated[field]}`).join(", ")} <br />
      enrollment.CS5610 = {enrollment.CS5610}, enrollment.CS5800 ={" "}
      {enrollment.CS5800}
      <hr />
    </div>
  );
}
updated[field] is allowed because field can only be one of Course's property names. The values between the angle brackets are type parameters: they let one utility type work with any object type you give it:
Utility Types
updated.name = Web Developmentfields = name: Web Development, number: CS5610, credits: 4
enrollment.CS5610 = 120, enrollment.CS5800 = 85
3.6 Dynamic Styling
SlidesChapter 2 styled tags with CSS files and Tailwind classes. React can generate content dynamically based on algorithms written in JavaScript, and we can also dynamically style that content by programmatically controlling the classes and styles applied to it so the look follows the data. In the next couple of exercises we first learn to work with classes and then with styles.
3.6.1 Working with HTML Classes
Let's start practicing simple things, like classes and styles. Start with static classes, then build the class name from a variable, then pick a class with a ternary. Under the app/labs/lab3 folder, create a new component Classes with a matching styling file. From the Lab 3 component, import the new Classes component and confirm it renders as shown:
.wd-bg-yellow {
  background-color: lightyellow;
}
.wd-bg-blue {
  background-color: lightblue;
}
.wd-bg-red {
  background-color: lightcoral;
}
.wd-bg-green {
  background-color: lightgreen;
}
.wd-fg-black {
  color: black;
}
.wd-padding-10px {
  padding: 10px;
}import "./Classes.css";
export default function Classes() {
const color = "blue";
const dangerous = true;
return (
<div id="wd-classes">
<h2>Classes</h2>
<div className="wd-bg-yellow wd-fg-black wd-padding-10px">
Yellow background
</div>
<div className="wd-bg-blue wd-fg-black wd-padding-10px">
Blue background
</div>
<div className="wd-bg-red wd-fg-black wd-padding-10px">
Red background
</div>
<div className={`wd-bg-${color} wd-fg-black wd-padding-10px`}>
Dynamic Blue background
</div>
<div
className={`${dangerous ? "wd-bg-red" : "wd-bg-green"} wd-fg-black wd-padding-10px`}
>
Dangerous background
</div>
<hr />
</div>
);
}Importing Classes.css loads the rules. The fourth box concatenates wd-bg- with the color constant. The fifth box picks wd-bg-red or wd-bg-green from dangerous. Flip that flag to see the background change:
Classes
Import Classes into app/labs/lab3/page.tsx and render it after OptionalChaining. The page does not import Classes.css; Classes.tsx does:
import VariablesAndConstants from "./VariablesAndConstants";
import VariableTypes from "./VariableTypes";
import BooleanVariables from "./BooleanVariables";
import IfElse from "./IfElse";
import TernaryOperator from "./TernaryOperator";
import ConditionalOutputIfElse from "./ConditionalOutputIfElse";
import ConditionalOutputInline from "./ConditionalOutputInline";
import NullUndefined from "./NullUndefined";
import LegacyFunctions from "./LegacyFunctions";
import ArrowFunctions from "./ArrowFunctions";
import ImpliedReturn from "./ImpliedReturn";
import TemplateLiterals from "./TemplateLiterals";
import SimpleArrays from "./SimpleArrays";
import ArrayIndexAndLength from "./ArrayIndexAndLength";
import AddingAndRemovingToFromArrays from "./AddingAndRemovingToFromArrays";
import ForLoops from "./ForLoops";
import MapFunction from "./MapFunction";
import FindFunction from "./FindFunction";
import FindIndex from "./FindIndex";
import FilterFunction from "./FilterFunction";
import IncludesSomeEvery from "./IncludesSomeEvery";
import ReduceFunction from "./ReduceFunction";
import JsonStringify from "./JsonStringify";
import House from "./House";
import Spreader from "./Spreader";
import Destructing from "./Destructing";
import FunctionDestructing from "./FunctionDestructing";
import DestructingImports from "./DestructingImports";
import OptionalChaining from "./OptionalChaining";
import Classes from "./Classes";

export default function Lab3() {
  console.log("Hello World!");
  return (
    <div id="wd-lab3">
      <h2>Lab 3</h2>
      <VariablesAndConstants />
      <VariableTypes />
      <BooleanVariables />
      <IfElse />
      <TernaryOperator />
      <ConditionalOutputIfElse />
      <ConditionalOutputInline />
      <NullUndefined />
      <LegacyFunctions />
      <ArrowFunctions />
      <ImpliedReturn />
      <TemplateLiterals />
      <SimpleArrays />
      <ArrayIndexAndLength />
      <AddingAndRemovingToFromArrays />
      <ForLoops />
      <MapFunction />
      <FindFunction />
      <FindIndex />
      <FilterFunction />
      <IncludesSomeEvery />
      <ReduceFunction />
      <JsonStringify />
      <House />
      <Spreader />
      <Destructing />
      <FunctionDestructing />
      <DestructingImports />
      <OptionalChaining />
      <Classes />
    </div>
  );
}3.6.2 Working with the Style Attribute
In React, the style attribute accepts a JavaScript object where the properties are CSS properties — camelCase, the same object you used in §2.1.1 — and the values are CSS values. Spread smaller objects into larger ones so padding and color are reused. To practice how this works, implement the Styles component below and then import it into the Lab 3 component. The component declares constant objects that can be applied to elements using the style attribute. Alternatively, the style attribute accepts an object literal, which results in a double curly-bracket syntax. Refresh the browser and confirm it renders as expected:
export default function Styles() {
  const colorBlack = { color: "black" };
  const padding10px = { padding: "10px" };
  const bgBlue = {
    backgroundColor: "lightblue",
    color: "black",
    ...padding10px,
  };
  const bgRed = {
    backgroundColor: "lightcoral",
    ...colorBlack,
    ...padding10px,
  };
  return (
    <div id="wd-styles">
      <h2>Styles</h2>
      <div
        style={{
          backgroundColor: "lightyellow",
          color: "black",
          padding: "10px",
        }}
      >
        Yellow background
      </div>
      <div style={bgRed}>Red background</div>
      <div style={bgBlue}>Blue background</div>
    </div>
  );
}
Double curly braces on the yellow box are one pair to enter a JSX expression and one pair for the object literal. The red and blue boxes pass a named object instead:
Styles
Import Styles into app/labs/lab3/page.tsx and render it last:
import VariablesAndConstants from "./VariablesAndConstants";
import VariableTypes from "./VariableTypes";
import BooleanVariables from "./BooleanVariables";
import IfElse from "./IfElse";
import TernaryOperator from "./TernaryOperator";
import ConditionalOutputIfElse from "./ConditionalOutputIfElse";
import ConditionalOutputInline from "./ConditionalOutputInline";
import NullUndefined from "./NullUndefined";
import LegacyFunctions from "./LegacyFunctions";
import ArrowFunctions from "./ArrowFunctions";
import ImpliedReturn from "./ImpliedReturn";
import TemplateLiterals from "./TemplateLiterals";
import SimpleArrays from "./SimpleArrays";
import ArrayIndexAndLength from "./ArrayIndexAndLength";
import AddingAndRemovingToFromArrays from "./AddingAndRemovingToFromArrays";
import ForLoops from "./ForLoops";
import MapFunction from "./MapFunction";
import FindFunction from "./FindFunction";
import FindIndex from "./FindIndex";
import FilterFunction from "./FilterFunction";
import IncludesSomeEvery from "./IncludesSomeEvery";
import ReduceFunction from "./ReduceFunction";
import JsonStringify from "./JsonStringify";
import House from "./House";
import Spreader from "./Spreader";
import Destructing from "./Destructing";
import FunctionDestructing from "./FunctionDestructing";
import DestructingImports from "./DestructingImports";
import OptionalChaining from "./OptionalChaining";
import Classes from "./Classes";
import Styles from "./Styles";

export default function Lab3() {
  console.log("Hello World!");
  return (
    <div id="wd-lab3">
      <h2>Lab 3</h2>
      <VariablesAndConstants />
      <VariableTypes />
      <BooleanVariables />
      <IfElse />
      <TernaryOperator />
      <ConditionalOutputIfElse />
      <ConditionalOutputInline />
      <NullUndefined />
      <LegacyFunctions />
      <ArrowFunctions />
      <ImpliedReturn />
      <TemplateLiterals />
      <SimpleArrays />
      <ArrayIndexAndLength />
      <AddingAndRemovingToFromArrays />
      <ForLoops />
      <MapFunction />
      <FindFunction />
      <FindIndex />
      <FilterFunction />
      <IncludesSomeEvery />
      <ReduceFunction />
      <JsonStringify />
      <House />
      <Spreader />
      <Destructing />
      <FunctionDestructing />
      <DestructingImports />
      <OptionalChaining />
      <Classes />
      <Styles />
    </div>
  );
}3.7 Client and Server Components
SlidesIn Next.js, all components are Server Components by default. This means they execute only on the server during rendering, producing HTML that is sent to the browser. Server Components are fast, secure, and can directly access server-only resources such as the filesystem or environment variables, but they cannot use browser-specific features like interactivity, state, or DOM APIs, including hooks such as usePathname. If you need interactivity or browser APIs, you must explicitly turn a component into a Client Component by adding "use client" at the top of the file. Client Components are still rendered once on the server to produce the first HTML, then hydrate and keep running in the browser. That is what allows hooks, event handlers, and browser globals — but they lose direct server access such as the filesystem. The two simple examples below highlight exactly what each side can and cannot do.
3.7.1 Client Components
This Client Component below is marked with the "use client" directive at the top. The directive must be the first statement in the file. Next.js still renders the component on the server for the first HTML (open View Source on /labs/lab3 and you will find the pathname text there), then hydrates it so it keeps running in the browser. The directive is what allows client features such as hooks from next/navigation. In this example, the component uses the usePathname() hook to read the current route. Hooks like this only work in Client Components: remove the directive and next dev or next build stops with an error saying the hook needs "use client". The code renders a simple heading and displays the current pathname. Create ClientComponentDemo.tsx, import it into Lab 3, and confirm it renders as shown:
"use client";

import { usePathname } from "next/navigation";

export default function ClientComponentDemo() {
  const pathname = usePathname();
  return (
    <div id="wd-client-component-demo">
      <h1>Client Component Demo</h1>
      <p>Current pathname: {pathname}</p>
    </div>
  );
}
Embedded in this book page, the pathname is the book route. Open it from http://localhost:3000/labs/lab3 to see /labs/lab3:
Client Component Demo
Current pathname: /book/ch3
Import ClientComponentDemo into app/labs/lab3/page.tsx and render it last. The Lab 3 page itself stays a Server Component — no "use client" there — and it can still render a Client Component:
import VariablesAndConstants from "./VariablesAndConstants";
import VariableTypes from "./VariableTypes";
import BooleanVariables from "./BooleanVariables";
import IfElse from "./IfElse";
import TernaryOperator from "./TernaryOperator";
import ConditionalOutputIfElse from "./ConditionalOutputIfElse";
import ConditionalOutputInline from "./ConditionalOutputInline";
import NullUndefined from "./NullUndefined";
import LegacyFunctions from "./LegacyFunctions";
import ArrowFunctions from "./ArrowFunctions";
import ImpliedReturn from "./ImpliedReturn";
import TemplateLiterals from "./TemplateLiterals";
import SimpleArrays from "./SimpleArrays";
import ArrayIndexAndLength from "./ArrayIndexAndLength";
import AddingAndRemovingToFromArrays from "./AddingAndRemovingToFromArrays";
import ForLoops from "./ForLoops";
import MapFunction from "./MapFunction";
import FindFunction from "./FindFunction";
import FindIndex from "./FindIndex";
import FilterFunction from "./FilterFunction";
import IncludesSomeEvery from "./IncludesSomeEvery";
import ReduceFunction from "./ReduceFunction";
import JsonStringify from "./JsonStringify";
import House from "./House";
import Spreader from "./Spreader";
import Destructing from "./Destructing";
import FunctionDestructing from "./FunctionDestructing";
import DestructingImports from "./DestructingImports";
import OptionalChaining from "./OptionalChaining";
import Classes from "./Classes";
import Styles from "./Styles";
import ClientComponentDemo from "./ClientComponentDemo";

export default function Lab3() {
  console.log("Hello World!");
  return (
    <div id="wd-lab3">
      <h2>Lab 3</h2>
      <VariablesAndConstants />
      <VariableTypes />
      <BooleanVariables />
      <IfElse />
      <TernaryOperator />
      <ConditionalOutputIfElse />
      <ConditionalOutputInline />
      <NullUndefined />
      <LegacyFunctions />
      <ArrowFunctions />
      <ImpliedReturn />
      <TemplateLiterals />
      <SimpleArrays />
      <ArrayIndexAndLength />
      <AddingAndRemovingToFromArrays />
      <ForLoops />
      <MapFunction />
      <FindFunction />
      <FindIndex />
      <FilterFunction />
      <IncludesSomeEvery />
      <ReduceFunction />
      <JsonStringify />
      <House />
      <Spreader />
      <Destructing />
      <FunctionDestructing />
      <DestructingImports />
      <OptionalChaining />
      <Classes />
      <Styles />
      <ClientComponentDemo />
    </div>
  );
}3.7.2 Server Components
By default, Next.js pages and components are Server Components and are marked by omitting the "use client" directive, making the file execute exclusively on the server. The server component below demonstrates server-only capabilities by accessing Node.js globals like the process object and using fs.readdirSync() to list files from app/labs/lab3 on the server's filesystem. Adding "use client" would cause a build failure, as APIs like process and fs are unavailable in the browser environment. Create ServerComponentDemo.tsx, import it into Lab 3, and confirm it renders as shown:
import fs from "node:fs";
import path from "node:path";

export default function ServerComponentDemo() {
  const platform = process.platform;
  const nodeVersion = process.version;
  const serverRenderTime = new Date().toLocaleTimeString();
  const lab3Dir = path.join(process.cwd(), "app/labs/lab3");
  let files: string[] = [];
  try {
    files = fs.readdirSync(lab3Dir);
  } catch (error) {
    console.error("Error reading lab3 directory:", error);
    files = [];
  }
  return (
    <div id="wd-server-component-demo">
      <h1>Server Component Demo</h1>
      <h2>Server Render Time</h2>
      <p>Rendered on server at: {serverRenderTime}</p>
      <h2>Server Information</h2>
      <pre>
        {JSON.stringify({ platform, nodeVersion, serverRenderTime }, null, 2)}
      </pre>
      <h2>Filesystem Access Demo</h2>
      <pre>{JSON.stringify(files, null, 2)}</pre>
    </div>
  );
}
The file list is whatever sits in app/labs/lab3 on the machine that rendered this page — a capability the browser does not have:
Server Component Demo
Server Render Time
Rendered on server at: 2:00:31 AM
Server Information
{
  "platform": "linux",
  "nodeVersion": "v26.13.0",
  "serverRenderTime": "2:00:31 AM"
}
Filesystem Access Demo
[
  "Add.tsx",
  "AddingAndRemovingToFromArrays.tsx",
  "ArrayIndexAndLength.tsx",
  "ArrowFunctions.tsx",
  "BooleanVariables.tsx",
  "Classes.css",
  "Classes.tsx",
  "ClientComponentDemo.tsx",
  "ConditionalOutputIfElse.tsx",
  "ConditionalOutputInline.tsx",
  "Destructing.tsx",
  "DestructingImports.tsx",
  "FilterFunction.tsx",
  "FindFunction.tsx",
  "FindIndex.tsx",
  "ForLoops.tsx",
  "FunctionDestructing.tsx",
  "Highlight.tsx",
  "House.tsx",
  "IfElse.tsx",
  "ImpliedReturn.tsx",
  "IncludesSomeEvery.tsx",
  "JsonStringify.tsx",
  "LegacyFunctions.tsx",
  "MapFunction.tsx",
  "Math.ts",
  "NullUndefined.tsx",
  "OptionalChaining.tsx",
  "PathParameters.tsx",
  "ReduceFunction.tsx",
  "ServerComponentDemo.tsx",
  "SimpleArrays.tsx",
  "Spreader.tsx",
  "Square.tsx",
  "Styles.tsx",
  "TemplateLiterals.tsx",
  "TernaryOperator.tsx",
  "VariableTypes.tsx",
  "VariablesAndConstants.tsx",
  "add",
  "children",
  "client-apis",
  "intermediates",
  "page.tsx",
  "server-apis",
  "todos",
  "types"
]
Import ServerComponentDemo into app/labs/lab3/page.tsx after ClientComponentDemo, so both demos are on the page:
import VariablesAndConstants from "./VariablesAndConstants";
import VariableTypes from "./VariableTypes";
import BooleanVariables from "./BooleanVariables";
import IfElse from "./IfElse";
import TernaryOperator from "./TernaryOperator";
import ConditionalOutputIfElse from "./ConditionalOutputIfElse";
import ConditionalOutputInline from "./ConditionalOutputInline";
import NullUndefined from "./NullUndefined";
import LegacyFunctions from "./LegacyFunctions";
import ArrowFunctions from "./ArrowFunctions";
import ImpliedReturn from "./ImpliedReturn";
import TemplateLiterals from "./TemplateLiterals";
import SimpleArrays from "./SimpleArrays";
import ArrayIndexAndLength from "./ArrayIndexAndLength";
import AddingAndRemovingToFromArrays from "./AddingAndRemovingToFromArrays";
import ForLoops from "./ForLoops";
import MapFunction from "./MapFunction";
import FindFunction from "./FindFunction";
import FindIndex from "./FindIndex";
import FilterFunction from "./FilterFunction";
import IncludesSomeEvery from "./IncludesSomeEvery";
import ReduceFunction from "./ReduceFunction";
import JsonStringify from "./JsonStringify";
import House from "./House";
import Spreader from "./Spreader";
import Destructing from "./Destructing";
import FunctionDestructing from "./FunctionDestructing";
import DestructingImports from "./DestructingImports";
import OptionalChaining from "./OptionalChaining";
import Classes from "./Classes";
import Styles from "./Styles";
import ClientComponentDemo from "./ClientComponentDemo";
import ServerComponentDemo from "./ServerComponentDemo";

export default function Lab3() {
  console.log("Hello World!");
  return (
    <div id="wd-lab3">
      <h2>Lab 3</h2>
      <VariablesAndConstants />
      <VariableTypes />
      <BooleanVariables />
      <IfElse />
      <TernaryOperator />
      <ConditionalOutputIfElse />
      <ConditionalOutputInline />
      <NullUndefined />
      <LegacyFunctions />
      <ArrowFunctions />
      <ImpliedReturn />
      <TemplateLiterals />
      <SimpleArrays />
      <ArrayIndexAndLength />
      <AddingAndRemovingToFromArrays />
      <ForLoops />
      <MapFunction />
      <FindFunction />
      <FindIndex />
      <FilterFunction />
      <IncludesSomeEvery />
      <ReduceFunction />
      <JsonStringify />
      <House />
      <Spreader />
      <Destructing />
      <FunctionDestructing />
      <DestructingImports />
      <OptionalChaining />
      <Classes />
      <Styles />
      <ClientComponentDemo />
      <ServerComponentDemo />
    </div>
  );
}
A useful mental box: server components fetch and format data; client components handle hooks, clicks, and anything that reads the address bar.
On your Vercel deployment, Lab 3 is prerendered when the site is built, so the render time and the file list show the moment of the build and don't change on refresh. In npm run dev the page renders on every request, so the time updates there.
The try/catch around readdirSync is how JavaScript handles a call that might throw. If the folder is missing, the catch logs the error and leaves files as an empty array instead of crashing the page. Use this pattern whenever Node I/O — and later, a network call — can fail.
3.7.3 Suspense
<Suspense>, imported from react, is a component that wraps part of a page. Until that part is ready to show, React displays the fallback you give it instead, such as a short "Loading..." message. The rest of the page outside the boundary shows right away.
<Suspense fallback={<p>Loading...</p>}>
  <SomeComponent />
</Suspense>
You need it when a component reads the URL with useSearchParams, which you use in §3.7.4. When you run next build, Next.js pre-renders the page ahead of time, with no visitor and so no URL. The part that reads the URL cannot render yet, so it renders later in the browser, once the URL is known. Wrapping that part in <Suspense> tells Next.js where that part starts, and the fallback shows in the meantime. Without it, next build fails.
3.7.4 More Client-Only APIs
§3.7.1 used one client-only hook. The browser offers many more features that exist only on the user's machine. An API (application programming interface) is a set of functions and objects a program can call; a client-only API is one that exists only in the browser, so only a Client Component can call it. In this section you build six small Client Components, one concept each, in a new folder app/labs/lab3/client-apis. They all go on their own page, /labs/lab3/client-apis, so the main Lab 3 page stays as it is. Add them one at a time and check each demo before moving on.
Step 1: usePathname
A pathname is the part of the URL after the host and before any ?, for example /labs/lab3/client-apis. A hook is a React function whose name starts with use and that may only be called at the top of a component. usePathname() from next/navigation returns the current pathname. This version also splits it into segments, the pieces between the slashes:
"use client";

import { usePathname } from "next/navigation";

export default function PathnameDemo() {
  const pathname = usePathname();
  const segments = pathname.split("/").filter((segment) => segment !== "");
  return (
    <div id="wd-pathname-demo">
      <h3>usePathname</h3>
      <p>Pathname: {pathname}</p>
      <p>Segments: {JSON.stringify(segments)}</p>
    </div>
  );
}usePathname
Pathname: /book/ch3
Segments: ["book","ch3"]
In this book the pathname is the book route; on your page it is /labs/lab3/client-apis and the segments are ["labs","lab3","client-apis"].
Render it from a new page at app/labs/lab3/client-apis/page.tsx and open http://localhost:3000/labs/lab3/client-apis:
import PathnameDemo from "./PathnameDemo";

export default function ClientApis() {
  return (
    <div id="wd-client-apis">
      <h2>Client-Only APIs</h2>
      <PathnameDemo />
    </div>
  );
}
Step 2: useSearchParams
The query string is the part of a URL after ?, made of name=value pairs joined by &, as in ?name=Alice. Each pair is a search parameter. The useSearchParams() hook returns an object whose get("name") method reads one parameter, or null if it is missing; the ?? operator (§3.4.17) supplies a default:
"use client";

import { useSearchParams } from "next/navigation";

export default function SearchParamsDemo() {
  const searchParams = useSearchParams();
  const name = searchParams.get("name") ?? "stranger";
  return (
    <div id="wd-search-params-demo">
      <h3>useSearchParams</h3>
      <p>Hello, {name}!</p>
      <p>Query string: {searchParams.toString() || "(empty)"}</p>
      <a href="?name=Alice">Say hi to Alice</a>
    </div>
  );
}Loading query string...
Click the link and the greeting changes without a server round trip. Prerendering means Next.js builds a page's HTML ahead of time, at next build; at that moment there is no visitor and therefore no query string. So Next.js requires any component that calls useSearchParams on a prerendered page to sit inside a <Suspense> boundary. Suspense, imported from react, renders its fallback in the prerendered HTML and swaps in the real component once the browser knows the URL. Without it, next build fails with a "Missing Suspense boundary with useSearchParams" error.
Add SearchParamsDemo to the page, inside its own Suspense boundary:
import { Suspense } from "react";
import PathnameDemo from "./PathnameDemo";
import SearchParamsDemo from "./SearchParamsDemo";

export default function ClientApis() {
  return (
    <div id="wd-client-apis">
      <h2>Client-Only APIs</h2>
      <PathnameDemo />
      <Suspense fallback={<p>Loading query string...</p>}>
        <SearchParamsDemo />
      </Suspense>
    </div>
  );
}
Step 3: The window object
In the browser, the global window object represents the open tab. window.location describes the current URL: its protocol (http: or https:), its host (domain plus port), and its port (empty when the protocol's default port is used). window.innerWidth and innerHeight give the visible size in pixels. window does not exist on the server, and the first HTML is rendered on the server, so reading it during render would crash there or produce HTML that differs from the browser's. React calls that mismatch a hydration error: hydration is React attaching to the server's HTML in the browser, and it expects both renders to match. The fix is useEffect. useState holds a value that triggers a re-render when it changes; useEffect(fn, []) runs fn once, only in the browser, after the first render. Inside it, addEventListener("resize", update) registers a listener, a function the browser calls every time the window is resized, and requestAnimationFrame(update) asks the browser to call update once before its next repaint, which fills in the first values. The function returned from the effect is the cleanup, which removes the listener when the component goes away:
"use client";

import { useEffect, useState } from "react";

type WindowInfo = {
  protocol: string;
  host: string;
  port: string;
  width: number;
  height: number;
};

export default function WindowDemo() {
  const [info, setInfo] = useState<WindowInfo | null>(null);
  useEffect(() => {
    const update = () =>
      setInfo({
        protocol: window.location.protocol,
        host: window.location.host,
        port: window.location.port || "(default)",
        width: window.innerWidth,
        height: window.innerHeight,
      });
    const first = requestAnimationFrame(update);
    window.addEventListener("resize", update);
    return () => {
      cancelAnimationFrame(first);
      window.removeEventListener("resize", update);
    };
  }, []);
  return (
    <div id="wd-window-demo">
      <h3>The window object</h3>
      {info ? (
        <ul>
          <li>Protocol: {info.protocol}</li>
          <li>Host: {info.host}</li>
          <li>Port: {info.port}</li>
          <li>
            Window size: {info.width} x {info.height}
          </li>
        </ul>
      ) : (
        <p>Loading window info...</p>
      )}
    </div>
  );
}The window object
Loading window info...
Resize the browser window and watch the size update. The first render on both server and browser shows "Loading window info...", so the HTML matches and there is no hydration error.
Add WindowDemo to the page:
import { Suspense } from "react";
import PathnameDemo from "./PathnameDemo";
import SearchParamsDemo from "./SearchParamsDemo";
import WindowDemo from "./WindowDemo";

export default function ClientApis() {
  return (
    <div id="wd-client-apis">
      <h2>Client-Only APIs</h2>
      <PathnameDemo />
      <Suspense fallback={<p>Loading query string...</p>}>
        <SearchParamsDemo />
      </Suspense>
      <WindowDemo />
    </div>
  );
}
Step 4: navigator.geolocation
window.navigator (usually written just navigator) describes the browser itself. navigator.geolocation is the Geolocation API, which asks the device for its latitude and longitude. Because location is private, the browser first shows a permission prompt and the user may refuse. getCurrentPosition(success, failure, options) takes two callbacks (functions to call later): the first receives the position, the second receives an error whose code equals PERMISSION_DENIED when the user says no. The component first checks that the API exists at all, and calls it only from a button click so the prompt never appears unasked. On success it also writes the coordinates into the query string with window.history.replaceState, which changes the URL without reloading the page or adding a Back-button entry; Next.js keeps useSearchParams in sync with it:
"use client";

import { useState } from "react";

type Coords = { lat: number; lon: number };

export default function GeolocationDemo() {
  const [coords, setCoords] = useState<Coords | null>(null);
  const [status, setStatus] = useState("Click the button to share your location.");
  const locate = () => {
    if (!("geolocation" in navigator)) {
      setStatus("Geolocation is not available in this browser.");
      return;
    }
    setStatus("Waiting for permission...");
    navigator.geolocation.getCurrentPosition(
      (position) => {
        const next = {
          lat: Number(position.coords.latitude.toFixed(4)),
          lon: Number(position.coords.longitude.toFixed(4)),
        };
        setCoords(next);
        setStatus("Location found.");
        window.history.replaceState(null, "", `?lat=${next.lat}&lon=${next.lon}`);
      },
      (error) => {
        setCoords(null);
        setStatus(
          error.code === error.PERMISSION_DENIED
            ? "Permission denied. That's fine; the demo still works without it."
            : `Could not get your location: ${error.message}`,
        );
      },
      { timeout: 10000 },
    );
  };
  return (
    <div id="wd-geolocation-demo">
      <h3>navigator.geolocation</h3>
      <button type="button" onClick={locate}>
        Find my location
      </button>
      <p>{status}</p>
      {coords && (
        <p>
          Latitude: {coords.lat}, Longitude: {coords.lon}
        </p>
      )}
    </div>
  );
}navigator.geolocation
Click the button to share your location.
Click the button, then try again after blocking location in the site settings: the message explains what happened instead of failing silently. Coordinates are rounded to four decimals (about 10 meters).
Add GeolocationDemo to the page:
import { Suspense } from "react";
import PathnameDemo from "./PathnameDemo";
import SearchParamsDemo from "./SearchParamsDemo";
import WindowDemo from "./WindowDemo";
import GeolocationDemo from "./GeolocationDemo";

export default function ClientApis() {
  return (
    <div id="wd-client-apis">
      <h2>Client-Only APIs</h2>
      <PathnameDemo />
      <Suspense fallback={<p>Loading query string...</p>}>
        <SearchParamsDemo />
      </Suspense>
      <WindowDemo />
      <GeolocationDemo />
    </div>
  );
}
Step 5: An OpenStreetMap iframe
An <iframe> (inline frame) embeds another web page inside yours. OpenStreetMap is a free, community-made world map, and its embed page needs no account or key. The page takes a bounding box (bbox: west, south, east and north edges in degrees) and a marker. This component reads lat and lon from the query string with useSearchParams from Step 2, which is where Step 4 put them, and falls back to Northeastern University's Boston campus when they are missing or not numbers:
"use client";

import { useSearchParams } from "next/navigation";

const DEFAULT_LAT = 42.3398;
const DEFAULT_LON = -71.0892;

export default function MapEmbed() {
  const searchParams = useSearchParams();
  const lat = Number(searchParams.get("lat") ?? DEFAULT_LAT);
  const lon = Number(searchParams.get("lon") ?? DEFAULT_LON);
  const valid = Number.isFinite(lat) && Number.isFinite(lon);
  const center = valid ? { lat, lon } : { lat: DEFAULT_LAT, lon: DEFAULT_LON };
  const d = 0.01;
  const bbox = [center.lon - d, center.lat - d, center.lon + d, center.lat + d].join(",");
  const src = `https://www.openstreetmap.org/export/embed.html?bbox=${bbox}&layer=mapnik&marker=${center.lat},${center.lon}`;
  return (
    <div id="wd-map-embed">
      <h3>OpenStreetMap iframe</h3>
      <p>
        Showing {center.lat}, {center.lon}
        {searchParams.has("lat") ? "" : " (default location)"}
      </p>
      <iframe title="Map" src={src} width="100%" height="300" style={{ border: 0 }} />
    </div>
  );
}Loading map...
Click Find my location in Step 4 and allow access: the map recenters on you, because both components share the URL.
Add MapEmbed to the page, inside its own Suspense boundary:
import { Suspense } from "react";
import PathnameDemo from "./PathnameDemo";
import SearchParamsDemo from "./SearchParamsDemo";
import WindowDemo from "./WindowDemo";
import GeolocationDemo from "./GeolocationDemo";
import MapEmbed from "./MapEmbed";

export default function ClientApis() {
  return (
    <div id="wd-client-apis">
      <h2>Client-Only APIs</h2>
      <PathnameDemo />
      <Suspense fallback={<p>Loading query string...</p>}>
        <SearchParamsDemo />
      </Suspense>
      <WindowDemo />
      <GeolocationDemo />
      <Suspense fallback={<p>Loading map...</p>}>
        <MapEmbed />
      </Suspense>
    </div>
  );
}
Step 6: The client's public IP address
An IP address is the number that identifies a machine on the internet. Your device's public IP is the address other servers see, usually your router's, and the browser has no API that reports it. The component asks a free, keyless endpoint (a URL that returns data), https://api.ipify.org?format=json, which echoes the caller's IP as JSON. fetch sends the request and returns a promise, a value that arrives later; each .then runs when the previous step finishes, and .catch runs if anything fails, such as no network or an ad blocker, so the page shows a message instead of breaking:
"use client";

import { useEffect, useState } from "react";

export default function ClientIpDemo() {
  const [ip, setIp] = useState<string | null>(null);
  const [error, setError] = useState<string | null>(null);
  useEffect(() => {
    fetch("https://api.ipify.org?format=json")
      .then((response) => {
        if (!response.ok) throw new Error(`HTTP ${response.status}`);
        return response.json();
      })
      .then((data: { ip: string }) => setIp(data.ip))
      .catch((err: Error) => setError(err.message));
  }, []);
  return (
    <div id="wd-client-ip-demo">
      <h3>Public IP address</h3>
      {error ? (
        <p>Could not look up your IP: {error}</p>
      ) : (
        <p>Your public IP: {ip ?? "Looking up..."}</p>
      )}
    </div>
  );
}Public IP address
Your public IP: Looking up...
Keep in mind that every server you contact already sees this address, including your own Next.js server. Asking a third party from the browser shares the visitor's IP with that third party, so when you need it, reading it on the server is often the better choice.
Add ClientIpDemo to the page:
import { Suspense } from "react";
import PathnameDemo from "./PathnameDemo";
import SearchParamsDemo from "./SearchParamsDemo";
import WindowDemo from "./WindowDemo";
import GeolocationDemo from "./GeolocationDemo";
import MapEmbed from "./MapEmbed";
import ClientIpDemo from "./ClientIpDemo";

export default function ClientApis() {
  return (
    <div id="wd-client-apis">
      <h2>Client-Only APIs</h2>
      <PathnameDemo />
      <Suspense fallback={<p>Loading query string...</p>}>
        <SearchParamsDemo />
      </Suspense>
      <WindowDemo />
      <GeolocationDemo />
      <Suspense fallback={<p>Loading map...</p>}>
        <MapEmbed />
      </Suspense>
      <ClientIpDemo />
    </div>
  );
}
3.7.5 More Server-Only APIs
§3.7.2 used process and fs on the server. This section adds seven small Server Components, one concept each, in app/labs/lab3/server-apis, rendered on their own page, /labs/lab3/server-apis. A server-only API is one that exists only in Node.js, so only a Server Component can call it. Add them one at a time. Demos that read the current request or change on every visit can't be prerendered into this book, so their demo shows the reference site's own /labs/lab3/server-apis page in a frame.
Step 1: Server time vs client time
The server and the browser each have their own clock and time zone. The Server Component formats the server's time in UTC (Coordinated Universal Time, the zone-free reference clock). It renders a small Client Component, ClientTime, that reads the browser's clock inside useEffect and, with setInterval, again every second (1000 milliseconds) (§3.7.4 Step 3), so the server's HTML and the browser's first render match. Create ClientTime.tsx first:
"use client";

import { useEffect, useState } from "react";

export default function ClientTime() {
  const [time, setTime] = useState<string | null>(null);
  useEffect(() => {
    const tick = () => setTime(new Date().toLocaleTimeString());
    const first = setTimeout(tick, 0);
    const timer = setInterval(tick, 1000);
    return () => {
      clearTimeout(first);
      clearInterval(timer);
    };
  }, []);
  return <p>Browser time: {time ?? "(waiting for the browser...)"}</p>;
}
Then create ServerTimeDemo.tsx:
import ClientTime from "./ClientTime";

export default function ServerTimeDemo() {
  const serverTime = new Date().toLocaleTimeString("en-US", { timeZone: "UTC" });
  return (
    <div id="wd-server-time-demo">
      <h3>Server time vs client time</h3>
      <p>Server time (UTC): {serverTime}</p>
      <ClientTime />
    </div>
  );
}Server time vs client time
Server time (UTC): 2:00:31 AM
Browser time: (waiting for the browser...)
This book is prerendered, so here the server time is when the site was built and the browser time is now. On a page that renders on every request the two are only milliseconds apart, but may still show different hours if the zones differ.
Render it from a new page at app/labs/lab3/server-apis/page.tsx and open http://localhost:3000/labs/lab3/server-apis:
import ServerTimeDemo from "./ServerTimeDemo";

export default function ServerApis() {
  return (
    <div id="wd-server-apis">
      <h2>Server-Only APIs</h2>
      <ServerTimeDemo />
    </div>
  );
}
Step 2: The os module
node:os is the Node.js module (a file of code you can import) that describes the operating system the server runs on: its hostname (the machine's name), platform, uptime() in seconds since boot, cpus() (one entry per processor core) and freemem() in bytes. The browser can't see any of this:
import os from "node:os";

export default function OsDemo() {
  const info = {
    hostname: os.hostname(),
    platform: os.platform(),
    uptimeMinutes: Math.round(os.uptime() / 60),
    cpuCount: os.cpus().length,
    freeMemoryMB: Math.round(os.freemem() / 1024 / 1024),
  };
  return (
    <div id="wd-os-demo">
      <h3>The os module</h3>
      <pre>{JSON.stringify(info, null, 2)}</pre>
    </div>
  );
}The os module
{
  "hostname": "4db862c9-fb8",
  "platform": "linux",
  "uptimeMinutes": 1,
  "cpuCount": 2,
  "freeMemoryMB": 5722
}
On Vercel the hostname belongs to a short-lived cloud machine, not to your laptop.
Add OsDemo to the page:
import ServerTimeDemo from "./ServerTimeDemo";
import OsDemo from "./OsDemo";

export default function ServerApis() {
  return (
    <div id="wd-server-apis">
      <h2>Server-Only APIs</h2>
      <ServerTimeDemo />
      <OsDemo />
    </div>
  );
}
Step 3: process.env
An environment variable is a named setting given to a program from outside its code; in Node.js they are properties of process.env. They are the usual home for secrets such as passwords and keys, because Next.js never sends a server-only variable to the browser: only variables whose names start with NEXT_PUBLIC_ are copied into browser code. This demo uses a harmless variable, LAB3_SERVER_MESSAGE, with a fallback when it isn't set. The Server Component prints it, then renders a Client Component that tries to read the same variable. Never print a real secret like this. Create EnvClientCheck.tsx first:
"use client";

export default function EnvClientCheck() {
  const value = process.env.LAB3_SERVER_MESSAGE;
  return <p>In the browser: {value ?? "undefined"}</p>;
}
Then create EnvDemo.tsx:
import EnvClientCheck from "./EnvClientCheck";

export default function EnvDemo() {
  const message = process.env.LAB3_SERVER_MESSAGE ?? "hello from the server (fallback)";
  return (
    <div id="wd-env-demo">
      <h3>process.env</h3>
      <p>On the server: {message}</p>
      <EnvClientCheck />
    </div>
  );
}process.env
On the server: hello from the server (fallback)
In the browser: undefined
The server line shows the message; the browser line shows undefined. To set your own value, add LAB3_SERVER_MESSAGE=hi to a file named .env.local in the project root and restart npm run dev.
Add EnvDemo to the page:
import ServerTimeDemo from "./ServerTimeDemo";
import OsDemo from "./OsDemo";
import EnvDemo from "./EnvDemo";

export default function ServerApis() {
  return (
    <div id="wd-server-apis">
      <h2>Server-Only APIs</h2>
      <ServerTimeDemo />
      <OsDemo />
      <EnvDemo />
    </div>
  );
}
Step 4: headers()
Every request a browser sends carries headers, name-value lines describing the request. user-agent names the browser and operating system. x-forwarded-for is added by proxies (servers that pass requests along, like Vercel's edge network) and lists the client's IP first. headers() from next/headers reads them. It returns a promise, so the component is an async function and uses await, which pauses until the promise's value is ready. Server Components may be async; Client Components may not:
import { headers } from "next/headers";

export default async function RequestHeadersDemo() {
  const requestHeaders = await headers();
  const userAgent = requestHeaders.get("user-agent") ?? "(none)";
  const forwardedFor = requestHeaders.get("x-forwarded-for");
  const ip = forwardedFor?.split(",")[0].trim() ?? "(unknown, e.g. on localhost)";
  return (
    <div id="wd-request-headers-demo">
      <h3>headers()</h3>
      <p>User agent: {userAgent}</p>
      <p>Your IP as the server sees it: {ip}</p>
    </div>
  );
}Compare the IP with Step 6 of §3.7.4: the server sees the same address without asking anyone else. On npm run dev there is no proxy, so the IP is unknown. Because headers() depends on the request, Next.js renders this page dynamically, on every request, instead of prerendering it at build time.
Add RequestHeadersDemo to the page:
import ServerTimeDemo from "./ServerTimeDemo";
import OsDemo from "./OsDemo";
import EnvDemo from "./EnvDemo";
import RequestHeadersDemo from "./RequestHeadersDemo";

export default function ServerApis() {
  return (
    <div id="wd-server-apis">
      <h2>Server-Only APIs</h2>
      <ServerTimeDemo />
      <OsDemo />
      <EnvDemo />
      <RequestHeadersDemo />
    </div>
  );
}
Step 5: Fetching data on the server
A Server Component can call other servers with fetch before any HTML is sent. Open-Meteo is a free weather service that needs no key; this request asks for the current temperature and wind in Boston. The try/catch from §3.7.2 turns a network failure into a message. The next: { revalidate: 1800 } option lets Next.js cache (keep and reuse) the answer for 1800 seconds, 30 minutes, so repeated visits don't call Open-Meteo every time:
const WEATHER_URL =
"https://api.open-meteo.com/v1/forecast?latitude=42.34&longitude=-71.09" +
"¤t=temperature_2m,wind_speed_10m&temperature_unit=fahrenheit&wind_speed_unit=mph";
type Weather = { current: { time: string; temperature_2m: number; wind_speed_10m: number } };
export default async function WeatherDemo() {
let weather: Weather | null = null;
let error: string | null = null;
try {
const response = await fetch(WEATHER_URL, { next: { revalidate: 1800 } });
if (!response.ok) throw new Error(`HTTP ${response.status}`);
weather = await response.json();
} catch (err) {
error = err instanceof Error ? err.message : "unknown error";
}
return (
<div id="wd-weather-demo">
<h3>Weather in Boston (Open-Meteo)</h3>
{weather ? (
<ul>
<li>Temperature: {weather.current.temperature_2m} °F</li>
<li>Wind: {weather.current.wind_speed_10m} mph</li>
<li>Measured at (UTC): {weather.current.time}</li>
</ul>
) : (
<p>Weather is unavailable right now: {error}</p>
)}
</div>
);
}The browser never contacts Open-Meteo; it only receives the finished HTML.
Add WeatherDemo to the page:
import ServerTimeDemo from "./ServerTimeDemo";
import OsDemo from "./OsDemo";
import EnvDemo from "./EnvDemo";
import RequestHeadersDemo from "./RequestHeadersDemo";
import WeatherDemo from "./WeatherDemo";

export default function ServerApis() {
  return (
    <div id="wd-server-apis">
      <h2>Server-Only APIs</h2>
      <ServerTimeDemo />
      <OsDemo />
      <EnvDemo />
      <RequestHeadersDemo />
      <WeatherDemo />
    </div>
  );
}
Step 6: Reading and writing a file
node:fs/promises is the promise version of fs: readFile and writeFile return promises you await. The counter lives in a text file under os.tmpdir(), the operating system's folder for temporary files, and path.join builds the full file name. A missing file throws, so catch starts the count at 0. await connection() from next/server tells Next.js this component must run on every request, so the page is dynamic and never prerendered:
import fs from "node:fs/promises";
import os from "node:os";
import path from "node:path";
import { connection } from "next/server";

const COUNTER_FILE = path.join(os.tmpdir(), "lab3-visits.txt");

export default async function VisitCounterDemo() {
  await connection();
  let visits = 0;
  try {
    visits = Number(await fs.readFile(COUNTER_FILE, "utf8")) || 0;
  } catch {
    visits = 0;
  }
  visits += 1;
  try {
    await fs.writeFile(COUNTER_FILE, String(visits));
  } catch (error) {
    console.error("Could not save the visit count:", error);
  }
  return (
    <div id="wd-visit-counter-demo">
      <h3>Visit counter</h3>
      <p>This page has been rendered {visits} times.</p>
      <p>Counter file: {COUNTER_FILE}</p>
    </div>
  );
}Run it with npm run dev and refresh: the count keeps rising, even across restarts, because the file stays on your disk. On serverless hosting such as Vercel your code runs on short-lived machines where only /tmp is writable, and that folder is temporary and not shared between machines, so the count resets often and can jump around. A file is fine for a demo, not for data you need to keep.
Add VisitCounterDemo to the page:
import ServerTimeDemo from "./ServerTimeDemo";
import OsDemo from "./OsDemo";
import EnvDemo from "./EnvDemo";
import RequestHeadersDemo from "./RequestHeadersDemo";
import WeatherDemo from "./WeatherDemo";
import VisitCounterDemo from "./VisitCounterDemo";

export default function ServerApis() {
  return (
    <div id="wd-server-apis">
      <h2>Server-Only APIs</h2>
      <ServerTimeDemo />
      <OsDemo />
      <EnvDemo />
      <RequestHeadersDemo />
      <WeatherDemo />
      <VisitCounterDemo />
    </div>
  );
}
Step 7: child_process
node:child_process starts another program on the server, called a child process. execFile(program, args) runs one program with a fixed list of arguments and collects what it prints; promisify from node:util wraps it so it returns a promise. This demo only ever runs node --version. Never build the program name or its arguments from user input such as a query string or form field: anyone could then run commands on your server. Fixed arguments with execFile keep that door closed:
import { execFile } from "node:child_process";
import { promisify } from "node:util";

const execFileAsync = promisify(execFile);

export default async function ChildProcessDemo() {
  let output: string;
  try {
    const { stdout } = await execFileAsync("node", ["--version"]);
    output = stdout.trim();
  } catch (error) {
    output = `Could not run node: ${error instanceof Error ? error.message : "unknown error"}`;
  }
  return (
    <div id="wd-child-process-demo">
      <h3>child_process</h3>
      <p>Output of node --version: {output}</p>
    </div>
  );
}child_process
Output of node --version: v26.13.0
If the host has no node program on its path, the catch shows the error instead of crashing the page.
Add ChildProcessDemo to the page:
import ServerTimeDemo from "./ServerTimeDemo";
import OsDemo from "./OsDemo";
import EnvDemo from "./EnvDemo";
import RequestHeadersDemo from "./RequestHeadersDemo";
import WeatherDemo from "./WeatherDemo";
import VisitCounterDemo from "./VisitCounterDemo";
import ChildProcessDemo from "./ChildProcessDemo";

export default function ServerApis() {
  return (
    <div id="wd-server-apis">
      <h2>Server-Only APIs</h2>
      <ServerTimeDemo />
      <OsDemo />
      <EnvDemo />
      <RequestHeadersDemo />
      <WeatherDemo />
      <VisitCounterDemo />
      <ChildProcessDemo />
    </div>
  );
}
3.8 Parameterizing Components
SlidesReact components can be parameterized by using the familiar HTML attribute syntax, which passes attribute values to the component's function as an object map parameter. The following Add component can receive properties a and b deconstructed from the attributes — the same parameter destructuring as §3.4.15. Implement the Add component below and confirm that passing it a={3} and b={4} results in a + b = 7. Note that the values of a and b are destructed from the object parameter in the Add function parameter list. Render <Add a={3} b={4} /> from Lab 3:
export default function Add({ a, b }: { a: number; b: number }) {
  return (
    <div id="wd-add">
      <h4>Add</h4>
      a = {a}
      b = {b} <br />
      a + b = {a + b}
      <hr />
    </div>
  );
}
The braces around 3 and 4 pass numbers, not the strings "3" and "4". The sum is 7:
Add
a = 3b = 4a + b = 7
Import Add into app/labs/lab3/page.tsx and render it with its two props after ServerComponentDemo:
import VariablesAndConstants from "./VariablesAndConstants";
import VariableTypes from "./VariableTypes";
import BooleanVariables from "./BooleanVariables";
import IfElse from "./IfElse";
import TernaryOperator from "./TernaryOperator";
import ConditionalOutputIfElse from "./ConditionalOutputIfElse";
import ConditionalOutputInline from "./ConditionalOutputInline";
import NullUndefined from "./NullUndefined";
import LegacyFunctions from "./LegacyFunctions";
import ArrowFunctions from "./ArrowFunctions";
import ImpliedReturn from "./ImpliedReturn";
import TemplateLiterals from "./TemplateLiterals";
import SimpleArrays from "./SimpleArrays";
import ArrayIndexAndLength from "./ArrayIndexAndLength";
import AddingAndRemovingToFromArrays from "./AddingAndRemovingToFromArrays";
import ForLoops from "./ForLoops";
import MapFunction from "./MapFunction";
import FindFunction from "./FindFunction";
import FindIndex from "./FindIndex";
import FilterFunction from "./FilterFunction";
import IncludesSomeEvery from "./IncludesSomeEvery";
import ReduceFunction from "./ReduceFunction";
import JsonStringify from "./JsonStringify";
import House from "./House";
import Spreader from "./Spreader";
import Destructing from "./Destructing";
import FunctionDestructing from "./FunctionDestructing";
import DestructingImports from "./DestructingImports";
import OptionalChaining from "./OptionalChaining";
import Classes from "./Classes";
import Styles from "./Styles";
import ClientComponentDemo from "./ClientComponentDemo";
import ServerComponentDemo from "./ServerComponentDemo";
import Add from "./Add";

export default function Lab3() {
  console.log("Hello World!");
  return (
    <div id="wd-lab3">
      <h2>Lab 3</h2>
      <VariablesAndConstants />
      <VariableTypes />
      <BooleanVariables />
      <IfElse />
      <TernaryOperator />
      <ConditionalOutputIfElse />
      <ConditionalOutputInline />
      <NullUndefined />
      <LegacyFunctions />
      <ArrowFunctions />
      <ImpliedReturn />
      <TemplateLiterals />
      <SimpleArrays />
      <ArrayIndexAndLength />
      <AddingAndRemovingToFromArrays />
      <ForLoops />
      <MapFunction />
      <FindFunction />
      <FindIndex />
      <FilterFunction />
      <IncludesSomeEvery />
      <ReduceFunction />
      <JsonStringify />
      <House />
      <Spreader />
      <Destructing />
      <FunctionDestructing />
      <DestructingImports />
      <OptionalChaining />
      <Classes />
      <Styles />
      <ClientComponentDemo />
      <ServerComponentDemo />
      <Add a={3} b={4} />
    </div>
  );
}3.8.1 Child Components
In the previous section we discussed passing data to a component through attributes. Another way is composition: nest JSX in the body, between the opening and closing tags, without naming that content as props. In HTML it is common to wrap content with specific tags to add certain formatting. For instance the tags h1 and p format the content in their bodies with specific font sizes and margins — they take the content in the body and return a transformed version. We can implement React components the same way. The content in the body of a React component is passed to the component function as a parameter called children. For instance, the Square component below takes a number in its body and returns the square of the number. Import the new component, use it to compute the square of 4, and confirm it renders the correct result:
import { ReactNode } from "react";

export default function Square({ children }: { children: ReactNode }) {
  const num = Number(children);
  return <span id="wd-square">{num * num}</span>;
}
On the Lab 3 page, render <Square>4</Square> under an <h4>Square of 4</h4> heading, with an <hr /> after it. The child text 4 becomes 16:
Square of 4
16Highlight wraps arbitrary children in a yellow span with red text — formatting, not arithmetic:
import { ReactNode } from "react";

export default function Highlight({ children }: { children: ReactNode }) {
  return (
    <span
      id="wd-highlight"
      style={{ backgroundColor: "yellow", color: "red" }}
    >
      {children}
    </span>
  );
}Import both Square and Highlight into app/labs/lab3/page.tsx. The square of 4 sits under its own <h4> heading, followed by a rule and the highlighted sentence:
import VariablesAndConstants from "./VariablesAndConstants";
import VariableTypes from "./VariableTypes";
import BooleanVariables from "./BooleanVariables";
import IfElse from "./IfElse";
import TernaryOperator from "./TernaryOperator";
import ConditionalOutputIfElse from "./ConditionalOutputIfElse";
import ConditionalOutputInline from "./ConditionalOutputInline";
import NullUndefined from "./NullUndefined";
import LegacyFunctions from "./LegacyFunctions";
import ArrowFunctions from "./ArrowFunctions";
import ImpliedReturn from "./ImpliedReturn";
import TemplateLiterals from "./TemplateLiterals";
import SimpleArrays from "./SimpleArrays";
import ArrayIndexAndLength from "./ArrayIndexAndLength";
import AddingAndRemovingToFromArrays from "./AddingAndRemovingToFromArrays";
import ForLoops from "./ForLoops";
import MapFunction from "./MapFunction";
import FindFunction from "./FindFunction";
import FindIndex from "./FindIndex";
import FilterFunction from "./FilterFunction";
import IncludesSomeEvery from "./IncludesSomeEvery";
import ReduceFunction from "./ReduceFunction";
import JsonStringify from "./JsonStringify";
import House from "./House";
import Spreader from "./Spreader";
import Destructing from "./Destructing";
import FunctionDestructing from "./FunctionDestructing";
import DestructingImports from "./DestructingImports";
import OptionalChaining from "./OptionalChaining";
import Classes from "./Classes";
import Styles from "./Styles";
import ClientComponentDemo from "./ClientComponentDemo";
import ServerComponentDemo from "./ServerComponentDemo";
import Add from "./Add";
import Square from "./Square";
import Highlight from "./Highlight";

export default function Lab3() {
  console.log("Hello World!");
  return (
    <div id="wd-lab3">
      <h2>Lab 3</h2>
      <VariablesAndConstants />
      <VariableTypes />
      <BooleanVariables />
      <IfElse />
      <TernaryOperator />
      <ConditionalOutputIfElse />
      <ConditionalOutputInline />
      <NullUndefined />
      <LegacyFunctions />
      <ArrowFunctions />
      <ImpliedReturn />
      <TemplateLiterals />
      <SimpleArrays />
      <ArrayIndexAndLength />
      <AddingAndRemovingToFromArrays />
      <ForLoops />
      <MapFunction />
      <FindFunction />
      <FindIndex />
      <FilterFunction />
      <IncludesSomeEvery />
      <ReduceFunction />
      <JsonStringify />
      <House />
      <Spreader />
      <Destructing />
      <FunctionDestructing />
      <DestructingImports />
      <OptionalChaining />
      <Classes />
      <Styles />
      <ClientComponentDemo />
      <ServerComponentDemo />
      <Add a={3} b={4} />
      <h4>Square of 4</h4>
      <Square>4</Square>
      <hr />
      <Highlight>
        Lorem ipsum dolor sit amet, consectetur adipisicing elit.
      </Highlight>
    </div>
  );
}3.8.1.1 Composing Styles with Children
Square and Highlight each wrap one small piece of text. This section, which is a reading demo and not part of the graded lab, shows a more useful pattern: components whose only job is to add styling around whatever children they receive. A wrapper component is a component that renders its children inside extra markup, such as a styled div, without needing to know what those children are. You do not need to add these files to your Lab 3 page; read the listings and compare each one with the live demo under it.
All the styling below uses the style attribute from §3.6.2: a JavaScript object whose keys are camel-cased CSS property names. We use these inline style objects instead of CSS classes here on purpose. The values come from props, so they change from one instance to the next, and a fixed class in a stylesheet cannot hold a value that is only known when the component renders. When a style value is a plain number, React adds px for you, so { margin: 12 } becomes margin: 12px.
One configurable Box
Start with a single Box that accepts one prop per CSS property it controls: borderStyle, borderColor, borderWidth, width, height, position, padding, margin, borderRadius, and boxShadow. Two new pieces of syntax appear in its parameter list. A question mark after a property name in the type, as in borderColor?: string, makes that prop optional: the caller may leave it out. A default value, as in borderColor = "black" inside the destructured parameters, is the value the variable takes when the caller leaves the prop out. position chooses how the browser places the box: static (the default) and relative both keep it in the normal flow of the page. boxShadow draws a shadow from an x-offset, a y-offset, a blur distance, and a color. Because each style property has the same name as the variable holding its value, the style object can use the shorthand { borderStyle }, which means { borderStyle: borderStyle }:
import { ReactNode } from "react";

export default function Box({
  children,
  borderStyle = "solid",
  borderColor = "black",
  borderWidth = 1,
  width,
  height,
  position = "static",
  padding = 0,
  margin = 0,
  borderRadius = 0,
  boxShadow = "none",
}: {
  children: ReactNode;
  borderStyle?: string;
  borderColor?: string;
  borderWidth?: number;
  width?: number;
  height?: number;
  position?: "static" | "relative";
  padding?: number;
  margin?: number;
  borderRadius?: number;
  boxShadow?: string;
}) {
  return (
    <div
      style={{
        borderStyle,
        borderColor,
        borderWidth,
        width,
        height,
        position,
        padding,
        margin,
        borderRadius,
        boxShadow,
      }}
    >
      {children}
    </div>
  );
}
The demo renders one Box with only defaults and one with every prop set:
import Box from "./Box";

export default function BoxDemo() {
  return (
    <div id="wd-box-demo">
      <Box>Default box</Box>
      <Box
        borderStyle="dashed"
        borderColor="blue"
        borderWidth={4}
        width={220}
        height={80}
        position="relative"
        padding={16}
        margin={12}
        borderRadius={12}
        boxShadow="4px 4px 8px gray"
      >
        Configured box
      </Box>
    </div>
  );
}One component per box-model layer
One Box with ten props works, but every new property makes its parameter list longer. Another approach is to split it into small single-purpose components, each of which applies just one kind of CSS and then renders its children. Because each one wraps children, they can be placed inside one another, which is called nesting. Following the box model from §2.1.10 from the outside in, we get Margin, Border, Padding, and Content. Each also paints its own layer in the same color DevTools uses for that layer in the box-model diagram in §2.1.10: tan for margin, yellow for border, green for padding, and blue for content. A margin is normally transparent; the tan background is only there so you can see it.
import { ReactNode } from "react";

export default function Margin({
  children,
  margin,
}: {
  children: ReactNode;
  margin: number;
}) {
  return <div style={{ margin, backgroundColor: "#F9CC9D" }}>{children}</div>;
}import { ReactNode } from "react";
export default function Border({
children,
width,
style = "solid",
color = "black",
radius = 0,
}: {
children: ReactNode;
width: number;
style?: string;
color?: string;
radius?: number;
}) {
return (
<div
style={{
borderWidth: width,
borderStyle: style,
borderColor: color,
borderRadius: radius,
backgroundColor: "#FDDD9B",
}}
>
{children}
</div>
);
}import { ReactNode } from "react";
export default function Padding({
children,
padding,
}: {
children: ReactNode;
padding: number;
}) {
return <div style={{ padding, backgroundColor: "#C3D08B" }}>{children}</div>;
}import { ReactNode } from "react";
export default function Content({
children,
width,
height,
}: {
children: ReactNode;
width: number;
height: number;
}) {
return (
<div style={{ width, height, backgroundColor: "#8CB6C0" }}>{children}</div>
);
}Nesting them as <Margin><Border><Padding><Content>Hello</Content></Padding></Border></Margin> rebuilds the DevTools diagram one ring at a time: the outermost component is the outermost ring, and Hello sits in the blue content box in the middle:
import Margin from "./Margin";
import Border from "./Border";
import Padding from "./Padding";
import Content from "./Content";

export default function BoxModelDemo() {
  return (
    <div id="wd-box-model-demo" style={{ backgroundColor: "white" }}>
      <Margin margin={20}>
        <Border width={6} color="black" radius={8}>
          <Padding padding={20}>
            <Content width={120} height={40}>
              Hello
            </Content>
          </Padding>
        </Border>
      </Margin>
    </div>
  );
}We left position out of this set on purpose. position is not a layer of the box model, so it stays a prop of the single Box. The order of nesting matters, because each component styles only the div it renders. Swap Padding and Border and the green padding now sits outside the border, so the border hugs the content directly. This is no longer the order the box model describes for one element; it is two separate elements, each with its own box:
import Margin from "./Margin";
import Border from "./Border";
import Padding from "./Padding";
import Content from "./Content";

export default function NestingOrderDemo() {
  return (
    <div id="wd-nesting-order-demo" style={{ backgroundColor: "white" }}>
      <Margin margin={20}>
        <Padding padding={20}>
          <Border width={6} color="black" radius={8}>
            <Content width={120} height={40}>
              Hello
            </Content>
          </Border>
        </Padding>
      </Margin>
    </div>
  );
}Children can be anything
So far every child has been text or another wrapper. children can be any mix of HTML tags and components. A card is a common page element: a bordered panel with a header strip and a body. Build it from three wrappers:
import { ReactNode } from "react";

export default function Card({ children }: { children: ReactNode }) {
  return (
    <div
      style={{
        width: 260,
        borderStyle: "solid",
        borderWidth: 1,
        borderColor: "lightgray",
        borderRadius: 8,
        boxShadow: "2px 2px 6px lightgray",
        margin: 8,
      }}
    >
      {children}
    </div>
  );
}import { ReactNode } from "react";
export default function CardHeader({ children }: { children: ReactNode }) {
return (
<div
style={{
padding: 8,
fontWeight: "bold",
backgroundColor: "whitesmoke",
borderBottom: "1px solid lightgray",
}}
>
{children}
</div>
);
}import { ReactNode } from "react";
export default function CardBody({ children }: { children: ReactNode }) {
return <div style={{ padding: 8 }}>{children}</div>;
}The body below holds plain tags, the Highlight and Square components from §3.8.1, and a button, all as children of one CardBody:
import Card from "./Card";
import CardHeader from "./CardHeader";
import CardBody from "./CardBody";
import Highlight from "../Highlight";
import Square from "../Square";

export default function CardDemo() {
  return (
    <div id="wd-card-demo">
      <Card>
        <CardHeader>Lab 3 Card</CardHeader>
        <CardBody>
          <p>
            Children can be <b>tags</b>, <Highlight>components</Highlight>,
            or both.
          </p>
          <p>
            The square of 3 is <Square>3</Square>.
          </p>
          <button>Got it</button>
        </CardBody>
      </Card>
    </div>
  );
}Children can be tags, components, or both.
The square of 3 is 9.
3.8.2 Working with the Pathname
SlidesusePathname returns the current URL path from the address bar so a Client Component can adapt to where the user is — which screen, which lab, which section. One common use is highlighting the active item in a nav, and that is what the Labs table of contents does next. Your Chapter 1 app/labs/TOC.tsx is still a Server Component with the links written out by hand: no "use client", no LINKS, and no match. Replace the whole file with the client version below. It maps a LINKS array, and when a link's match function says the pathname belongs to that lab, it gives that link an inline style object (§3.6.2) and aria-current="page". The Labs pages don't load Tailwind, so Tailwind classes would have no visible effect here. If your Chapter 1 TOC has extra links you added yourself, add each one to LINKS with match: () => false:
"use client";

import Link from "next/link";
import { usePathname } from "next/navigation";

const LINKS = [
  { href: "/labs", id: "wd-home-link", label: "Home", match: (p: string) => p === "/labs" },
  { href: "/labs/lab1", id: "wd-lab1-link", label: "Lab 1", match: (p: string) => p.endsWith("/lab1") || p.includes("/lab1/") },
  { href: "/labs/lab2", id: "wd-lab2-link", label: "Lab 2", match: (p: string) => p.includes("/lab2") },
  { href: "/labs/lab3", id: "wd-lab3-link", label: "Lab 3", match: (p: string) => p.includes("/lab3") },
  { href: "/", id: "wd-kambaz-link", label: "Kambaz", match: () => false },
] as const;

const activeStyle = {
  backgroundColor: "#2563eb",
  color: "white",
  borderRadius: "4px",
  padding: "2px 8px",
  textDecoration: "none",
};

export default function TOC() {
  const pathname = usePathname() ?? "";
  return (
    <ul>
      {LINKS.map((link) => {
        const active = link.match(pathname);
        return (
          <li key={link.id}>
            <Link
              href={link.href}
              id={link.id}
              style={active ? activeStyle : undefined}
              aria-current={active ? "page" : undefined}
            >
              {link.label}
            </Link>
          </li>
        );
      })}
    </ul>
  );
}
The file starts with "use client" because usePathname reads the address bar. Each mapped li uses key={link.id}. Visit http://localhost:3000/labs/lab3 and confirm the Lab 3 item is a blue pill with white text while the other links stay plain blue links; Lab 1 and Lab 2 should do the same on their routes. The book's own Labs menu on this site has extra course-site links (book chapters, intermediate steps) that your project doesn't have, so leave those out.
3.8.3 Encoding Path Parameters
Dynamic folders in the App Router — [a] and [b] — capture path segments as parameters. A client page reads them with useParams. Create app/labs/lab3/add/[a]/[b]/page.tsx:
"use client";

import { useParams } from "next/navigation";

export default function AddPathParameters() {
  const { a, b } = useParams();
  return (
    <div id="wd-add-path-parameters">
      <h4>Add Path Parameters</h4>
      {a} + {b} = {parseInt(a as string) + parseInt(b as string)}
    </div>
  );
}
Path values are strings (or string arrays), so parseInt turns them into numbers. Link to that route from a PathParameters component you import into Lab 3:
import Link from "next/link";

export default function PathParameters() {
  return (
    <div id="wd-path-parameters">
      <h2>Path Parameters</h2>
      <Link href="/labs/lab3/add/1/2">1 + 2</Link> <br />
      <Link href="/labs/lab3/add/3/4">3 + 4</Link>
    </div>
  );
}Import PathParameters into app/labs/lab3/page.tsx and render it after the Highlight. The add/[a]/[b]/page.tsx route is a page of its own, so Lab 3 does not import it:
import VariablesAndConstants from "./VariablesAndConstants";
import VariableTypes from "./VariableTypes";
import BooleanVariables from "./BooleanVariables";
import IfElse from "./IfElse";
import TernaryOperator from "./TernaryOperator";
import ConditionalOutputIfElse from "./ConditionalOutputIfElse";
import ConditionalOutputInline from "./ConditionalOutputInline";
import NullUndefined from "./NullUndefined";
import LegacyFunctions from "./LegacyFunctions";
import ArrowFunctions from "./ArrowFunctions";
import ImpliedReturn from "./ImpliedReturn";
import TemplateLiterals from "./TemplateLiterals";
import SimpleArrays from "./SimpleArrays";
import ArrayIndexAndLength from "./ArrayIndexAndLength";
import AddingAndRemovingToFromArrays from "./AddingAndRemovingToFromArrays";
import ForLoops from "./ForLoops";
import MapFunction from "./MapFunction";
import FindFunction from "./FindFunction";
import FindIndex from "./FindIndex";
import FilterFunction from "./FilterFunction";
import IncludesSomeEvery from "./IncludesSomeEvery";
import ReduceFunction from "./ReduceFunction";
import JsonStringify from "./JsonStringify";
import House from "./House";
import Spreader from "./Spreader";
import Destructing from "./Destructing";
import FunctionDestructing from "./FunctionDestructing";
import DestructingImports from "./DestructingImports";
import OptionalChaining from "./OptionalChaining";
import Classes from "./Classes";
import Styles from "./Styles";
import ClientComponentDemo from "./ClientComponentDemo";
import ServerComponentDemo from "./ServerComponentDemo";
import Add from "./Add";
import Square from "./Square";
import Highlight from "./Highlight";
import PathParameters from "./PathParameters";

export default function Lab3() {
  console.log("Hello World!");
  return (
    <div id="wd-lab3">
      <h2>Lab 3</h2>
      <VariablesAndConstants />
      <VariableTypes />
      <BooleanVariables />
      <IfElse />
      <TernaryOperator />
      <ConditionalOutputIfElse />
      <ConditionalOutputInline />
      <NullUndefined />
      <LegacyFunctions />
      <ArrowFunctions />
      <ImpliedReturn />
      <TemplateLiterals />
      <SimpleArrays />
      <ArrayIndexAndLength />
      <AddingAndRemovingToFromArrays />
      <ForLoops />
      <MapFunction />
      <FindFunction />
      <FindIndex />
      <FilterFunction />
      <IncludesSomeEvery />
      <ReduceFunction />
      <JsonStringify />
      <House />
      <Spreader />
      <Destructing />
      <FunctionDestructing />
      <DestructingImports />
      <OptionalChaining />
      <Classes />
      <Styles />
      <ClientComponentDemo />
      <ServerComponentDemo />
      <Add a={3} b={4} />
      <h4>Square of 4</h4>
      <Square>4</Square>
      <hr />
      <Highlight>
        Lorem ipsum dolor sit amet, consectetur adipisicing elit.
      </Highlight>
      <PathParameters />
    </div>
  );
}
Click 1 + 2 and confirm the URL is /labs/lab3/add/1/2 and the page prints 1 + 2 = 3. The second link should print 3 + 4 = 7.
3.8.4 Rendering a Data Structure
Arrays, JSON, map, keys, default parameters, and parameterized components come together as a todo list — still throwaway Lab 3 code, now combining the ideas instead of introducing a new one. In app/labs/lab3/todos, create TodoItem.tsx that receives one todo as a prop. The todo = { … } in the parameter list is a default parameter (§3.4.15): if the parent omits todo, the milk item is used. The Todo type comes from TodoList.tsx, shown below.
import type { Todo } from "./TodoList";

const TodoItem = ({
  todo = { done: true, title: "Buy milk", status: "COMPLETED" },
}: {
  todo?: Todo;
}) => {
  return (
    <li className="flex items-center gap-2 border-b py-1">
      <input type="checkbox" className="me-2" defaultChecked={todo.done} />
      {todo.title} ({todo.status})
    </li>
  );
};

export default TodoItem;
Store the list next to the component as JSON — Next.js lets you import JSON as a value:
[
  { "title": "Buy milk", "status": "CANCELED", "done": true },
  { "title": "Pickup the kids", "status": "IN PROGRESS", "done": false },
  { "title": "Walk the dog", "status": "DEFERRED", "done": false }
]
TodoList maps that array onto TodoItem, using todo.title as the key (§3.4.4) because the titles are unique in this file:
import TodoItem from "./TodoItem";
import todos from "./todos.json";

export type Todo = (typeof todos)[number];

export default function TodoList() {
  return (
    <>
      <h3>Todo List</h3>
      <ul className="list-none p-0">
        {todos.map((todo) => (
          <TodoItem key={todo.title} todo={todo} />
        ))}
      </ul>
      <hr />
    </>
  );
}
Todo is derived from the JSON instead of written by hand. In a type position, typeof todos is the type TypeScript inferred for the imported JSON, an array of objects, and [number] picks one element's type. TodoItem imports it with import type.
Import TodoList into Lab 3. Each row is a checkbox whose default matches todo.done. The Tailwind classes on TodoItem and TodoList do nothing on your Labs pages, which don't load Tailwind, so your list looks like the plain demo below — that is expected:
Todo List
- Buy milk (CANCELED)
- Pickup the kids (IN PROGRESS)
- Walk the dog (DEFERRED)
Import TodoList from its subfolder, ./todos/TodoList, and render it last. TodoItem is rendered inside TodoList, so the page does not import it. This is the finished Lab 3 page — the same file §3.8.5 lists:
import VariablesAndConstants from "./VariablesAndConstants";
import VariableTypes from "./VariableTypes";
import BooleanVariables from "./BooleanVariables";
import IfElse from "./IfElse";
import TernaryOperator from "./TernaryOperator";
import ConditionalOutputIfElse from "./ConditionalOutputIfElse";
import ConditionalOutputInline from "./ConditionalOutputInline";
import NullUndefined from "./NullUndefined";
import LegacyFunctions from "./LegacyFunctions";
import ArrowFunctions from "./ArrowFunctions";
import ImpliedReturn from "./ImpliedReturn";
import TemplateLiterals from "./TemplateLiterals";
import SimpleArrays from "./SimpleArrays";
import ArrayIndexAndLength from "./ArrayIndexAndLength";
import AddingAndRemovingToFromArrays from "./AddingAndRemovingToFromArrays";
import ForLoops from "./ForLoops";
import MapFunction from "./MapFunction";
import FindFunction from "./FindFunction";
import FindIndex from "./FindIndex";
import FilterFunction from "./FilterFunction";
import IncludesSomeEvery from "./IncludesSomeEvery";
import ReduceFunction from "./ReduceFunction";
import JsonStringify from "./JsonStringify";
import House from "./House";
import Spreader from "./Spreader";
import Destructing from "./Destructing";
import FunctionDestructing from "./FunctionDestructing";
import DestructingImports from "./DestructingImports";
import OptionalChaining from "./OptionalChaining";
import Classes from "./Classes";
import Styles from "./Styles";
import ClientComponentDemo from "./ClientComponentDemo";
import ServerComponentDemo from "./ServerComponentDemo";
import Add from "./Add";
import Square from "./Square";
import Highlight from "./Highlight";
import PathParameters from "./PathParameters";
import TodoList from "./todos/TodoList";

export default function Lab3() {
  console.log("Hello World!");
  return (
    <div id="wd-lab3">
      <h2>Lab 3</h2>
      <VariablesAndConstants />
      <VariableTypes />
      <BooleanVariables />
      <IfElse />
      <TernaryOperator />
      <ConditionalOutputIfElse />
      <ConditionalOutputInline />
      <NullUndefined />
      <LegacyFunctions />
      <ArrowFunctions />
      <ImpliedReturn />
      <TemplateLiterals />
      <SimpleArrays />
      <ArrayIndexAndLength />
      <AddingAndRemovingToFromArrays />
      <ForLoops />
      <MapFunction />
      <FindFunction />
      <FindIndex />
      <FilterFunction />
      <IncludesSomeEvery />
      <ReduceFunction />
      <JsonStringify />
      <House />
      <Spreader />
      <Destructing />
      <FunctionDestructing />
      <DestructingImports />
      <OptionalChaining />
      <Classes />
      <Styles />
      <ClientComponentDemo />
      <ServerComponentDemo />
      <Add a={3} b={4} />
      <h4>Square of 4</h4>
      <Square>4</Square>
      <hr />
      <Highlight>
        Lorem ipsum dolor sit amet, consectetur adipisicing elit.
      </Highlight>
      <PathParameters />
      <TodoList />
    </div>
  );
}3.8.5 Exercises
Use this checklist to confirm Lab 3 covers every JavaScript topic in §3.2–§3.8. Import each component into app/labs/lab3/page.tsx in order. Each topic is listed once, with Lab, On your own, and With AI nested as a/b/c. Each item says what your deployed /labs/lab3 page must show. Give every mapped JSX sibling a key, and keep the wd-* ids from the listings — the ids help us test your work, but a missing id never costs points on its own.
When you are done, the Lab 3 page imports and renders every component in book order, each under its own heading. Your On your own and With AI additions live inside those components (or right after them on the page, for the extra Add, Square, and Highlight instances):
import VariablesAndConstants from "./VariablesAndConstants";
import VariableTypes from "./VariableTypes";
import BooleanVariables from "./BooleanVariables";
import IfElse from "./IfElse";
import TernaryOperator from "./TernaryOperator";
import ConditionalOutputIfElse from "./ConditionalOutputIfElse";
import ConditionalOutputInline from "./ConditionalOutputInline";
import NullUndefined from "./NullUndefined";
import LegacyFunctions from "./LegacyFunctions";
import ArrowFunctions from "./ArrowFunctions";
import ImpliedReturn from "./ImpliedReturn";
import TemplateLiterals from "./TemplateLiterals";
import SimpleArrays from "./SimpleArrays";
import ArrayIndexAndLength from "./ArrayIndexAndLength";
import AddingAndRemovingToFromArrays from "./AddingAndRemovingToFromArrays";
import ForLoops from "./ForLoops";
import MapFunction from "./MapFunction";
import FindFunction from "./FindFunction";
import FindIndex from "./FindIndex";
import FilterFunction from "./FilterFunction";
import IncludesSomeEvery from "./IncludesSomeEvery";
import ReduceFunction from "./ReduceFunction";
import JsonStringify from "./JsonStringify";
import House from "./House";
import Spreader from "./Spreader";
import Destructing from "./Destructing";
import FunctionDestructing from "./FunctionDestructing";
import DestructingImports from "./DestructingImports";
import OptionalChaining from "./OptionalChaining";
import Classes from "./Classes";
import Styles from "./Styles";
import ClientComponentDemo from "./ClientComponentDemo";
import ServerComponentDemo from "./ServerComponentDemo";
import Add from "./Add";
import Square from "./Square";
import Highlight from "./Highlight";
import PathParameters from "./PathParameters";
import TodoList from "./todos/TodoList";

export default function Lab3() {
  console.log("Hello World!");
  return (
    <div id="wd-lab3">
      <h2>Lab 3</h2>
      <VariablesAndConstants />
      <VariableTypes />
      <BooleanVariables />
      <IfElse />
      <TernaryOperator />
      <ConditionalOutputIfElse />
      <ConditionalOutputInline />
      <NullUndefined />
      <LegacyFunctions />
      <ArrowFunctions />
      <ImpliedReturn />
      <TemplateLiterals />
      <SimpleArrays />
      <ArrayIndexAndLength />
      <AddingAndRemovingToFromArrays />
      <ForLoops />
      <MapFunction />
      <FindFunction />
      <FindIndex />
      <FilterFunction />
      <IncludesSomeEvery />
      <ReduceFunction />
      <JsonStringify />
      <House />
      <Spreader />
      <Destructing />
      <FunctionDestructing />
      <DestructingImports />
      <OptionalChaining />
      <Classes />
      <Styles />
      <ClientComponentDemo />
      <ServerComponentDemo />
      <Add a={3} b={4} />
      <h4>Square of 4</h4>
      <Square>4</Square>
      <hr />
      <Highlight>
        Lorem ipsum dolor sit amet, consectetur adipisicing elit.
      </Highlight>
      <PathParameters />
      <TodoList />
    </div>
  );
}- Variables and conditionals (§3.2)
- Lab component — Create VariablesAndConstants, VariableTypes, BooleanVariables, IfElse, TernaryOperator, ConditionalOutputIfElse, ConditionalOutputInline, and NullUndefined, and render each on /labs/lab3 under its own heading, in book order.
- On your own — On /labs/lab3: one more let and one more const in Variables and Constants; a second string and number with their typeof in Variable Types; one more === comparison in Boolean Variables; a visible third paragraph (not false1) in If Else; a Good morning / Good afternoon ternary on hour; a Guest Inline heading; and nullValue ?? "default" = default in Null vs Undefined.
- With AI — On /labs/lab3: sampleSum, sampleCount and sampleLabel with their typeof, true6, a hidden false1 paragraph, a Premium/Free ternary showing Free, an Admin Inline heading, and the two null == / === undefined lines — next to your own additions, not replacing them.
- Functions (§3.3)
- Lab component — Create LegacyFunctions, ArrowFunctions, ImpliedReturn, and TemplateLiterals, and render each on /labs/lab3 under its own heading.
- On your own — On /labs/lab3: a subtract result under the legacy sum, add(2, 4) = 6 in Arrow Functions, square(9) = 81 in Implied Return, and a template string that includes your name and a ternary in Template Literals.
- With AI — On /labs/lab3: multiply(3, 7) = 21 (also logged to the console), multiply(3, 4) = 12, divide(20, 4) = 5, and the RS101 published: Yes string — next to your own additions.
- Arrays (§3.4.1–§3.4.9)
- Lab component — Create the array samples from SimpleArrays through ReduceFunction, and render each on /labs/lab3 under its own heading.
- On your own — On /labs/lab3: a third item in the SimpleArrays list, indexOf(9) = -1, one more pushed todo, a lowercased array from the loop, a third mapped todo, a missing find, findIndex for 3 = -1, a filter of numbers >= 5, every(n > 4) = false and some(n === 1), and a product reduce.
- With AI — On /labs/lab3: Call the dentist, indexOf1 = 0, Buy stamps, stringLengths, Email the TA with doubles, two = 2, sixIndex = 4, numbersLessThan2, includes(5), and joined — next to your own additions.
- JSON, objects, and destructuring (§3.4.10–§3.4.17)
- Lab component — Create JsonStringify, House, Spreader, Destructing, FunctionDestructing, Math.ts, DestructingImports, and OptionalChaining and render them on /labs/lab3: the House section pretty-prints an object with a nested object and an array inside a <pre> (JSON.stringify(house, null, 2)), and Destructing Imports is a table with at least 4 rows of 3 cells (Math, Matematica, named functions).
- On your own — On /labs/lab3: a stringified object of your own, yearBuilt and the owners (Alice, Bob) under House, obj4 stringified, a fourth array item or third property destructured, multiply and greet() with the default name, a fifth Destructing Imports row for add(10, 20) = 30, and house.garage?.cars ?? 0 = 0 — and npm run build still succeeds.
- With AI — On /labs/lab3: sampleCourse, house.garage.cars, arr3, city = Boston, the divide quotient, a sixth Destructing Imports row for remainder(10, 3) = 1, and the zip line reading unknown — next to your own additions.
- Classes and styles (§3.6)
- Lab component — Create Classes.css, Classes.tsx, and Styles.tsx and render both on /labs/lab3: at least 4 boxes colored by classes defined in Classes.css (not inline styles), and at least 3 boxes colored with inline style={{ backgroundColor: … }} objects.
- On your own — Classes shows a sixth box whose class comes from a ternary on a const of yours; Styles shows a fourth box, Green background, using a bgGreen object that spreads colorBlack and padding10px.
- With AI — Classes also shows Dynamic Green background (seven boxes); Styles also shows Gray background (five boxes).
- Client and server components (§3.7)
- Lab component — On /labs/lab3: a Client Component ("use client") that prints the current pathname (/labs/lab3), and a Server Component that prints the server information and a list of at least 3 file names read from app/labs/lab3 with fs.
- On your own — The Client Component also shows Pathname length: 10 on /labs/lab3; the Server Information block also shows arch.
- With AI — The Client Component also shows Last segment: lab3; the Server Information block also shows pid.
- Add, Square, and Highlight (§3.8–§3.8.1)
- Lab component — Create Add.tsx, Square.tsx, and Highlight.tsx. /labs/lab3 shows a + b = 7 for <Add a={3} b={4} />, 16 for <Square>4</Square>, and a sentence wrapped in Highlight (yellow background, red text).
- On your own — /labs/lab3 also shows a + b = 30 for <Add a={10} b={20} />, 81 for <Square>9</Square>, and a Highlight around a sentence you wrote.
- With AI — /labs/lab3 also shows a + b = 15, Square of 5 = 25, and Children can be any JSX highlighted.
- Labs TOC highlight (§3.8.2)
- Lab component — Replace app/labs/TOC.tsx with the client version that maps LINKS and uses usePathname. On each Lab page the TOC (from app/labs/layout.tsx) links Home, Lab 1, Lab 2, Lab 3, and Kambaz, and only the current lab's link is marked as active (the blue pill style and aria-current).
- On your own — The marking moves with you: on /labs/lab1 only Lab 1 is the pill, and on /labs/lab3 only Lab 3 is.
- With AI — The TOC also has a Book Ch3 link to https://kambaz.dev/book/ch3 that is never highlighted.
- Path parameters (§3.8.3)
- Lab component — Create app/labs/lab3/add/[a]/[b]/page.tsx and PathParameters.tsx. /labs/lab3 links to at least two /labs/lab3/add/<a>/<b> URLs, and visiting /labs/lab3/add/<a>/<b> shows a + b for any two numbers (for example /labs/lab3/add/12/30 shows 42).
- On your own — Path Parameters shows a third link with two numbers of your choice, and its page prints their sum.
- With AI — Path Parameters also links 5 + 6, and its page prints 5 + 6 = 11.
- Todo list (§3.8.4)
- Lab component — Create todos/TodoItem.tsx, todos/todos.json, and todos/TodoList.tsx (map with key={todo.title}). /labs/lab3 shows a list of at least 3 todo checkboxes from todos.json, with at least one checked and one unchecked.
- On your own — The Todo List shows a fourth row from a todo you added to todos.json, and TodoList logs the todos array to the console.
- With AI — The Todo List also shows Email the TA (COMPLETED), checked.
3.9 Check Your Understanding
Pause and test the JavaScript topics from this chapter. The practice quiz draws 10 items — var/let/const, ===, ternaries, arrows, map/filter/find, spread, destructuring, JSON, client vs server, "use client", list keys, reduce, and ?.. It is a self-check, not part of your course grade. Misses link back to the subsection you should reread; each new attempt draws a different 10.
3.10 Implementing a Data Driven Kambaz Application
SlidesChapter 1 and Chapter 2 built Kambaz screens whose markup never changed. The labs you just finished were practice — throwaway snippets that nail one idea. Kambaz is the application you keep building across the course. Wire those screens to JSON so the UI follows the data: different courses on the dashboard, and different modules, assignments, and people once the URL encodes a course id. A single coverage checklist is in §3.10.10 — use it after you have walked through the screens, not instead of wiring data as you read.
Keep your Chapter 2 styling. The listings below show the data wiring on the book's reference markup. If your Chapter 2 screen has more fields, icons, or classes than a listing, keep your version and change only the lines that read params, usePathname, or db — the hardcoded titles, names, and ids become lookups. Keep the wd-* ids from the listings too: the ids help us test your work, but a missing id never costs points on its own. The checks look at what each screen shows.
Data you need. §3.10.2 gives you the reference JSON files, the same data the demos in this section use. You can change names and add rows, but keep at least three courses, and at least two courses that each have modules, assignments, and enrolled users, so the screens visibly change from one course to the next.
Confirm the Kambaz landing route still redirects to Sign in:
import { redirect } from "next/navigation";

export default function Kambaz() {
  redirect("/account/signin");
}
3.10.1 Data Driven Kambaz Navigation
The sidebar in §2.4.1 listed each link by hand. Replace that repetition with an array of labels, paths, and icons, then map it — the same pattern as the Labs TOC in §3.8.2. Account stays a special case (red text on white when active). Courses intentionally points at /dashboard, because you only reach a course from a dashboard card. Only one item is highlighted at a time: Dashboard on /dashboard, and Courses once you are inside a course (/courses/…).
The component is a Client Component: it reads the current path with usePathname, then highlights the active route. Each mapped Link needs key={link.label}:
"use client";

import { AiOutlineDashboard } from "react-icons/ai";
import { IoCalendarOutline } from "react-icons/io5";
import { LiaBookSolid, LiaCogSolid } from "react-icons/lia";
import { FaInbox, FaRegCircleUser } from "react-icons/fa6";
import Link from "next/link";
import { usePathname } from "next/navigation";

const LINKS = [
  { label: "Dashboard", path: "/dashboard", icon: AiOutlineDashboard },
  { label: "Courses", path: "/dashboard", icon: LiaBookSolid },
  { label: "Calendar", path: "/calendar", icon: IoCalendarOutline },
  { label: "Inbox", path: "/inbox", icon: FaInbox },
  { label: "Labs", path: "/labs", icon: LiaCogSolid },
] as const;

export default function KambazNavigation() {
  const pathname = usePathname() ?? "";
  const accountActive = pathname.includes("/account");

  return (
    <nav
      id="wd-kambaz-navigation"
      className="fixed bottom-0 top-0 z-20 hidden w-[120px] bg-black md:block"
    >
      <a
        href="https://www.northeastern.edu/"
        id="wd-neu-link"
        target="_blank"
        rel="noreferrer"
        className="block bg-black py-3 text-center"
      >
        {/* eslint-disable-next-line @next/next/no-img-element */}
        <img
          src="/images/NEU.png"
          width={75}
          height={75}
          alt="Northeastern University"
          className="mx-auto"
        />
      </a>
      <Link
        href="/account"
        id="wd-account-link"
        className={`block py-3 text-center text-sm no-underline ${
          accountActive ? "bg-white text-red-600" : "bg-black text-white"
        }`}
      >
        <FaRegCircleUser
          className={`inline-block text-3xl ${
            accountActive ? "text-red-600" : "text-white"
          }`}
        /> <br />
        Account
      </Link>
      {LINKS.map((link) => {
        const active =
          link.label === "Courses"
            ? pathname.includes("/courses")
            : pathname.includes(link.path);
        const Icon = link.icon;
        return (
          <Link
            key={link.label}
            href={link.path}
            id={`wd-${link.label.toLowerCase()}-link`}
            className={`block py-3 text-center text-sm no-underline ${
              active ? "bg-white text-red-600" : "bg-black text-white"
            }`}
          >
            <Icon className="inline-block text-3xl text-red-500" /> <br />
            {link.label}
          </Link>
        );
      })}
    </nav>
  );
}3.10.2 Implementing a Kambaz Database
The JSON files under database/ are a stand-in for a real database until a later chapter adds a server — not an actual database. The folder is named database because screens will import * as db. Collect the JSON the UI will read under app/(kambaz)/database. Start with courses.json — each course has an _id (the value you will encode in the URL), name, description, and image, plus metadata such as dates and credits. Re-export every file from index.ts so screens can write import * as db from "../database":
import courses from "./courses.json";
export { courses };
That import needs the file itself. Download the reference courses.json (three courses: RS101, RS102, RS103) into app/(kambaz)/database/. It is the same data the demos in this section use. You can also open the link, copy the JSON, and paste it into a new courses.json, or download it from a terminal in your project folder (macOS, Linux, or Git Bash):
curl -o "app/(kambaz)/database/courses.json" https://kambaz.dev/downloads/kambaz-database/courses.jsonThe other four files — modules.json, assignments.json, users.json, and enrollments.json — come from the same folder. Each later section downloads the file it needs and adds one import line to index.ts, so your project builds after every step: modules in §3.10.7, assignments in §3.10.8, and users and enrollments in §3.10.9. Don't import a file before it is in the folder: next build fails with Module not found.
3.10.3 Data Driven Dashboard
SlidesRefactor the dashboard from §2.4.2 so it maps db.courses onto CourseCard. Pass each course to the card as a single course prop and key the card by course._id:
import CourseCard from "./CourseCard";
import * as db from "../database";

export default function Dashboard() {
  const courses = db.courses;
  return (
    <div id="wd-dashboard">
      <h1 id="wd-dashboard-title">Dashboard</h1>
      <hr />
      <h2 id="wd-dashboard-published">Published Courses ({courses.length})</h2>
      <hr />
      <div
        id="wd-dashboard-courses"
        className="grid grid-cols-1 gap-8 sm:grid-cols-2 xl:grid-cols-3 2xl:grid-cols-4"
      >
        {courses.map((course) => (
          <CourseCard key={course._id} course={course} />
        ))}
      </div>
    </div>
  );
}
CourseCard takes one course prop and reads course._id, course.name, course.description, and course.image. The Link encodes course._id in the path so later screens can look the course up:
import Link from "next/link";
import Image from "next/image";

export default function CourseCard({
  course,
}: {
  course: {
    _id: string;
    name: string;
    description: string;
    image: string;
  };
}) {
  return (
    <div className="wd-dashboard-course w-[300px] max-w-full overflow-hidden rounded-lg border border-neutral-200 bg-white shadow-sm">
      <Link
        href={`/courses/${course._id}/home`}
        className="wd-dashboard-course-link block text-neutral-900 no-underline"
      >
        <Image
          src={course.image}
          width={300}
          height={160}
          alt={course.name}
          className="h-40 w-full object-cover"
        />
        <div className="p-4">
          <h5 className="wd-dashboard-course-title m-0 mb-2 truncate text-lg font-semibold whitespace-nowrap">
            {course.name}
          </h5>
          <p className="wd-dashboard-course-description m-0 mb-3 h-[100px] overflow-hidden text-sm text-neutral-600">
            {course.description}
          </p>
          <button
            type="button"
            className="inline-flex items-center justify-center rounded bg-blue-600 px-3 py-1.5 text-sm font-medium text-white"
          >
            Go
          </button>
        </div>
      </Link>
    </div>
  );
}
The published count interpolates courses.length. Clicking a card should land on /courses/RS101/home (or whichever _id you clicked). The target grid looks like Figure 3.10.3:

Dashboard
Published Courses (3)



3.10.4 Data Driven Courses Screen
SlidesThe course layout lives at app/(kambaz)/courses/[cid]/layout.tsx. Next.js provides params for the dynamic [cid] segment — await it, then find the course whose _id matches:
import { ReactNode } from "react";
import { FaAlignJustify } from "react-icons/fa6";
import CourseNavigation from "./Navigation";
import Breadcrumb from "./Breadcrumb";
import { courses } from "../../database";

export default async function CoursesLayout({
  children,
  params,
}: Readonly<{
  children: ReactNode;
  params: Promise<{ cid: string }>;
}>) {
  const { cid } = await params;
  const course = courses.find((c) => c._id === cid);
  return (
    <div id="wd-courses">
      <h2 className="text-2xl font-semibold text-red-600">
        <FaAlignJustify className="me-4 mb-1 inline text-xl" />
        <Breadcrumb course={course} />
      </h2>
      <hr className="my-3" />
      <div className="flex gap-4">
        <div className="hidden w-[140px] shrink-0 md:block">
          <CourseNavigation cid={cid} />
        </div>
        <div className="min-w-0 flex-1">{children}</div>
      </div>
    </div>
  );
}
Pass cid into course navigation so its links stay inside this course. The heading should show the selected course name, as in Figure 3.10.4:
3.10.5 Data Driven Course Navigation (On Your Own)
Map the course sidebar the same way you mapped Kambaz navigation. Start from an array of sections — Home, Modules, Piazza, Zoom, Assignments, Quizzes, Grades, People — and build each href as /courses/${cid}/${segment}. Read the current path with usePathname and highlight the active route. The layout already passes cid as a prop, so this file does not need useParams.
Your Chapter 2 Navigation.tsx writes the links out by hand. Try the array version yourself, then compare it with this one, which keeps the Chapter 2 list-group classes:
"use client";

import Link from "next/link";
import { usePathname } from "next/navigation";
import "../../kambaz.css";

const LINKS = [
  { segment: "home", id: "wd-course-home-link", label: "Home" },
  { segment: "modules", id: "wd-course-modules-link", label: "Modules" },
  { segment: "piazza", id: "wd-course-piazza-link", label: "Piazza" },
  { segment: "zoom", id: "wd-course-zoom-link", label: "Zoom" },
  { segment: "assignments", id: "wd-course-assignments-link", label: "Assignments" },
  { segment: "quizzes", id: "wd-course-quizzes-link", label: "Quizzes" },
  { segment: "grades", id: "wd-course-grades-link", label: "Grades" },
  { segment: "people/table", id: "wd-course-people-link", label: "People" },
] as const;

export default function CourseNavigation({ cid }: { cid: string }) {
  const pathname = usePathname() ?? "";
  const inCourse = pathname.startsWith(`/courses/${cid}`);

  return (
    <div id="wd-courses-navigation" className="wd list-group rounded-none text-lg">
      {LINKS.map(({ segment, id, label }) => {
        const href = `/courses/${cid}/${segment}`;
        const active = inCourse
          ? pathname === href ||
            (segment !== "home" && pathname.startsWith(href))
          : segment === "home";
        return (
          <Link
            key={id}
            href={href}
            id={id}
            className={
              active
                ? "list-group-item active border-0"
                : "list-group-item border-0 text-red-600"
            }
          >
            {label}
          </Link>
        );
      })}
    </div>
  );
}3.10.6 Implementing the Breadcrumb
A breadcrumb shows where you are in a nest of screens. The course name already identifies the course; appending the last path segment identifies the section — Home, Modules, Assignments (Figure 3.10.6a and Figure 3.10.6b):
Breadcrumb is another use of reading the current path (§3.8.2): a Client Component calls usePathname and takes the last segment, not only a nav highlight. The layout passes the course found in §3.10.4:
"use client";
import { usePathname } from "next/navigation";
export default function Breadcrumb({
course,
}: {
course: { name: string } | undefined;
}) {
const pathname = usePathname() ?? "";
const section = pathname.split("/").pop() ?? "";
const label = section.charAt(0).toUpperCase() + section.slice(1);
return (
<span>
{course?.name} > {label}
</span>
);
}Optional chaining on course?.name guards the case where find returns undefined — the same ?. from §3.4.17.
3.10.7 Data Driven Modules
SlidesModules currently ignore which course you opened. Each module in modules.json has a course field that matches a course _id. Filter by the cid from useParams, then map modules and nested lessons — each with a key from _id. The target list looks like Figure 3.10.7:
First give the screen its data. Download modules.json into app/(kambaz)/database/ (nine modules, three per course, each with lessons), or from a terminal:
curl -o "app/(kambaz)/database/modules.json" https://kambaz.dev/downloads/kambaz-database/modules.jsonThen add its import to index.ts:
import courses from "./courses.json";
import modules from "./modules.json";
export { courses, modules };
Now map the modules for the current course. Keep the toolbar and the classes from your Chapter 2 Modules screen — only the hardcoded Module and Lesson elements become a map:
"use client";

import { useParams } from "next/navigation";
import Module from "./Module";
import Lesson from "./Lesson";
import * as db from "../../../database";

export default function Modules() {
  const { cid } = useParams();
  const modules = db.modules.filter((module) => module.course === cid);
  return (
    <div>
      <div className="mb-3 flex flex-wrap items-center gap-2">
        <button
          type="button"
          className="rounded border border-neutral-300 bg-white px-3 py-1.5 text-sm"
        >
          Collapse All
        </button>
        <button
          type="button"
          className="rounded border border-neutral-300 bg-white px-3 py-1.5 text-sm"
        >
          View Progress
        </button>
        <select
          defaultValue="publish-all"
          className="rounded border border-neutral-300 bg-white px-3 py-1.5 text-sm"
        >
          <option value="publish-all">Publish All</option>
          <option value="unpublish-all">Unpublish All</option>
        </select>
        <button
          type="button"
          className="rounded border border-red-600 bg-red-600 px-3 py-1.5 text-sm font-medium text-white"
        >
          + Module
        </button>
      </div>
      <ul id="wd-modules" className="m-0 list-none p-0">
        {modules.map((module) => (
          <Module key={module._id} title={module.name}>
            {module.lessons?.map((lesson) => (
              <Lesson key={lesson._id} title={lesson.name} />
            ))}
          </Module>
        ))}
      </ul>
    </div>
  );
}
This page is a Client Component because it uses useParams. Nested lessons?.map uses optional chaining so a module without lessons does not throw. Open two courses and confirm the module titles change.
3.10.8 Data Driven Assignments (On Your Own)
SlidesRefactor Assignments the same way as Modules: filter db.assignments where assignment.course equals the current cid, then map each row to AssignmentItem with key={assignment._id}. Encode both course id and assignment id in the editor URL. This screen can stay a Server Component and await params instead of useParams. The list should match Figure 3.10.8:
Download assignments.json into app/(kambaz)/database/ (three assignments per course, A101–A303), or from a terminal:
curl -o "app/(kambaz)/database/assignments.json" https://kambaz.dev/downloads/kambaz-database/assignments.jsonAdd its import to index.ts:
import courses from "./courses.json";
import modules from "./modules.json";
import assignments from "./assignments.json";
export { courses, modules, assignments };
Then compare your Assignments screen with this version. Keep your Chapter 2 toolbar and classes; the list is the part that changes:
import { FaPlus, FaSearch } from "react-icons/fa";
import AssignmentItem from "./AssignmentItem";
import * as db from "../../../database";

export default async function Assignments({
  params,
}: {
  params: Promise<{ cid: string }>;
}) {
  const { cid } = await params;
  const assignments = db.assignments.filter(
    (assignment) => assignment.course === cid,
  );
  return (
    <div id="wd-assignments">
      <div className="mb-4 flex flex-wrap items-center justify-between gap-2">
        <div className="relative">
          <FaSearch className="pointer-events-none absolute top-1/2 left-3 -translate-y-1/2 text-neutral-500" />
          <input
            placeholder="Search for Assignments"
            id="wd-search-assignment"
            className="rounded border py-1.5 pr-3 pl-9 text-sm"
          />
        </div>
        <div className="flex gap-2">
          <button
            id="wd-add-assignment-group"
            type="button"
            className="inline-flex items-center gap-1 rounded border px-3 py-1.5 text-sm"
          >
            <FaPlus /> Group
          </button>
          <button
            id="wd-add-assignment"
            type="button"
            className="inline-flex items-center gap-1 rounded bg-red-600 px-3 py-1.5 text-sm font-medium text-white"
          >
            <FaPlus /> Assignment
          </button>
        </div>
      </div>
      <h3
        id="wd-assignments-title"
        className="mb-3 flex items-center justify-between rounded bg-neutral-200 p-3 text-lg"
      >
        <span>ASSIGNMENTS 40% of Total</span>
        <button
          type="button"
          className="inline-flex items-center rounded border bg-white px-2 py-0.5 text-sm"
        >
          <FaPlus />
        </button>
      </h3>
      <ul id="wd-assignment-list" className="m-0 list-none p-0">
        {assignments.map((assignment) => (
          <AssignmentItem
            key={assignment._id}
            cid={cid}
            aid={assignment._id}
            title={assignment.title}
            details={`Multiple Modules | Not available until ${assignment.available} | Due ${assignment.due} | ${assignment.points} pts`}
          />
        ))}
      </ul>
    </div>
  );
}3.10.8.1 Assignment Editor (On Your Own)
The editor at assignments/[aid]/page.tsx should display the assignment you clicked, not a hardcoded A1. Await cid and aid, find the row, and fill the fields with assignment?.title ?? "" and the other properties. Cancel and Save are Links back to that course's assignments list. The form should match Figure 3.10.8.1:
The listing below is the reference wiring on a plain form. Your Chapter 2 editor probably has more fields (Assignment Group, Display Grade as, Submission Type, the Assign card). Keep them and their classes: fill the fields that have data in assignments.json — title, description, points, due, and available — from assignment, and leave the rest as they are. The page sits four folders below app/(kambaz) (courses/[cid]/assignments/[aid]), so the import climbs four levels: ../../../../database.
import Link from "next/link";
import * as db from "../../../../database";

export default async function AssignmentEditor({
  params,
}: {
  params: Promise<{ cid: string; aid: string }>;
}) {
  const { cid, aid } = await params;
  const assignment = db.assignments.find((a) => a._id === aid);
  return (
    <div id="wd-assignments-editor">
      <label htmlFor="wd-name">Assignment Name</label>
      <input id="wd-name" defaultValue={assignment?.title ?? ""} /> <br /><br />
      <textarea
        id="wd-description"
        defaultValue={assignment?.description ?? ""}
        rows={8}
        className="w-full"
      /> <br />
      <table>
        <tbody>
          <tr>
            <td align="right" valign="top">
              <label htmlFor="wd-points">Points</label>
            </td>
            <td>
              <input id="wd-points" defaultValue={assignment?.points ?? 100} />
            </td>
          </tr>
          <tr>
            <td align="right" valign="top">
              <label htmlFor="wd-due-date">Due</label>
            </td>
            <td>
              <input
                type="date"
                id="wd-due-date"
                defaultValue={assignment?.due}
              />
            </td>
          </tr>
          <tr>
            <td align="right" valign="top">
              <label htmlFor="wd-available-from">Available from</label>
            </td>
            <td>
              <input
                type="date"
                id="wd-available-from"
                defaultValue={assignment?.available}
              />
            </td>
          </tr>
        </tbody>
      </table>
      <br />
      <Link href={`/courses/${cid}/assignments`} id="wd-cancel">
        Cancel
      </Link>{" "}
      <Link href={`/courses/${cid}/assignments`} id="wd-save">
        Save
      </Link>
    </div>
  );
}3.10.9 Data Driven People Screen
People currently lists the same hardcoded rows for every course.users.json holds the people; enrollments.json ties a user id to a course id. Filter users with enrollments.some — the same some from §3.4.8 — then map the enrolled users with key={user._id}.
Download the last two files, users.json and enrollments.json, into app/(kambaz)/database/, or from a terminal:
curl -o "app/(kambaz)/database/users.json" https://kambaz.dev/downloads/kambaz-database/users.json
curl -o "app/(kambaz)/database/enrollments.json" https://kambaz.dev/downloads/kambaz-database/enrollments.json
index.ts now re-exports all five files:
import courses from "./courses.json";
import modules from "./modules.json";
import assignments from "./assignments.json";
import users from "./users.json";
import enrollments from "./enrollments.json";
export { courses, modules, assignments, users, enrollments };
Then the People table reads both:
import { FaUserCircle } from "react-icons/fa";
import * as db from "../../../../database";

export default async function PeopleTable({
  params,
}: {
  params: Promise<{ cid: string }>;
}) {
  const { cid } = await params;
  const { users, enrollments } = db;
  const enrolled = users.filter((usr) =>
    enrollments.some(
      (enrollment) => enrollment.user === usr._id && enrollment.course === cid,
    ),
  );
  return (
    <div id="wd-people-table" className="overflow-x-auto">
      <table className="w-full border-collapse text-left text-sm">
        <thead>
          <tr className="border-b border-neutral-300">
            <th className="p-2">Name</th>
            <th className="p-2">Login ID</th>
            <th className="p-2">Section</th>
            <th className="p-2">Role</th>
            <th className="p-2">Last Activity</th>
            <th className="p-2">Total Activity</th>
          </tr>
        </thead>
        <tbody>
          {enrolled.map((user) => (
            <tr key={user._id} className="odd:bg-neutral-50">
              <td className="wd-full-name p-2 text-nowrap">
                <FaUserCircle className="me-2 inline align-middle text-3xl text-neutral-500" />
                <span className="wd-first-name">{user.firstName}</span>{" "}
                <span className="wd-last-name">{user.lastName}</span>
              </td>
              <td className="wd-login-id p-2">{user.loginId}</td>
              <td className="wd-section p-2">{user.section}</td>
              <td className="wd-role p-2">{user.role}</td>
              <td className="wd-last-activity p-2">{user.lastActivity}</td>
              <td className="wd-total-activity p-2">{user.totalActivity}</td>
            </tr>
          ))}
        </tbody>
      </table>
    </div>
  );
}
Open People for RS101 versus RS102 and confirm the names change with enrollment. Visit http://localhost:3000/dashboard to start from the data-driven dashboard, or jump to a course Home such as /courses/RS101/home.
3.10.10 Exercises
Use this checklist to confirm the data-driven Kambaz prototype covers every screen in §3.10. Each item points back to the section where you wired the worked example. Build in order as you read — this list is for checking coverage, not a substitute for the walkthroughs. Course Navigation, Assignments, and the Assignment Editor are marked On your own: try them from the description first, then compare with the listing. Each item says what your deployed screen must show — the element, how many, and what it contains. Keep the wd-* ids from the listings; the ids help us test your work, but a missing id never costs points on its own. Each screen is listed once, with Lab, On your own, and With AI nested as a/b/c.
- Kambaz Navigation from data (§3.10.1)
- Lab component — Kambaz Navigation renders Dashboard, Courses, Calendar, Inbox, and Labs by mapping a LINKS array (Account stays a special case), and only the item for the current screen is highlighted.
- On your own — No sidebar item is hardcoded outside LINKS: on /dashboard only Dashboard is highlighted, on /courses/RS101/home only Courses, and on /labs only Labs.
- With AI — The sidebar also shows a sixth item, History, rendered from LINKS.
- JSON database (§3.10.2)
- Lab component — app/(kambaz)/database/ holds the reference JSON files (download them from §3.10.2) and index.ts re-exports each one as its section needs it. Keep at least 3 courses, and at least 2 courses that each have modules, assignments, and enrolled users.
- On your own — courses.json has at least 3 courses, each with a unique _id that works in a URL such as /courses/RS101/home.
- With AI — Every course in courses.json also has a term field; no _id changed.
- Dashboard from JSON (§3.10.3)
- Lab component — The Dashboard shows one card per course in courses.json (at least 3), the published count matches, and each card links to /courses/<course _id>/home.
- On your own — A course you renamed or added in courses.json shows on its card without changes to CourseCard.tsx.
- With AI — The Dashboard also shows the RS104 Organic Chemistry card.
- Courses from the URL (§3.10.4)
- Lab component — Clicking a Dashboard card opens /courses/<_id>/home, and the course heading shows that card's course name. A different card shows a different name.
- On your own — /courses/RS101/home shows Rocket Propulsion and /courses/RS102/home shows Aerodynamics (or your renamed courses).
- With AI — The course heading also shows the course _id in parentheses, for example (RS101).
- Course Navigation from data (§3.10.5)
- Lab component — Course Navigation maps a LINKS array, and its links (Home, Modules, Assignments, People, …) keep the current course's _id in the URL.
- On your own — On /courses/RS102/modules every course link starts with /courses/RS102/ and only Modules is highlighted; the same holds on Home, Assignments, and People.
- With AI — Course Navigation also shows Announcements, rendered from LINKS.
- Breadcrumb (§3.10.6)
- Lab component — The course heading shows the course name and the current section, and the section changes when you switch between Home, Modules, and Assignments.
- On your own — The heading reads <course name> > Home, > Modules, and > Assignments on those three screens.
- With AI — On /courses/<_id>/people/table the heading ends in > People instead of > Table.
- Modules from JSON (§3.10.7)
- Lab component — /courses/<_id>/modules lists only that course's modules from modules.json, each with its lessons. Two courses show different module lists.
- On your own — A lesson you added to module M101 shows on /courses/RS101/modules and not on /courses/RS102/modules.
- With AI — Nozzle Design also shows under Fuel and Combustion on /courses/RS101/modules only.
- Assignments from JSON (§3.10.8)
- Lab component — /courses/<_id>/assignments lists only that course's assignments from assignments.json, each linking to /courses/<_id>/assignments/<assignment _id>. Two courses show different lists (On your own).
- On your own — /courses/RS101/assignments lists A101–A103 and /courses/RS102/assignments lists A201–A203, each row linking to its editor URL.
- With AI — /courses/RS102/assignments also lists A4 (A204), which opens /courses/RS102/assignments/A204.
- Assignment Editor from JSON (§3.10.8.1)
- Lab component — The Assignment Editor's name field shows the title of the assignment you clicked, and its description, points, due, and available fields come from the same row (On your own).
- On your own — Opening A1 and then A2 from /courses/RS101/assignments changes the fields, and Cancel and Save both return to /courses/RS101/assignments.
- With AI — The editor also shows Assignment id: <aid>, for example Assignment id: A101.
- People from enrollments (§3.10.9)
- Lab component — /courses/<_id>/people/table lists only the users enrolled in that course (from users.json and enrollments.json). Two courses show different rosters.
- On your own — A user you enrolled in a second course (new unique enrollment _id) shows in the People table of both courses.
- With AI — Thor Odinson (user 567) also shows in the RS102 People table.
3.11 Delivery
Submit this chapter's work as a new branch on the same webdev-client repository and deployment from earlier chapters, so graders can compare Chapter 2's styled prototype against this chapter's JavaScript and data-driven screens side by side.
- Finish every exercise described in this chapter inside the same
webdev-clientproject used in Chapter 1 and Chapter 2. - Create a branch named
a3, then add, commit, and push it to the same GitHub repository from §1.5:
git checkout -b a3
git add .
git commit -am "a3 JavaScript"
git push -u origin a3- In Vercel, configure the project to deploy every branch to its own URL: open the project's Settings → Git and enable deployments for all branches (some Vercel plans expose this under Build & Deployment → Branches). From then on, each push to
a3gets its own preview URL that contains the branch name, separate from your Chapter 2a2deployment. - Confirm
app/labs/TOC.tsxandapp/labs/page.tsxstill link Lab 1, Lab 2, Lab 3, and Kambaz, plus a link to your GitHub repository (https://github.com/<you>/<repo>; keep the idwd-github, which helps us test your work) and your full name (first name first, last name second, matching Canvas) on the Labs page — the same requirements from §1.8, now revisited for this chapter. Runnpm run buildbefore you push: a page that works innpm run devcan still fail the build, and then the Vercel deployment fails too. - Push any remaining changes to the
a3branch and confirm the branch deployment on Vercel reflects them. - On kambaz.dev/assignments/a3 (not in Canvas), submit both the GitHub repository URL (pointed at the
a3branch) and the Vercel deployment URL for that branch. Disable Vercel's Deployment Protection on that deployment, as in §1.6, so graders can open it without signing in.
Continue practicing in Labs, browse Lab 3 intermediate steps, or open the live Kambaz prototype to see this chapter's data-driven screens.
3.11 References
This chapter turned hardcoded markup into data-driven screens. The linked terms are the languages and libraries you wrote in; the topics are the JavaScript and React techniques the labs walked through.
These ideas also matter in this chapter even though they do not have their own term pages yet:
- Variables, constants, types, and booleans
- Conditionals, the ternary operator, and short-circuit output
- Arrow functions, implied return, and template literals
- Arrays: map, find, filter, reduce, includes, some, and every
- Objects, JSON.stringify, spread, and destructuring
- Optional chaining and nullish coalescing
- Dynamic class and style values
- Client Components and Server Components
- Pathname, path parameters, and rendering a data structure
3.12 Tools
Keep these language and library docs nearby while you write Lab 3. The JavaScript and TypeScript handbooks are the best place to confirm what a method returns before you map it into JSX.
- JavaScript (MDN) — MDN's JavaScript reference for the language syntax, arrays, and functions you write in Lab 3.
- TypeScript — The typed JavaScript language this course writes in; the handbook is the official syntax reference.
- React — The UI library that turns components and JSX into the screens you build in the labs.
- Next.js — The React framework this course uses for pages, layouts, and later the HTTP server routes.
- Chrome DevTools — Chrome's built-in inspector for HTML, CSS, the console, and the Network panel.
- Node.js — The JavaScript runtime you install so Next.js, npm, and later the Express server can run on your machine.
- GitHub — The host for your remote Git repository and the place Vercel and Render connect when you deploy.
- Vercel — The host for the Next.js client; connect the GitHub repo here to put the UI on the public Web.
3.13 AI Tools
Once the work is arrays, functions, and data-driven components, coding assistants are more useful than mockup tools. Ask them to explain a method or sketch a map — then type the code yourself so the syntax stays yours.
- Cursor — An AI-native editor that reads your project and helps write or refactor TypeScript in place.
- Claude — A conversational assistant for explaining APIs, reviewing code, and drafting implementations.
- GitHub Copilot — An AI pair programmer that suggests code as you type in the editor.
- Google Prompt Gallery — A public collection of Gemini prompt examples you can remix for writing, coding, and multimodal tasks.
- v0 — Generates interface mockups and React starting points from a written prompt.